

Revised and updated 19 Sep 2023 with Recipe for 20cm pan
Remember I was telling you about how I learnt a valuable lesson about persistence from watching my Mom try again and again to perfect her Pandan Chiffon Cake? Well, since I got my new mixer to play with, I decided to re-enact the Pandan Chiffon experience for myself. I thought it should be quite a simple thing to do but little did I know that it would take me quite a number of bakes before I finally felt ready to write this post.
This post is the result of months of research on the internet, reading recipe books, talking to various expert bakers and baking a lot of cakes. My Pandan Chiffon Cake is by no means perfect yet, but I think that I have learnt enough to pen down enough information so that whoever wants to bake a Pandan Chiffon Cake would have all the information they need to make a good cake.
Here’s my YouTube video demonstration on how to make it:
One of the problems when you are trying to find recipes on the net is that different writers have different standards. That is fine I guess. If you are happy with a Pandan Cake that sinks on the top, looks bad but tastes good, then that is the cake that you should bake. My wife loves the Pandan Chiffon Cake from Bengawan Solo, and that is exactly what that cake is like. It is ugly, and lacks structure but it is very fragrant and soft. If you like that style of cake, then you can also achieve it if you read this post. This article will contain all the information you need to tweak your cake any way you like.
My Perfect Pandan Chiffon Cake
So let me start by defining the perfect Pandan Chiffon Cake.
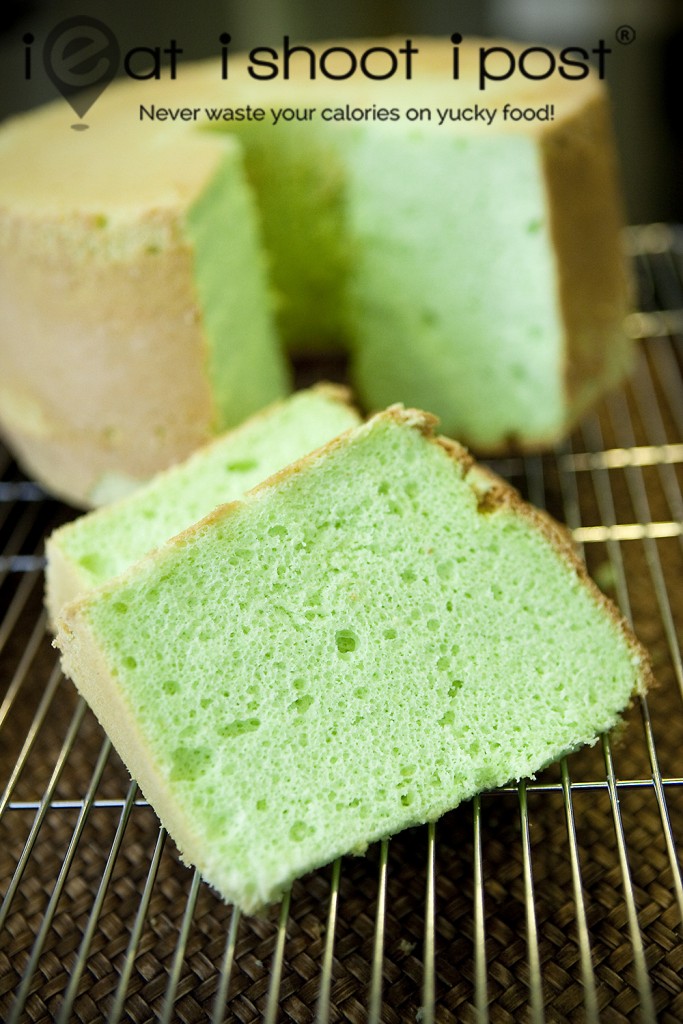
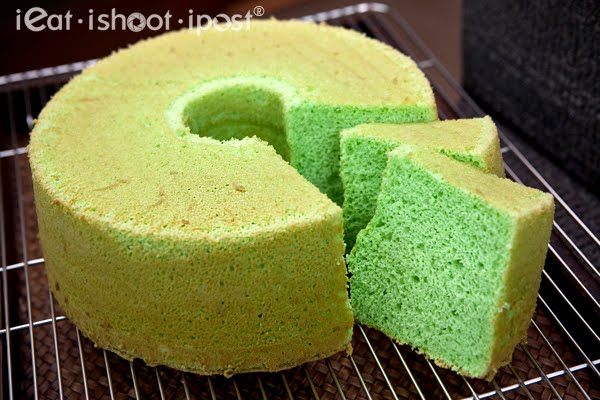
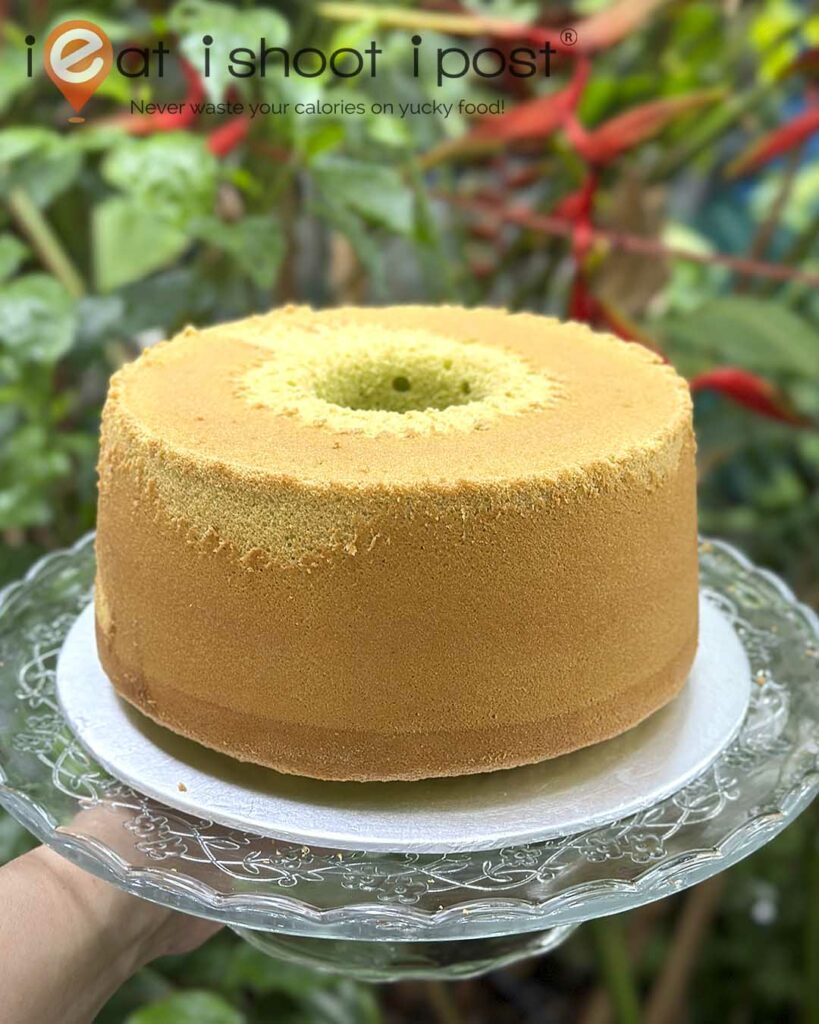
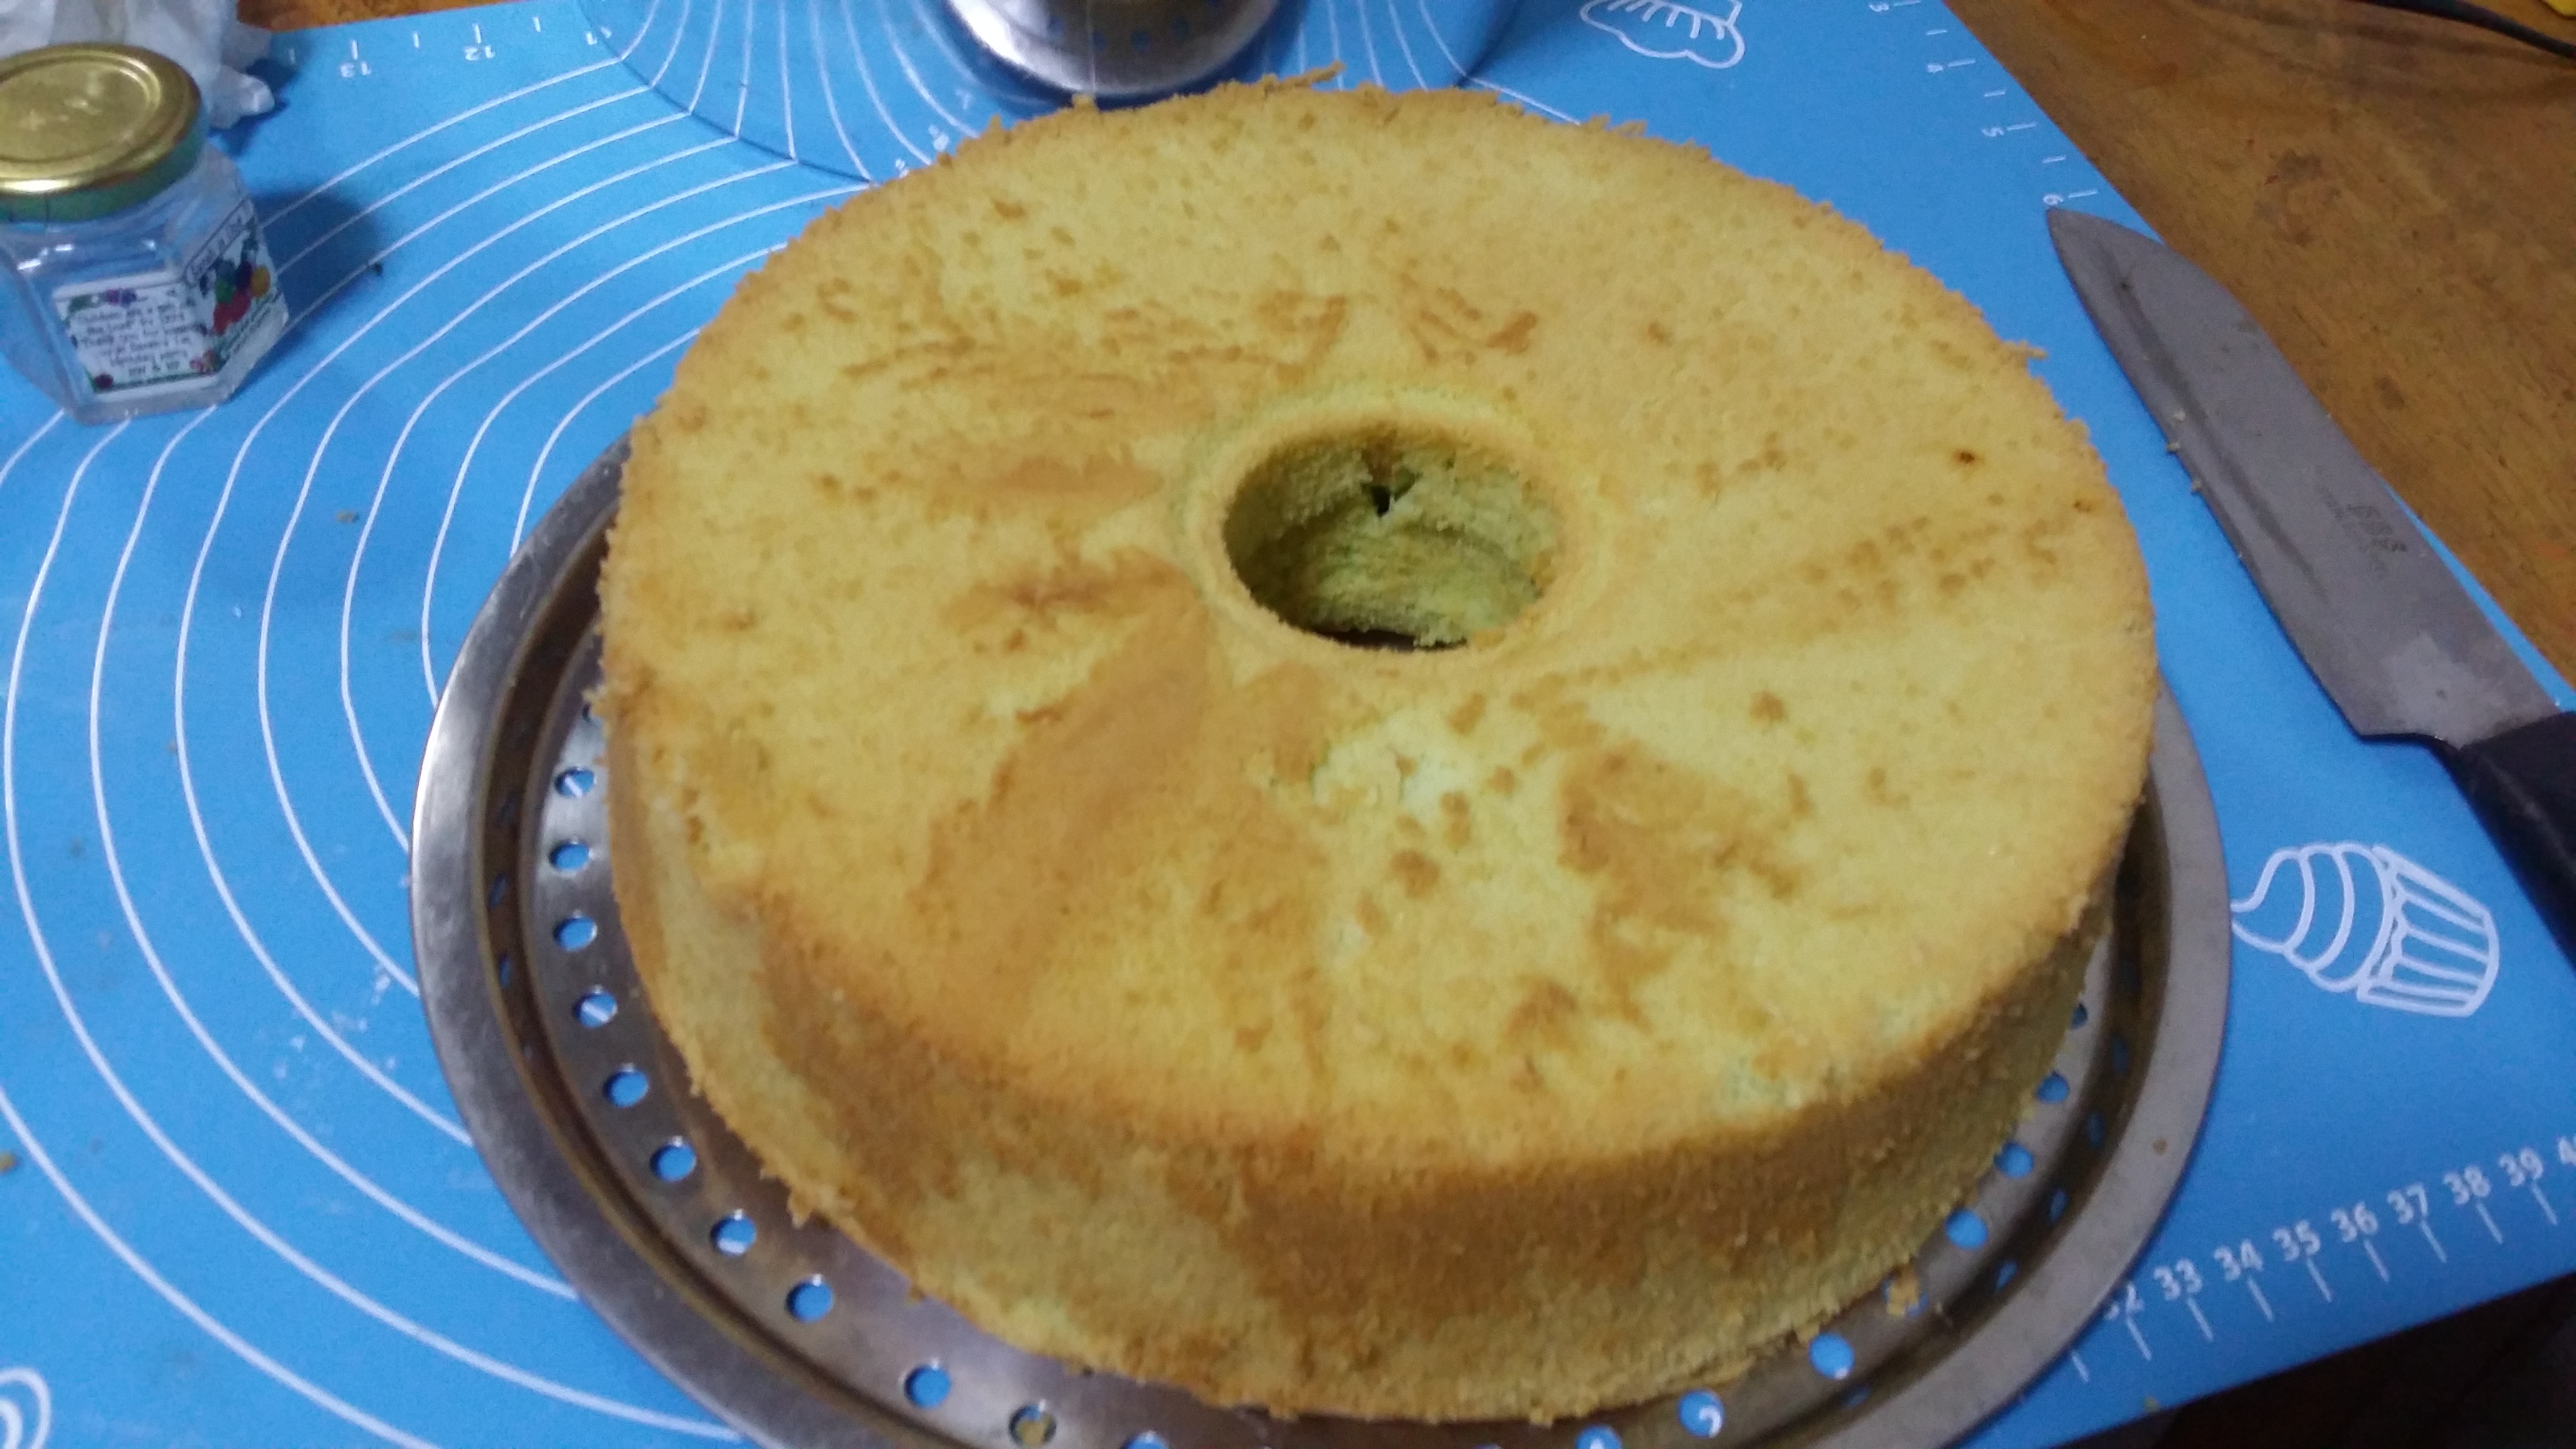
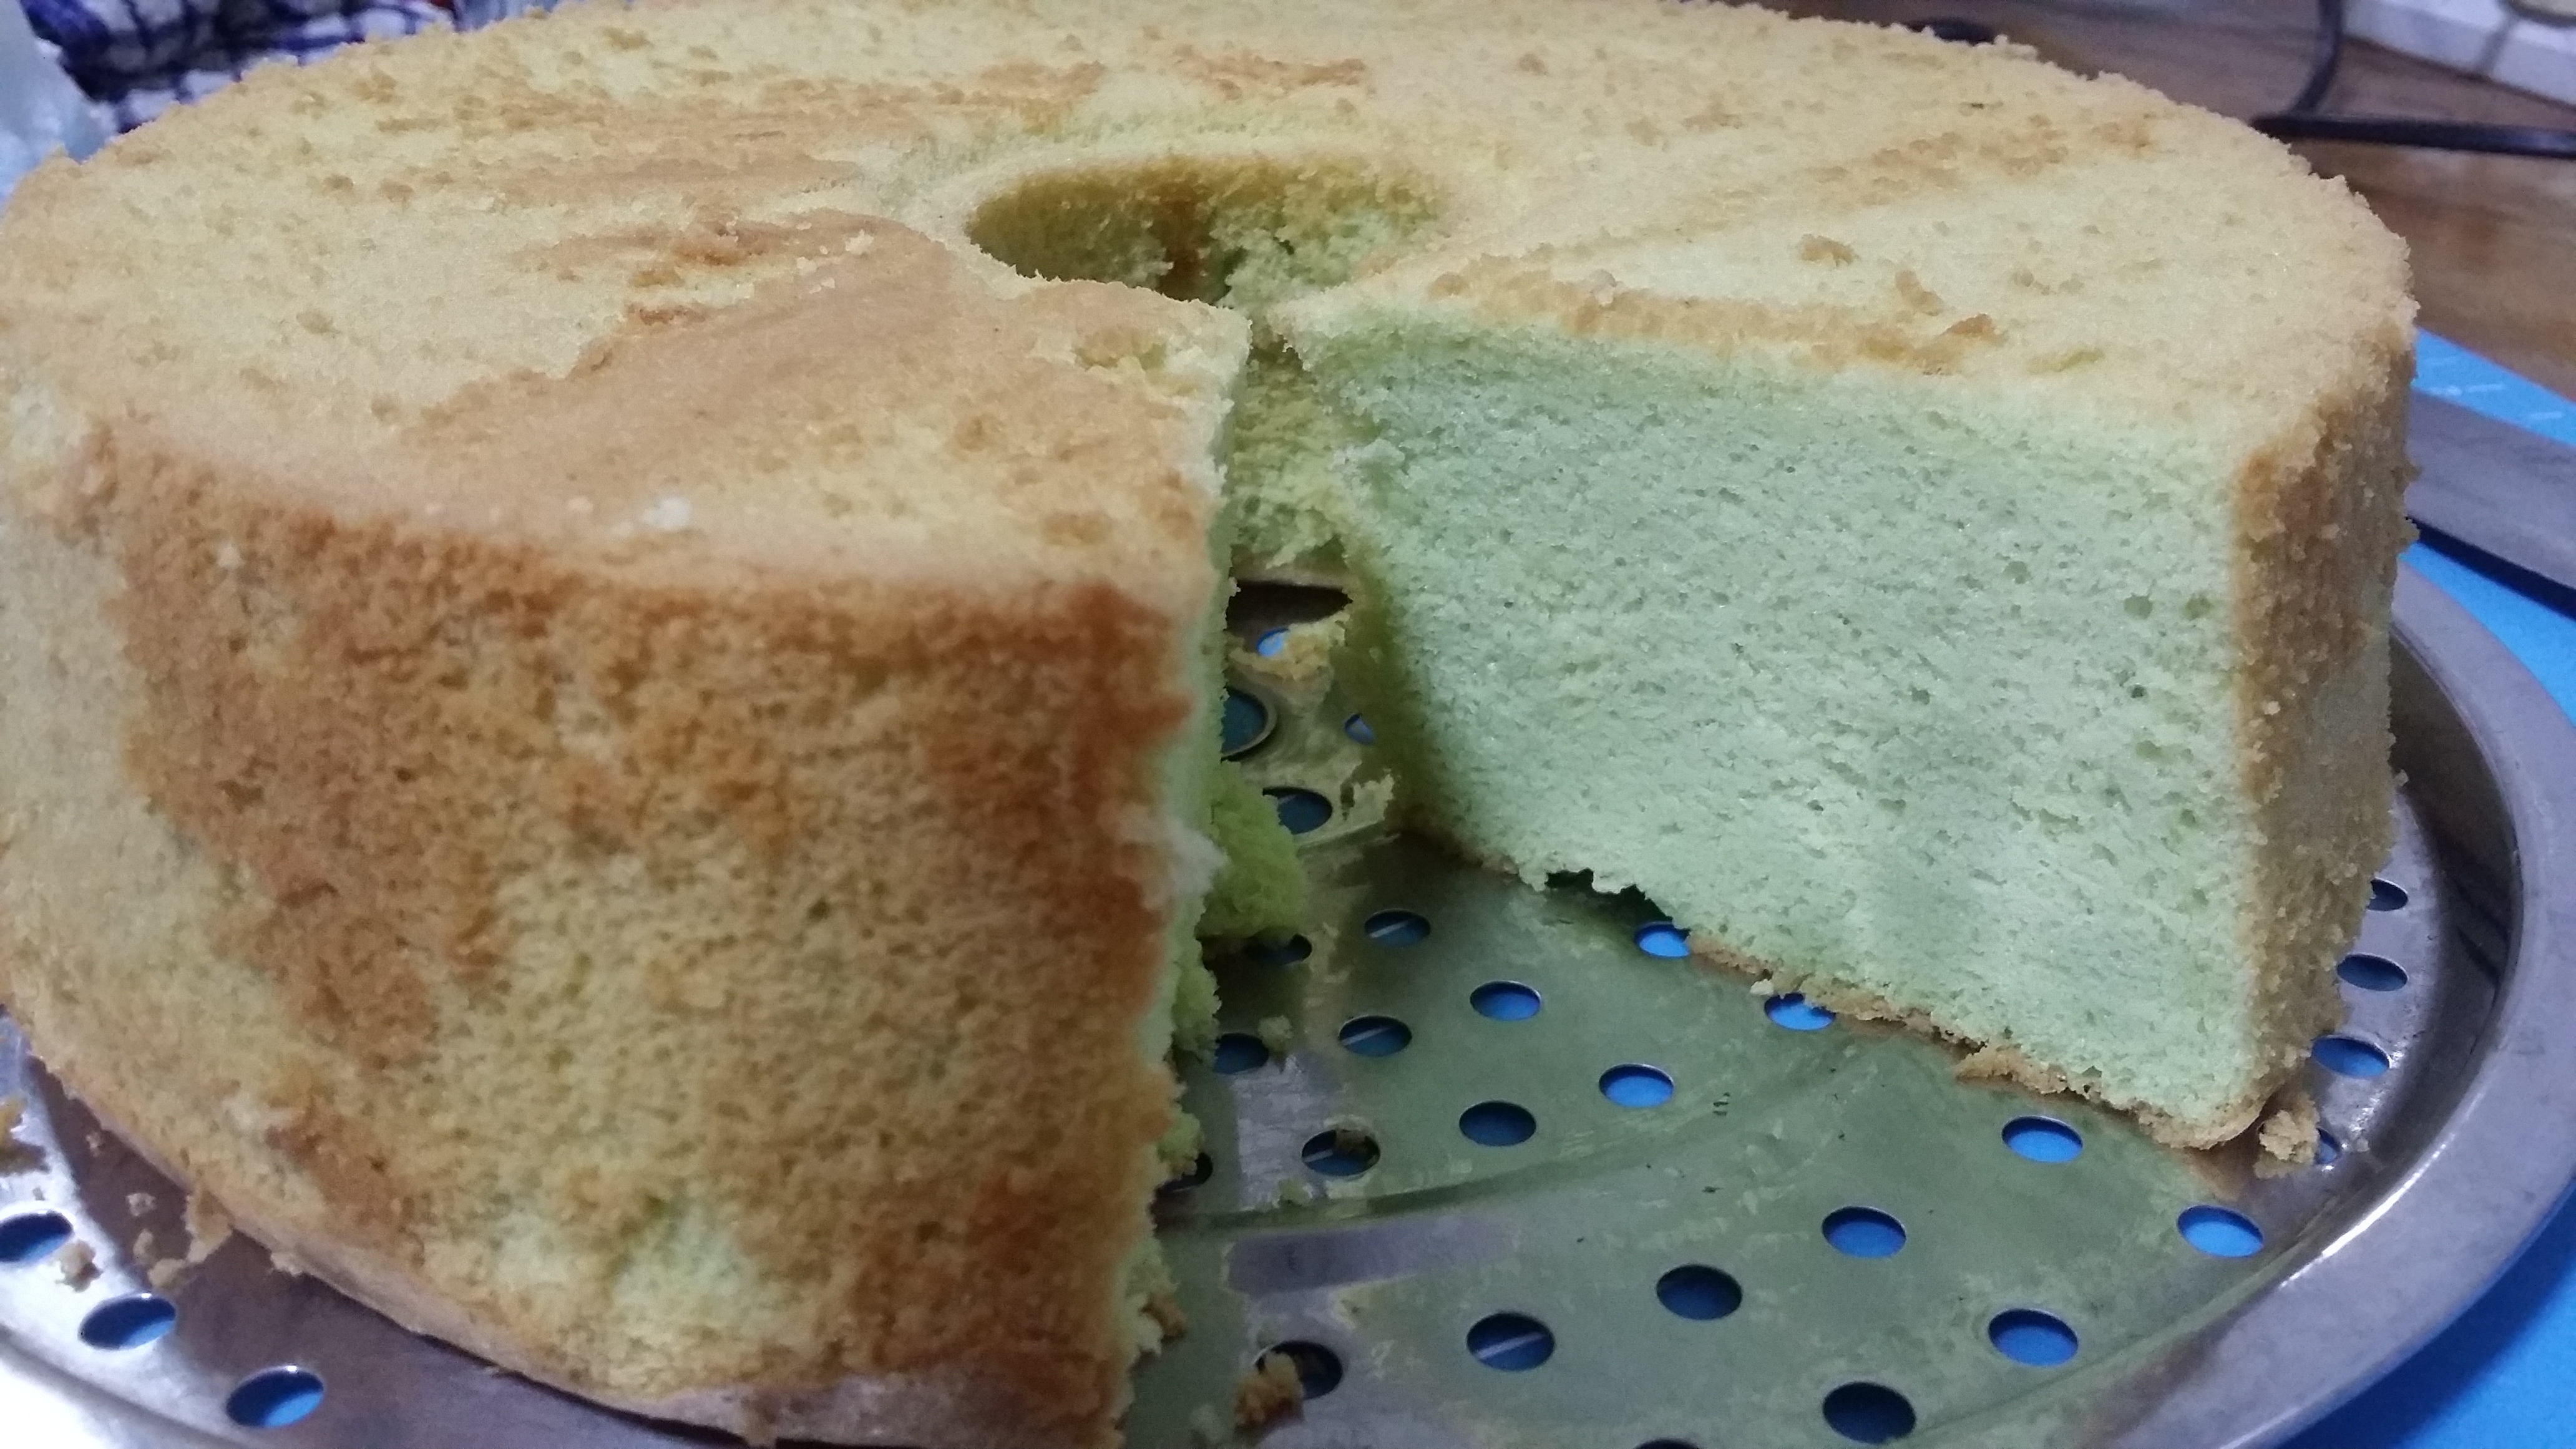
To me, the perfect Pandan Chiffon Cake should taste good, smell good and look good. It is easy to make a cake that tastes good but looks ugly. I made that kind of cake in my second or third attempt. But it was the search for the recipe that gave me a cake that has the right balance of looking and tasting good that took me another 30 attempts.
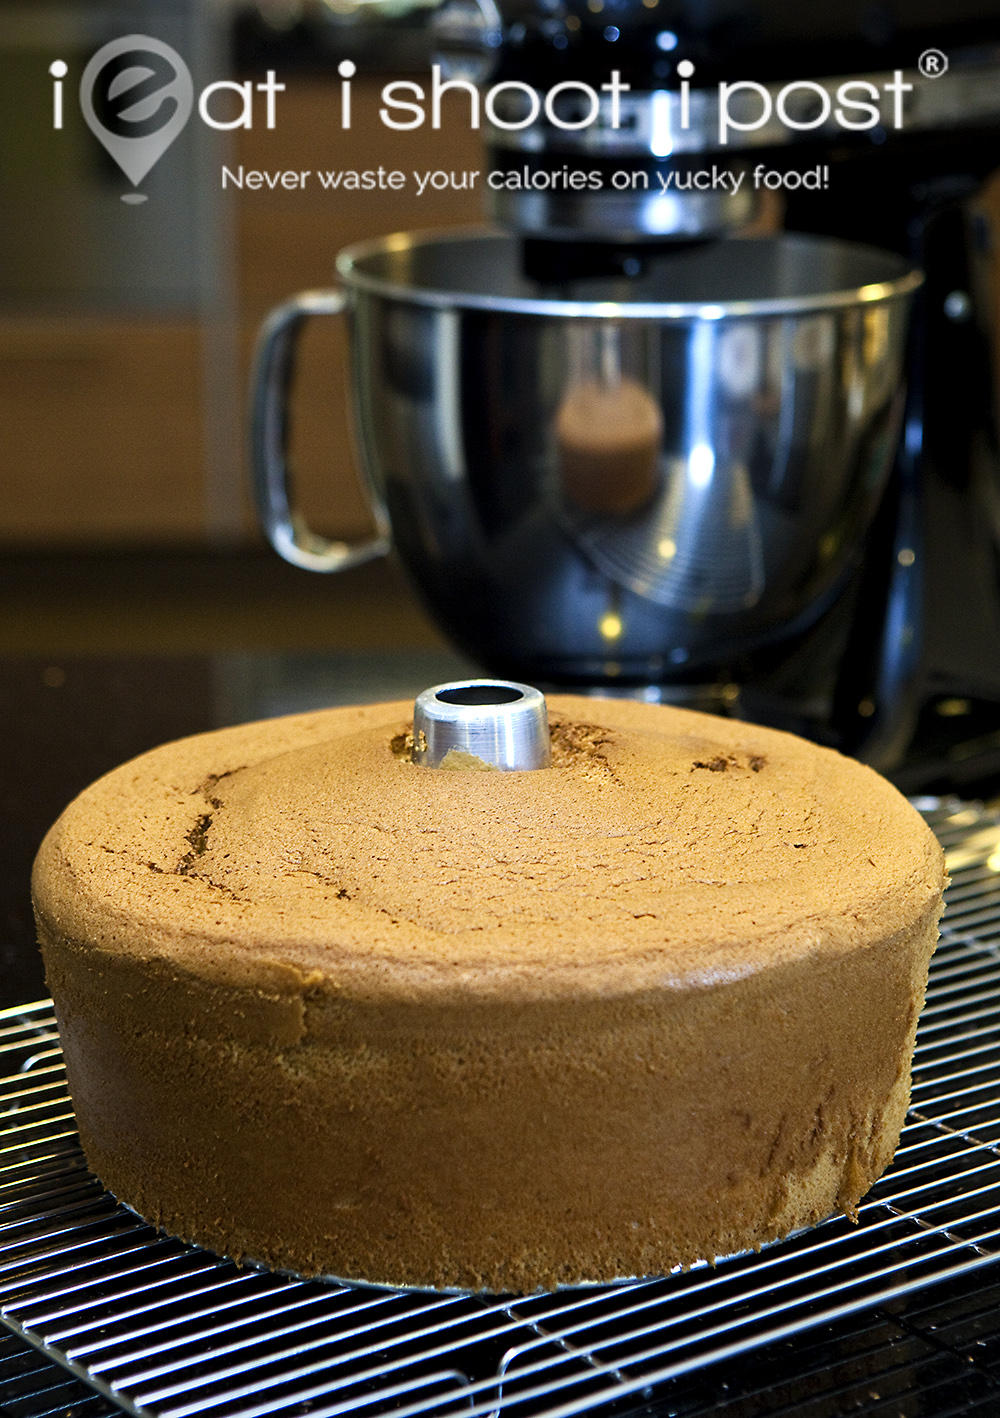
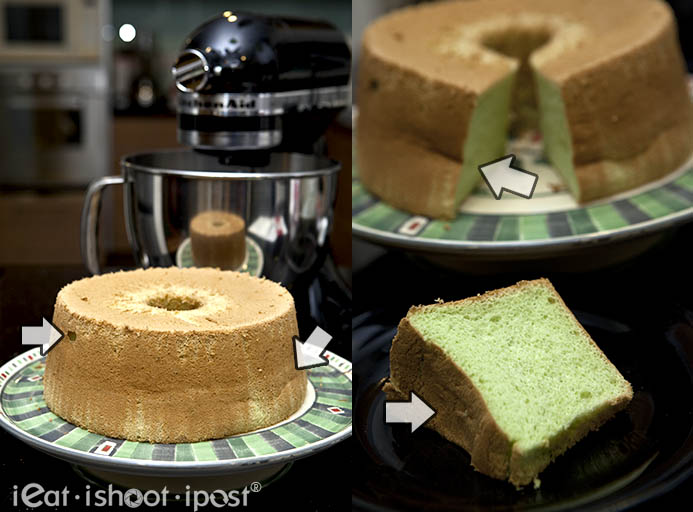
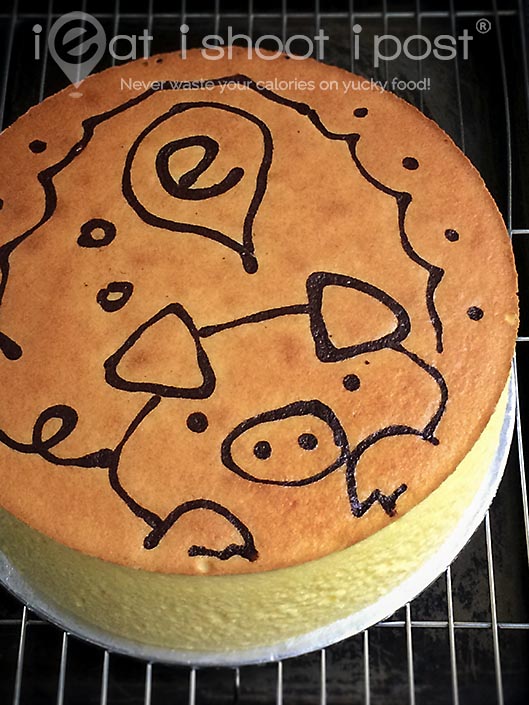
Just take a look at the photo above so that I can explain what I mean. Everyone loved the taste of this particular cake and if I were to give you a slice, you would probably be happy too. But as you can see from the photo, the sides of the cake are kinked because the outer edges are taller than the centre of the cake. This happens a lot because the Chiffon Cake is a cake where you really need to get everything right. In order for it to stand tall and proud, the top of the cake must have a nice dome after baking. Another of the early problems I had was also with large bubbles in the cake which sometimes appear on the sides. It’s like having a cake with a big pimple which I find unacceptable and so I had to find ways to minimize the problem.
My Journey in Finding My Perfect Recipe
The current version of the Chiffon Cake is based on my wife’s Aunt’s 30-year-old recipe. (This was when the Pandan Cake was the rage) With Kiamnianwong’s recipe, I finally managed to get a nice dome-shaped cake which is still soft and velvety on the inside. The top of the cake is not overly cracked and it stands nice and tall. I found that it is important for the cake to have enough of that browning on the outside as it adds a nice caramelized taste to the cake, as well as making it look really nice. While the cake was baking my whole family was really excited because of the sweet pandan and coconut fragrance emanating from the oven. I will share later what I did to get that result.
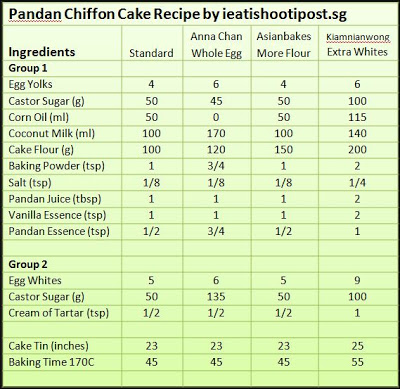
Here are four different recipes. They all work but my preference is for the Kianmianwong Extra Whites recipe.
I have highlighted four different recipes of the many different ones that I have tried. The standard recipe is the one that is found on the Prima website and it is the one that is most commonly found on the internet. I found that this recipe gave me a cake that consistently sunk on the top and kinked at the sides. That started my experimentation on altering the different components of the recipe one at a time. In order to give the cake more structure, the easiest is to add more flour as is the case with the Asianbakes recipe. Adding more flour would give you a lovely-looking cake, but my wife (the person for whom I am trying to please) remarked that it was too dry and not soft enough. Then another baker, Anna Chan shared with me her whole egg recipe which uses equal amounts of egg yolk and egg white. With her recipe, she also replaced the corn oil component with coconut milk. Again, my wife remarked that it was softer but somehow the texture still cannot beat Bengawan Solo. Sigh, back to the drawing board.

All these cakes will rise well if your technique is sound. So you can play around with the ratio of eggs to flour a bit and you would still come up with a nice looking Chiffon cake. What that means is that there is quite a bit of space for error in terms of the proportion of ingredients. What then is the critical factor that determines whether your cake will rise and set properly?
For me, the most critical factor was controlling the oven temperature. Let me save you a lot of heartache by saying this. Go and buy an oven thermometer! I think this is the single most important piece of equipment which is often overlooked. In order to achieve a nice dome-shaped cake, you need to have a nice hot oven to start with and when the cake is risen and about to crack, you need to reduce the top heat to slow the rise and drying out of the top crust. This is what they do with commercial ovens. Your home oven may or may not have this control. Mine doesn’t, so I had to experiment with all sorts of ways to lower the top heat halfway through the baking process. I tried putting a tray of water on top of the oven, thinking that that would somehow lower the top heat — Failed. I put a cover over the baking tin halfway through the baking process — Failed. What worked for a while was using an aluminium pie dish to partially cover the cake once it is starting to crack. That works but it is a real pain because you have to open the oven halfway and you have to be quick so that the temperature doesn’t drop too much.
Finally what I did was to put the oven on fan-forced mode at first and switch to non-fan-forced mode halfway through. That worked. But every oven is different, and if you want to get the results, you need to understand your own oven. I found that with my oven, the temperature inside is not necessarily what I set with the knob. That is where the oven thermometer comes in. Your thermometer is the only way you are going to be sure what temperature your cake is baking at.
The other mistake which I made is taking the cake out of the oven too soon. I did this a few times because I observed that if overbake the cake, it will rise to maximum height and start to sink while still in the oven. So I took it out early to try to prevent that. Bad Move. It sunk like the Titanic. It was so bad, the cake literally fell out of the tin by itself! Lesson learnt: Better to err on over-baking than under-baking.
Notes on Ingredients
1. Eggs
The thing about eggs is that they come in different sizes which range from 55g to 70g in our supermarket shelves. The recipes here use 60g eggs which are considered large eggs. I tried to Kay Kiang (act smart) once and bought the most expensive ones on the shelf. They turn out to be XL eggs which are 70g. My cake overflowed the tin! Fail. The other thing about eggs is that you need to get the freshest ones. Old eggs do not whip up too well. Nowadays I buy eggs based on the expiry dates. I just pick the ones with the longest expiry date.
2. Castor Sugar
Don’t use normal sugar, use fine castor sugar for best results. Sugar has a major role to play both in the stabilization of the meringue (egg whites) as well as to make the surface of the cake more resilient. So if you think you can simply reduce the sugar, think again. If you want a successful Chiffon, more sugar is better than less. At any rate, the average cake uses 100g sugar which is 23 teaspoons of sugar. If you divide the cake into ten slices, you are only taking 2.3 teaspoons per slice which is one-third the amount found in a can of Coke. Just take a smaller slice if you are concerned about your health or take your cake with Chinese Tea rather than Teh Tarik.
3. Baking Powder
You can use self-raising flour instead of cake flour and that will eliminate the need for baking powder. Actually, baking powder is used only as insurance. I have baked Chiffon Cakes that rose successfully without adding Baking Powder. I thought that by eliminating the Baking Powder I could slow the rise of the cake in the oven so that it wouldn’t crack easily. That didn’t work. So I went back to using Baking Powder, just in case. Don’t think that more is good. Put too much baking powder and your cake will rise too fast, crack, and deflate. And so will your ego.
4. Corn Oil
Other oils like Canola and Sunflower oil can be used instead of Corn oil. The main difference between a Chiffon Cake and, say, a butter cake is the fact that a Chiffon Cake uses oil instead of butter which is a liquid at room temperature. This gives it that characteristic light and moist texture which is why we like Chiffon Cakes. It also contains less saturated fats if not for the addition of coconut milk.
NB: Since the publication of this original recipe in 2010, extra virgin coconut oil has become more readily available. This oil has a wonderful coconut aroma and can be used to replace corn oil to give the cake extra oomph!
5. Flour
Cake flour is good I use Softasilk flour but any cake flour will work although they might give you slight differences in texture. Even all-purpose flour is ok. Top flour is now my current choice. It is actually formulated specially for Chiffon Cake and it works very well. Many recipes tell you to sift the flour three times. I think that is required only if you are measuring the flour by volume instead of weight. If you weigh your flour, you can just sift it once.
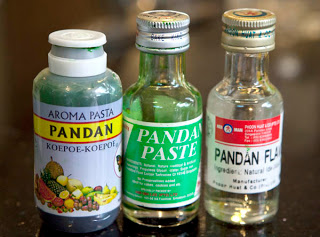
Different Pandan Essences available
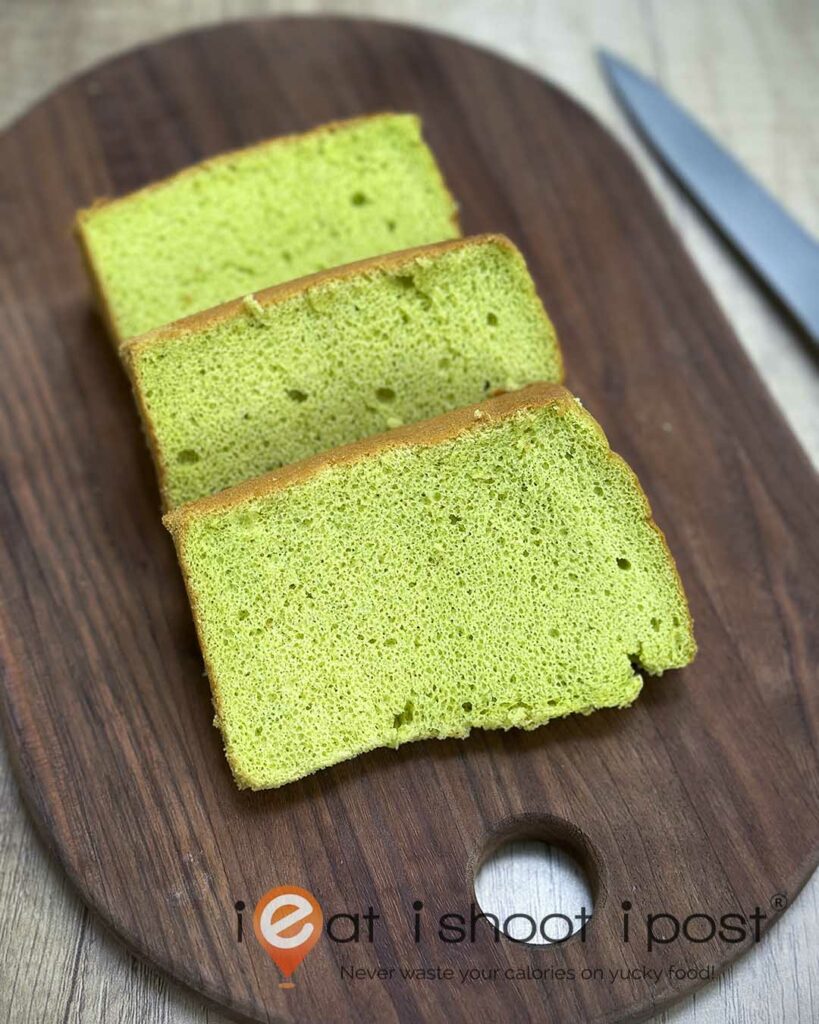
6. Pandan Juice and Pandan Paste
If this is your first time squeezing pandan leaves, you will be in for a shock. You can get a whole bunch of leaves, chop it up in a food processor and squeeze nothing out of it. What you need to do is to chop it up finely put one tablespoonful of water and squeeze it like you are trying to get money out of the tax dept. I tried to be smart by trying different methods of increasing the yield. I used sake instead of water because I thought that the alcohol would be able to extract more flavour, ala Vanilla pods — FAIL! I tried to heat up the leaves after I chopped them up — FAIL! I boil them in the coconut to try to extract the flavour, ala Bubo Cha Cha — FAIL. Once you heat it up, you can’t extract any colour and the smell changes! Just smash them up as best as you can and squeeze! And oh, how many leaves should you use? Any number you like, really. I just take the whole bunch and use that. Some recipes say 5 leaves, some say 9. Not much difference. More is better but still not enough. So you still have to add Vanilla and Pandan essence.
If you have no access to Pandan leaves, you can use Pandan Paste. This is basically an artificial pandan flavour in a thick green paste. This will give you green colouring as well because, without green colouring, your Pandan Chiffon Cake would look like it is jaundiced. To get that fragrance wafting through the house, real pandan leaves are still needed. If you have to get Pandan Paste, get the Koepoe Koepoe brand which is available in Sheng Shiong. That is better than the Bake King one sold in supermarkets. There is also Pandan essence which is available from Poon Huat which does not have colour. So if you like a strong pandan fragrance but don’t want your Chiffon Cake to look like it could glow in the dark, you can use less Pandan paste and use colourless Pandan essence.
Update 19 June 2021
Nowadays I like to chop my pandan leaves in the food processor but instead of using water, I use all the coconut milk I will use in the recipe. Then I squeeze the pandan leaves through a muslin bag and measure out 200ml of the resulting liquid. This eliminates the added water and the resulting pandan coconut milk is as concentrated as you can get!
Update 23 Sep 2023
For the Pandan juice, I now use a slow juicer to obtain pure pandan juice without adding water. The juice is left in the fridge overnight, and the supernatant (the lighter-coloured fluid on top) is discarded, leaving behind concentrated pandan juice. This method results in a pleasant colour and aroma! If you don’t have a slow juicer, prepare your pandan juice in a blender, refrigerate it overnight, and use the concentrated juice settled at the bottom of the container.
Update 10 Oct 2015
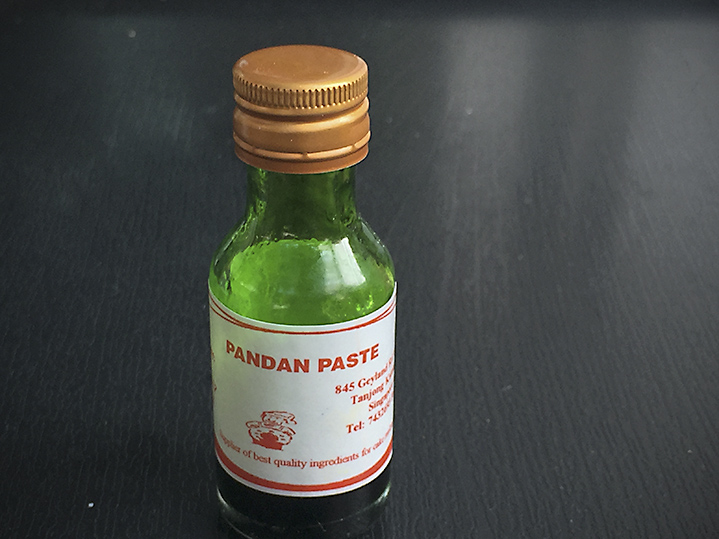
I recently used this pandan paste from Ailin bakery supplies at Tanjong Katong Complex which is excellent! The colour is very natural even if you add 1 Tbsp of it and the fragrance is very good! This has become my gold standard for pandan paste.
Pandan Paste from Ailin Bakery Supplies
7. Coconut Milk
The tetrapak, UHT coconut milk is the most convenient. I would advise you to use this while you are experimenting with the cake. Once you feel more confident, use the fresh ones sold in packets from the refrigeration units. However, once you are ready to show off your cake to your friends, go down to the market and buy a coconut and squeeze out the milk yourself. Leave it in the fridge for a while and skim off the cream on top. That is the way to get everyone excited when the cake is still baking in the oven. The expert baker from Sembawang Confectionary advised me to heat up the coconut milk to get maximum flavour. You are supposed to try to concentrate the milk when you heat it up, so that you get a creamy consistency. I find that if I just leave the milk to separate, I can skim off the cream and that works for me.
Update 23 Sep 2023
For more coconut fragrance, you can substitute Extra Virgin Coconut Oil for corn oil and just use the normal coconut milk!
8. Salt
Salt is important as it gives it flavour. Omit it and your friends will complain that Bengawan Solo tastes much better!
9. Cream of Tartar
So what the heck is this? I remember hearing of this Cream of Tartar as a kid and never knew that it was connected to the Chiffon Cake. Cream of Tartar is used to stabilize the egg whites. If you remember from my egg poaching video, I explained that we add vinegar to the water when poaching eggs because the acid in the vinegar helps to coagulate the egg white. Well, Cream of Tartar is basically Tartaric Acid and it is used to stabilize your meringue (beaten-up whites). You can certainly beat up egg whites quite well without it if you have an excellent egg beater like the KitchenAid, but if you are hand whisking it, the Cream of Tartar helps. It also prevents the egg whites from breaking down if you overbeat the eggs. The proportion of Cream of Tartar to egg white is 1/8 teaspoon for each white.
Recipe Card: Step by Step 9 Egg White Recipe (25 cm Chiffon Tin)
Ingredients:
Yellow Team
Egg yolks 6 (use 60g eggs)
Castor sugar 100g
Corn Oil 115ml
Coconut milk 140ml
Cake flour 200g
Baking Powder 2 tsp
Salt 1/4 tsp
Pandan juice 2 Tbsp
Vanilla essence 2 tsp
Pandan essence (optional) 1 tsp
White Team
Egg whites 9 (use 60g eggs)
Castor sugar 100g
Cream of tartar 1 tsp
Bake at 170°C for 55 mins
Method
1. Before you do anything, turn on your oven and preheat it to 170°C! Last thing you want is when you cake is ready to bake and the oven is cold!
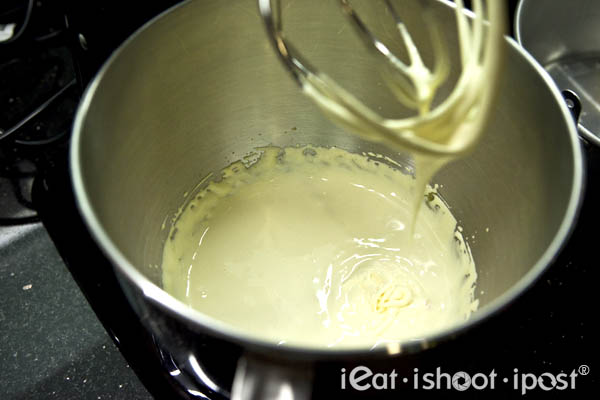
2. If you look at many of the videos available on the internet, they don’t seem to care how you mix the egg yolk batter. In fact, many recipes simply say mix everything together. I did this and somehow I always get a batter which is not so smooth. So I borrowed a technique from making sponge cake and creamed the egg yolk with sugar first for 5 minutes on level 6 on the mixer, using the wire whisk. The volume of the batter will triple you have a nice and light batter.
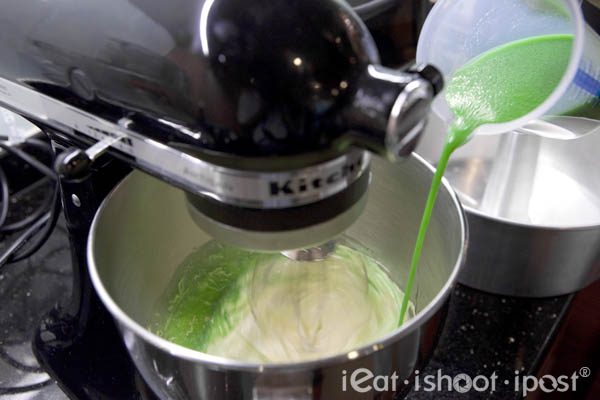
3. Mix the corn oil, coconut milk, pandan paste, vanilla together and add it slowly to the mixture while whisking .
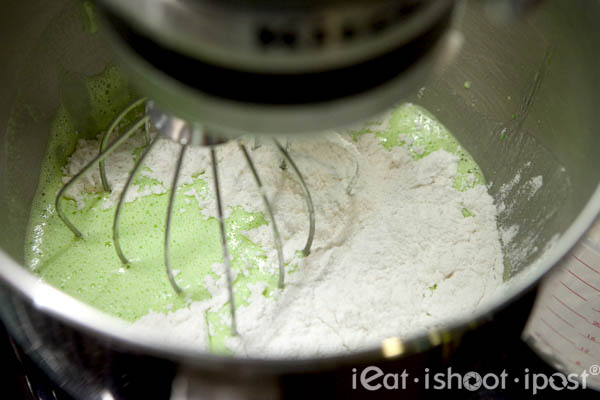
4. After that sift the flour into the batter and use the same wire whisk at speed 4 to combine the flour into the batter. I find that mixing flour into a thickened batter is much easier than trying to mix flour into a watery liquid. Doing it this way produces a nice and light batter with 2 to 3 times the volume compared to if you simply mix everything together. The main advantage of this is that it makes the subsequent folding of the batter to the egg white meringue so much easier as this batter is much lighter and easier to fold.
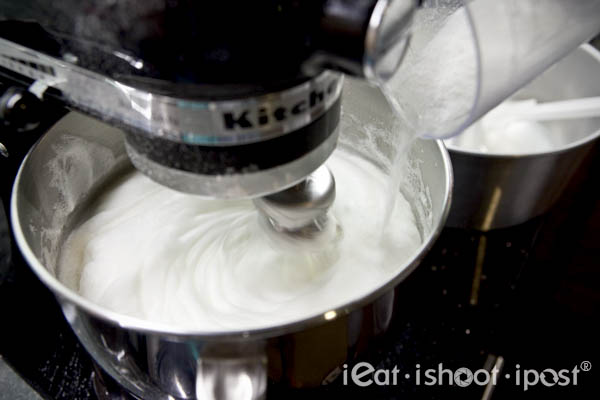
5. Now it is time to whisk the whites. Although this is often touted as the most critical part of the Chiffon Cake, I think that ironically, it is the easiest to master. Make sure you clean the mixing bowl properly. If there is any oil or yolk in it, you will have difficulty whisking your whites. One good way to ensure this is to clean the bowl using a bit of kitchen paper dampened with vinegar. Make sure your egg whites are at room temperature. Make sure they are fresh. For 5 egg whites, whisk at speed 4 for one minute. The resulting mixture should be foamy. Then add Cream of Tartar and whisk for 45 seconds, then add the sugar gradually over the next 45 seconds. Done. Works 100% of the time and takes the guess work out of when the whites are ready. If you are whisking 9 egg whites, its 1 minute at Speed 4, add Cream of Tartar, 1 minute at Speed 8 and gradually add the sugar while whisking at speed 8 for another minute.
Addendum 19 June 2021
You want to add the sugar in just before it reaches the soft peak stage i.e., when the whites have already tripled in volume, but there are still some visible bubbles. Once you add the sugar, it should only take 1 minute or so before the meringue reaches soft peaks.
Also, I have found that you get a more stable and velvety foam if you slow down your speed while whisking. It will take a longer time to whip but you will be rewarded with a more silky smooth meringue.
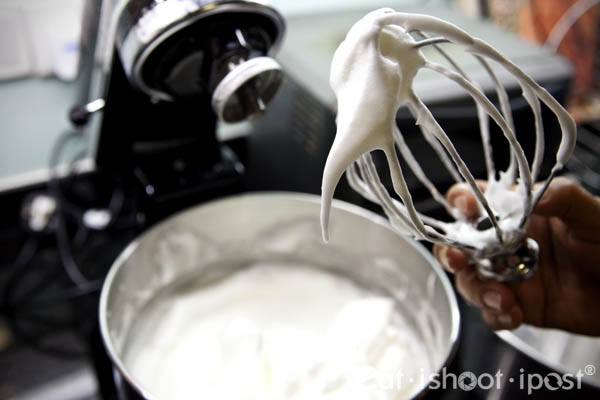
6. Contrary to some websites that say that it is better to overbeat the whites, in my experience it is better not to overbeat it. What you need to achieve is the stage just before it reaches stiff peaks. If you overbeat it, it will become dry and lumpy and you are going to have a difficult time folding in the batter. There are some recipes that state that you need to beat it for 15 minutes! Maybe that is if you are using a hand whisk. With the KitchenAid, it only takes 2.5 minutes for 5 whites and 3 minutes for 9 whites.
There are many ways to tell if you got the whites stiff enough. You can flip the mixing bowl over your own head and the white should not fall. This is the most gratifying if you are trying to show off to a group of baking newbies but you would only get a cursory smile from experienced bakers since they have seen it all before. Another way is to lift your whisk to see if the peaks droop (soft peaks) or not (stiff peaks). Here’s a trick that is less well-known. You can put an egg on top of the meringue and it should sink by half a cm if it is at the stiff peaks stage. If it doesn’t sink at all, you have gone too far. If the egg sinks too much, it is not ready yet. If your egg sinks right to the bottom, give up and just go and buy a Bengawan Solo cake!
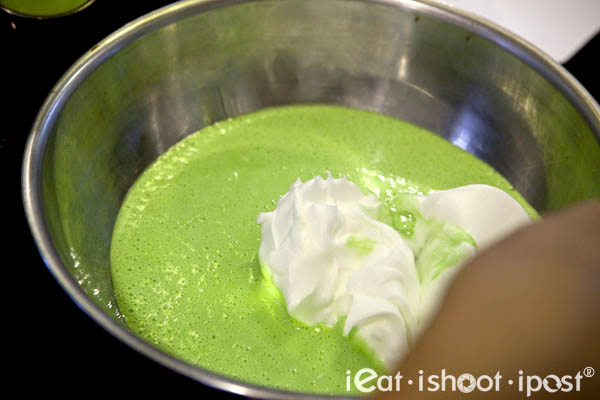
7. Now that the batter and meringue are done, it’s time to mix them together. Add one-third of the meringue to the green mixture and mix it with a spatula so that you get a light green batter which is easy to fold. Then add the rest of the meringue to the batter and GENTLY fold the mixture in. This is where people get superstitious. Some say you must go only in one direction. I don’t think it makes any difference BUT I still go in one direction, just in case. What is important is that you handle the batter gently. If you do it as if you are paddling a dragon boat, then you will deflate the batter and there again goes your ego.

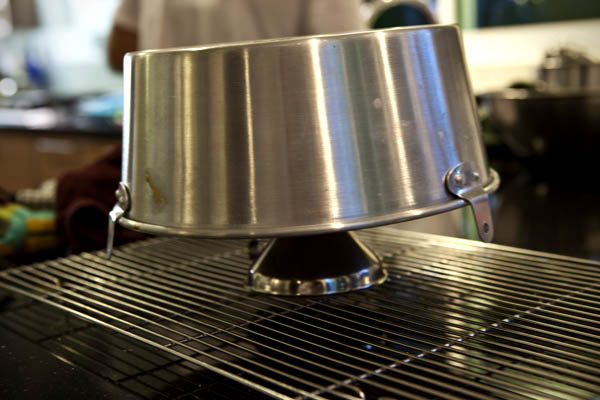
8. Here is something a lot of recipes don’t mention. You need to make sure that you get a tube cake tin which is just nice for your cake! For a 5-white recipe, you need a 23 cm tin. I used a 22 cm tin and my cake overflowed. For a 9-white recipe, use a 25 cm tin. If your tin is too big, the cake will not rise properly. What you want is for the cake to rise till the sides reach the rim and the middle to keep rising so that you achieve a dome shape. When you use a cake tin that is too large, you will find that the sides of the cake sometimes rise more than the centre and that is where you get a cake that kinks at the side.
9. Before you pour the mixture into the tin, give your batter bowl a few sharp blows by banging it on the table. This will get the big bubbles to rise to the top and burst. Don’t do it after you pour it into the cake tin as you will get ugly bubbles on the bottom of the cake because air gets in when you bang it.

10. After you get rid of as many bubbles as you can, pour the mixture into the cake tin slowly making sure that as many of the big bubbles burst while the batter flows over the rim of the cake tin. This is the trick that I finally found to be most useful for getting rid of big bubbles! Don’t turn the cake tin while you are doing this as you will introduce more air into the cake. Just keep pouring the batter into the same portion of the tin and you will see that the batter flows around the tin without trapping more air.
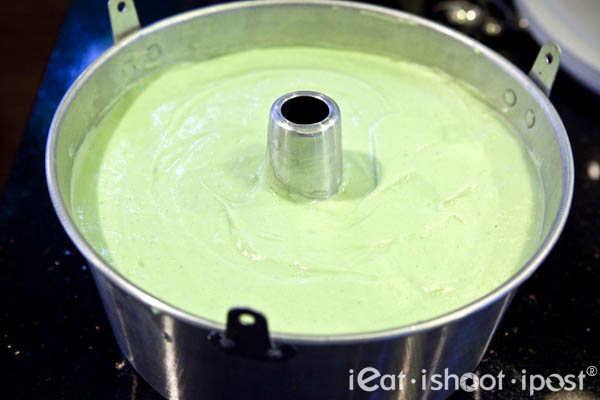
11. After all the batter is transferred into the tin, give it a few sharp blows on the table and use a chopstick to go around the tin a few times to release any bubbles still trapped at the bottom or side of the tin. It is very important to smoothen the surface properly with a spatula after you do this because if you don’t, the cake will crack along the same path of your chopsticks!
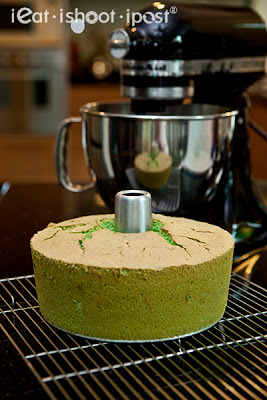
12. Now it is time to put the cake into the oven. Make sure that the oven thermometer shows 170 degrees. and put the cake as low in the oven as you can. Instead of using the rack that comes with the oven, use a low-wire stand. This is to get the cake as close to the bottom heating element as possible. This is one cake where you can’t just set the timer and go and sleep. You have to keep you eye on the cake and temperature at least until you know how your oven behaves. This is what the professional bakers do. Check on your cake every 10 minutes to make sure the oven temperature is constant. At around 20 to 25 minutes, your cake would have risen and start to crack. This is when you lower the temperature by switching to the non-fan forced mode or by putting an aluminum pie dish over it to reduce the heat from the top. Your oven might be different and require different methods to achieve this. The principle here is that you want to have more heat at the bottom than the top or else the top will brown, crack, become dry and start to sink before your baking is done.
Update: 23 Sep 2023
I was obsessed with the cake cracking in the past but nowadays I have come to accept that it is just how the chiffon cake is. Yes, you can try to minimise the cracks but at the end of the day, the cake is displayed upside down, so it really doesn’t matter! I guess as I get older (it was 13 years ago when I first wrote this post) I am trying to be more relaxed about things!
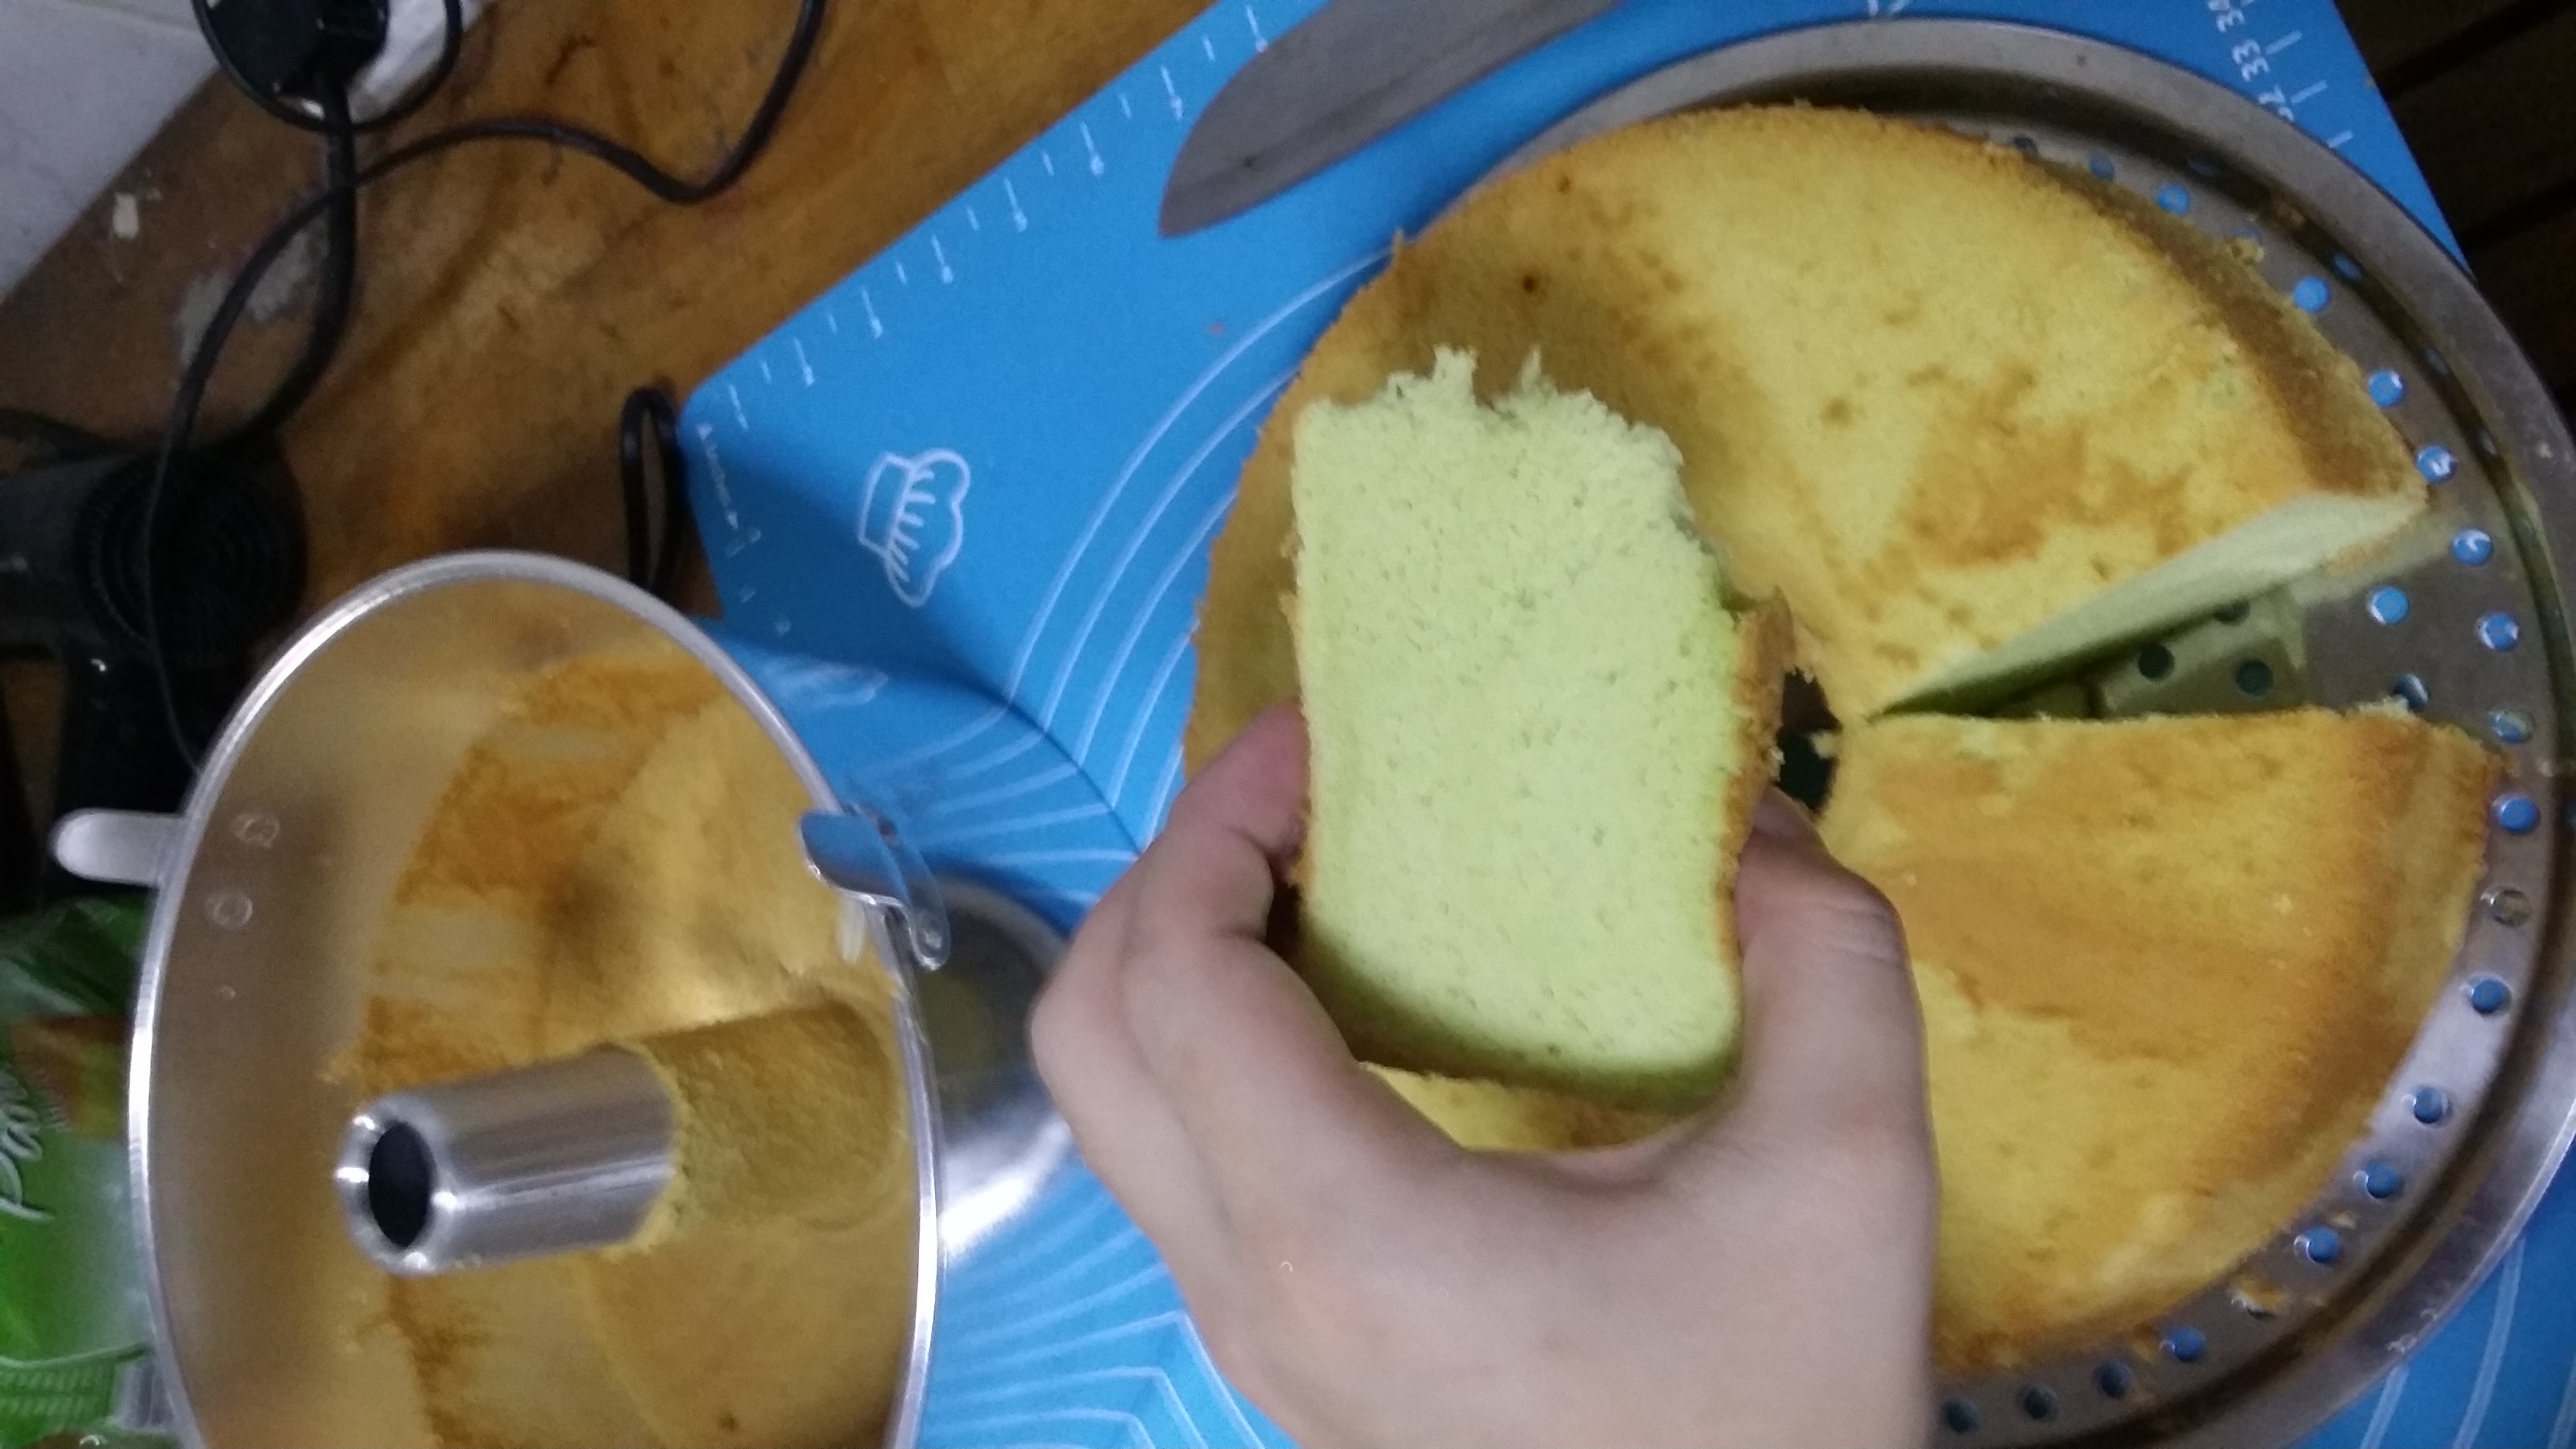
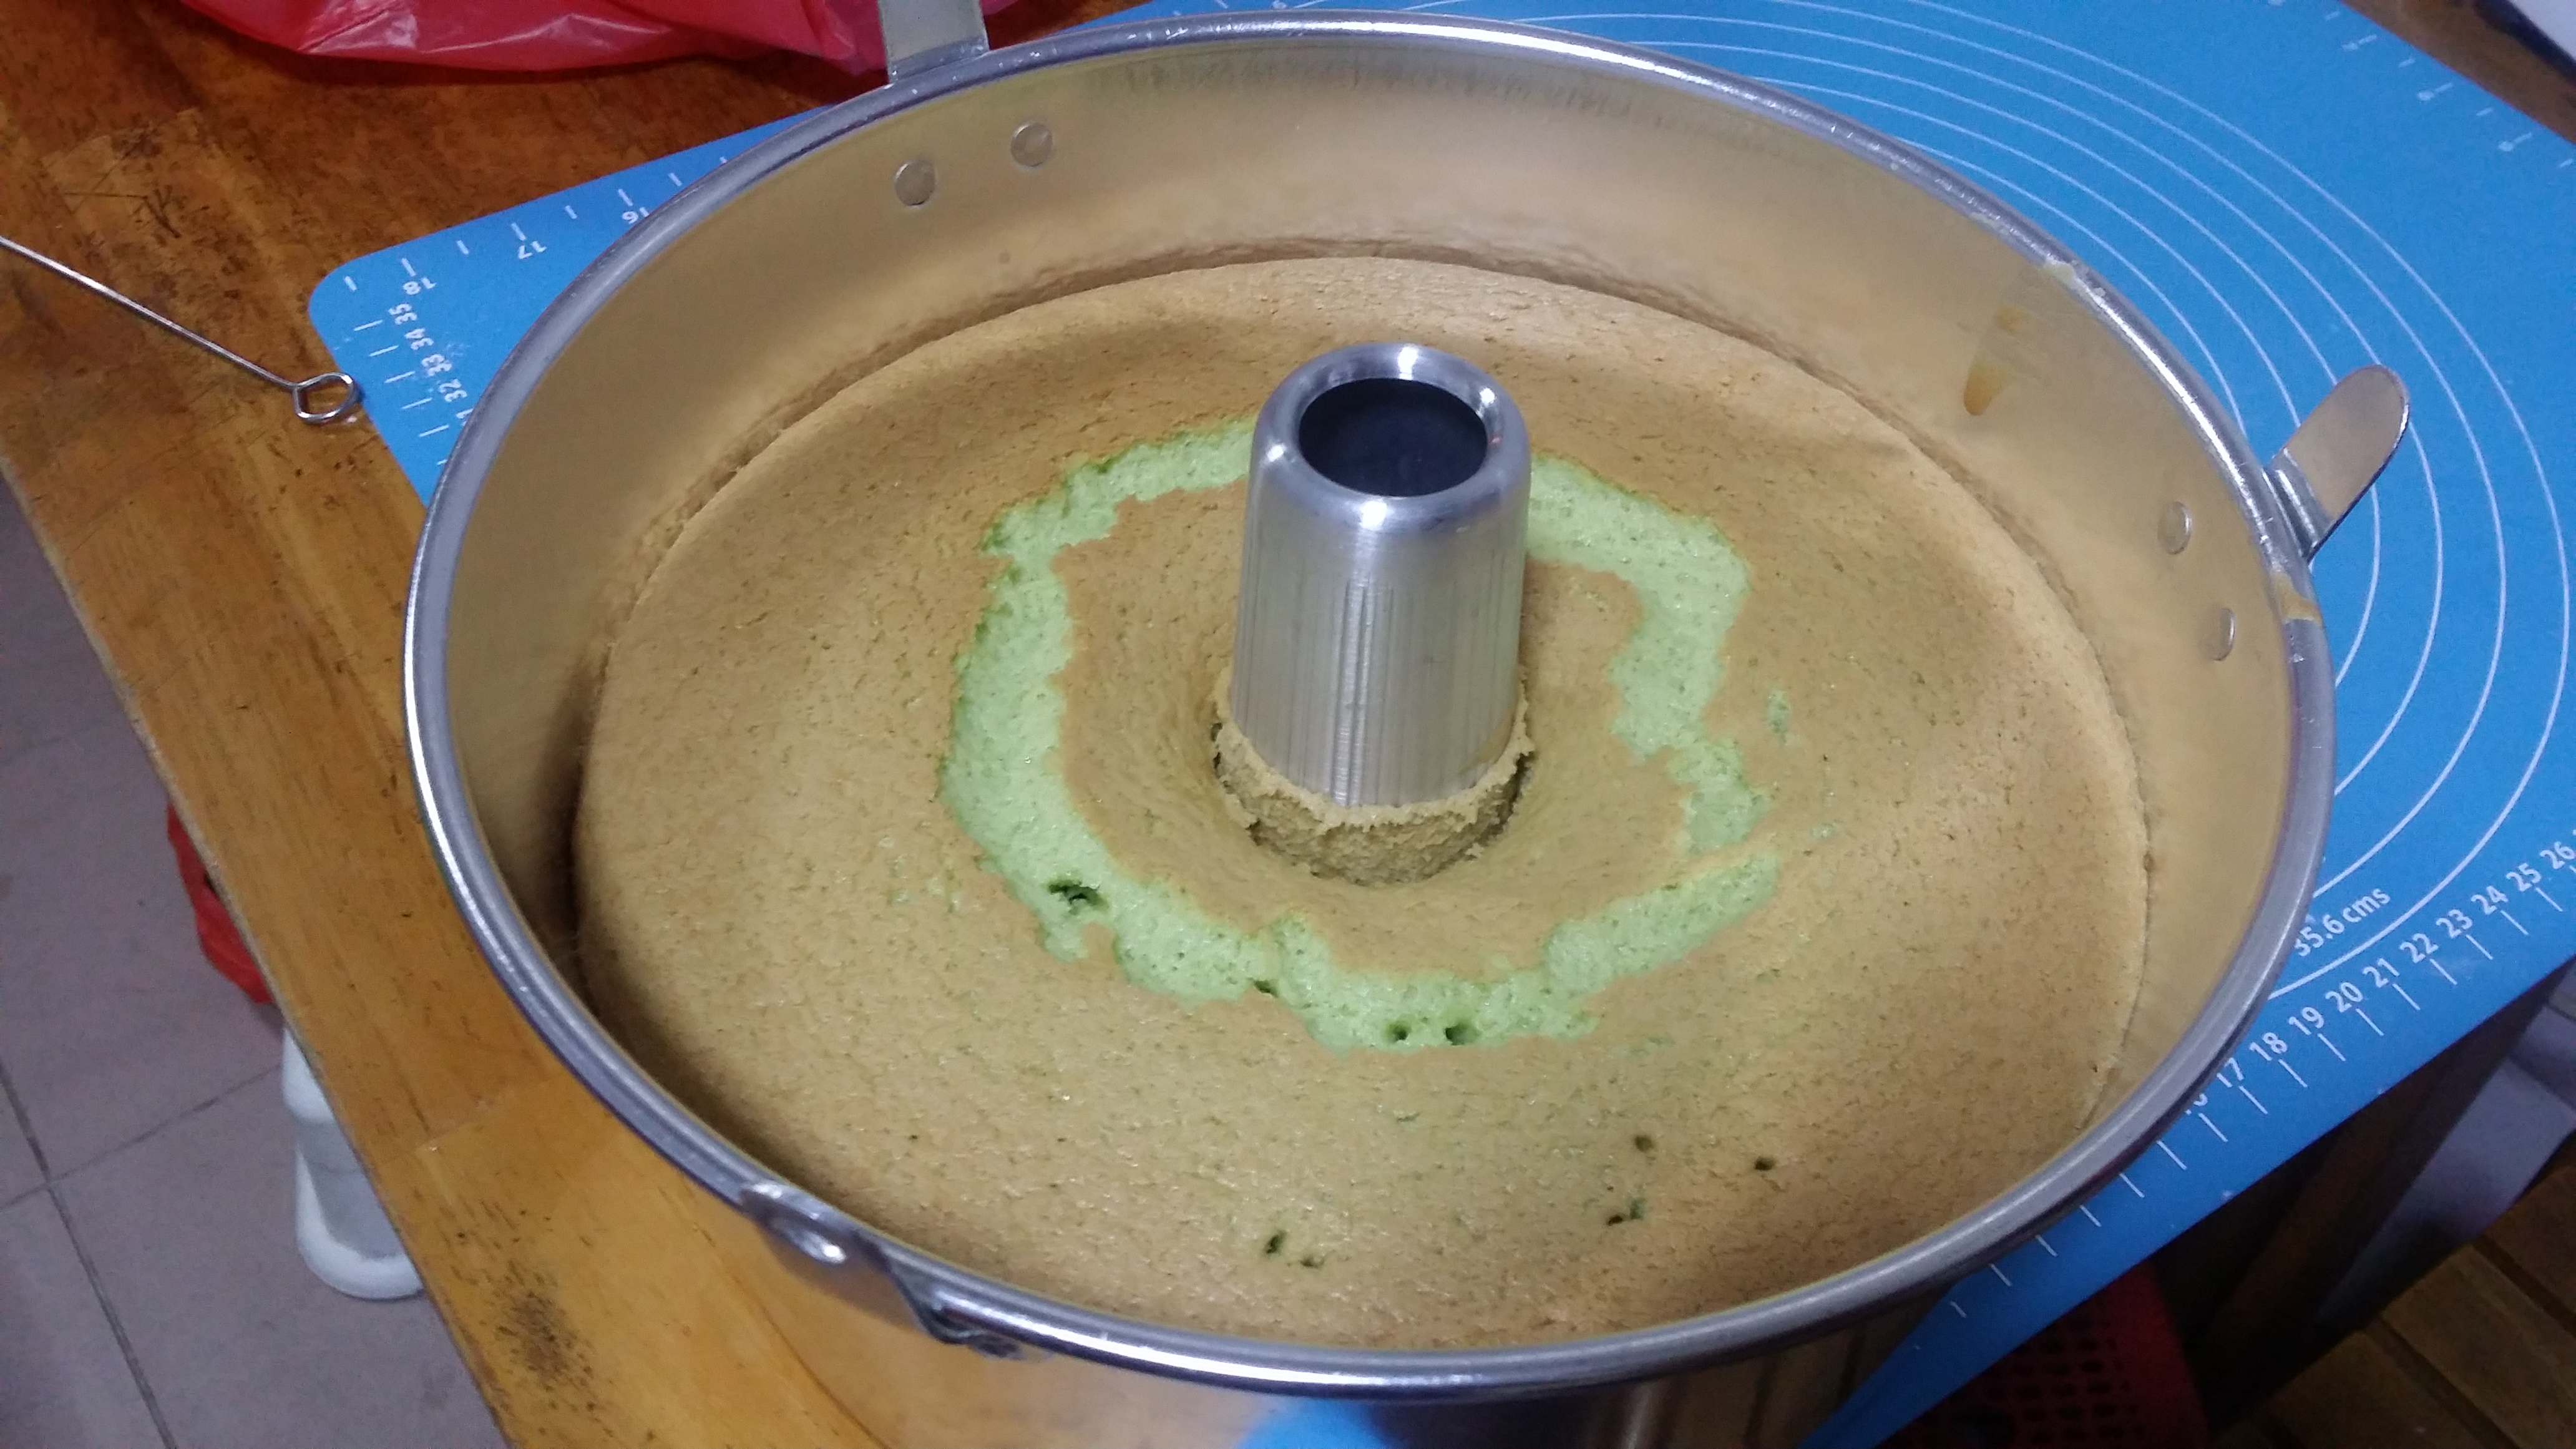
13. Once baking is done, overturn the cake and let it cool. Use either a bottle or a funnel to elevate the cake. This is important because if the cake is too close to your tabletop, condensation takes place and you will spoil the surface of the cake. To speed up the cooling process, my mom taught me to drape a wet towel over the cake tin. This works with no problems. Some websites say that you should cool it for 3 hours. With a wet towel, you can cut your cake within an hour. Once your cake is cooled, it’s time to remove it from the tin.
14. This part is critical if you want your cake to look good. Use a sharp knife and with one movement separate the sides of the cake from the tin, pressing your blade as firmly as possible on the cake tin. If you don’t do this properly, you will have ugly sides and tops.
15. If you like, you can place the cake in the fridge after it cools. This will stabilize the cake so that it will maintain its shape better. I never did this because I would always slice it when it was cooled to take a photo.
Conclusion
Well I think that is about it! I am no professional baker, so whatever is written are just the things I learnt along the way. If you are an expert in this area and you spot some errors or if there are better ways of doing things, please write in to share your tips!
I wish you all the best with your Pandan Chiffon Cake! Do write in and let us know how you went with your cake!
Updated 23 Sep 2023
Completely Revised Recipe for 20cm Cake
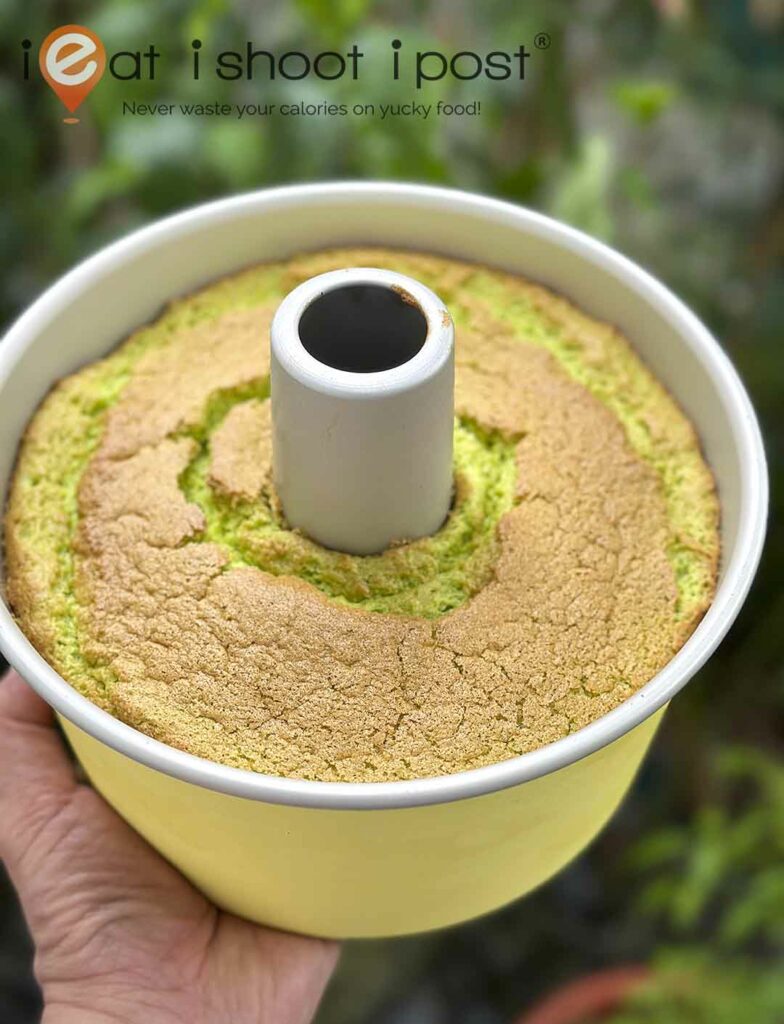
Recipe for 20cm Chiffon Tin
I have received several requests for a scaled-down version of the cake over the years, and I have finally created a recipe for it! The impetus came about because I was sent a very nice Pandan Chiffon cake by Kyra Zen, and she was sharing some tips on how she managed to achieve that super soft texture. She was using a 20cm pan, so I thought it would be a good time for me to revisit my recipe and scale it down for those of you who want to bake a smaller cake. While reworking the recipe, I have changed a few steps to improve on the texture of the cake. The ingredients are essentially the same but scaled down to fit a 20cm tin. I have tried using different proportions of eggs, flour and sugar but in the end, I have still stuck to my original recipe. However, the steps have been altered to make it easier to execute and achieve an even better result! This revision took me several weeks and about 10-15 bakes to complete!
Ingredients (20cm Chiffon Tin)
Yellow Team
Yolks 4 + 1 white (64g eggs)
Corn Oil 50ml (Substitute with Extra Virgin Coconut Oil if you like a stronger coconut aroma)
Coconut Cream 100ml
Pandan extract 30ml (2 Tbsp) (100g of Pandan leaves ie one pack from the supermarket)
Cake Flour (sifted) 135g (Top Flour)
White Team
Whites 5 (64g eggs)
Castor sugar 120g
Cream of Tartare 3/4 tsp
Method
Preheat Oven to 190°C
1. Whisk egg yolks till they are light and pale.
2. Slowly stream in oil and continue whisking at high speed. It should look like mayonnaise.
3. Stream in coconut milk, pandan juice and salt.
4. Manually fold in sifted flour until you cannot see any more white. Set aside
5. Whip eggs till foamy and add cream of tartare.
6. Whisk at high speed till the big bubbles have disappeared and slowly add castor sugar while whisking
7. Whisk till firm peaks
8. Fold whites into yolks 1/3 at a time, each time folding till the white is fully mixed with the green
9. Pour slowly into the cake tin
10. Run a chopstick around the sides and around the base of the tin to dislodge any bubbles
11. Give the tin a few sharp taps to get rid of bubbles
12. Place the cake in the oven and turn the temperature down to 170°C and bake for 23 minutes or until you observe the top of the cake reaching a peak and starting to sink.
13. Remove the cake, turn it upside down and allow to cool completely.
14. De-pan using a knife and serve!
For more details on each step, please read my previous article above. It will really help you achieve the perfect cake if you don’t succeed in your first attempt!
Points to note
1. I have omitted the baking powder in the recipe. It was added as insurance in the old recipe and I have managed to bake the cake perfectly without it.
2. With the smaller pan, the baking temperature has to be adjusted. I am using a hot and quick method to bake the cake by preheating it to 190°C and lowering it to 170°C when the cake enters the oven. The 23-minute baking time is less than half the baking time of the 25cm cake!
3. For the Pandan juice, I now use a slow juicer to obtain pure pandan juice without adding water. Actually, I had to replace my older model as it couldn’t handle the pandan leaves and just gave up and died! So, I had to buy the latest top-of-the-line slow juicer and now I am happily juicing my pandan leaves! The juice is left in the fridge overnight, and the supernatant (the lighter-coloured fluid on top) is discarded, leaving behind concentrated pandan juice. This method results in a pleasant colour and aroma! If you don’t have a slow juicer, your next best bet is to blend your pandan leaves in the blender with coconut milk and squeeze it through a muslin bag. You will then be using 130ml of the pandan-coconut juice. Alternatively, use water to blend the pandan juice and leave it overnight in the fridge and discard the supernatent. This will actually give you a more concentrated pandan juice!
4. In this reworked recipe, I have added one egg white to the yolks and now all the sugar is added to the whites. I find it is easier to create a stable yolk foam this way. Make sure you really whip up the yolks till they are pale and foamy before adding the coconut milk!
5. It is important to fold in the sifted flour manually. Don’t try to take a shortcut and use the machine to whisk in the flour. Do it slowly and gently. This step could make a big difference to the final texture of the chiffon cake!
Thanks again to Kyra Zen IG@aloeswood for sharing her tips!
Looking for your next project?
Success? Now try my tried and tested Japanese Cheesecake Recipe, or take a step further by adding some Gula Melaka! (see how to do it properly by clicking the link!)
Want to just have a quick taste of a Pandan Chiffon Cake without having to go through all the trouble of buying other ingredients? Here are some places to get a good cake to satisfy your cravings!
– Pure Pandan Speciality Chiffon Cake
–Sembawang Confectionary: Taste of the 80s
Other similar dessert recipes to try out:
Leslie’s Kueh Salat Recipe: Silky Restaurant Quality Kueh
Leslie’s Simplest Butter Cake Recipe
Fluffy Buttermilk Pancake Recipe
Japanese Durian Cheesecake
Ieat’s Overnight Yeasted Waffle Recipe
Simplified Croque Monsieur Recipe
Leslie’s Traditional Hainanese kaya recipe
Posted on: November 17, 2017


hi Leslie, thank you for the detailing your pandan cake experiment! its my first attempt at the pandan chiffon, and i used your 9 whites recipe. The pandan cake turned out tasty, but ugly! The cake rose pretty nicely but collapes a little after 20 mins. Basically after a massive eruption on the top of the cake. I finally knew why my american sponge did not work- Because i decided to lower the sugar content, and, used raw granulated sugar instead. So thank you for your tip =)
i used an oven thermometer (i happen to buy but didnt had to chance to use till this bake) and, the set temp and the actual temp reading was way too different. There was almost a 30-40C difference! I wonder which one is more accurate? The top of the cake was almost dark brown at 45 mins, and the top (1cm) did not rise as nicely as the rest of the cake. Was the temperature too high on top, that air bubbles released before the cake’s structure was properly formed? just a thought. unfortunately i do not have a fan option. Hope to hear from you! cheers
Sounds like your oven is a problem. Rely on the thermometer as it is more accurate.
First of, thanks so much for the detailed description of your pandan chiffon experiment. I have recently caught the chiffon cake bug and is obsessed with baking the perfect pandan chiffon. My biggest problem at the moment is the cracks at the top of the cake. Question: if I am using (Bake King’s) double action baking powder, does that mean I should use only half the amount mentioned here? I am wondering whether the cracks are because of using too much baking powder.
For my last attempt, I was baking in a fan-forced oven, using 170C for the first 15 mins, then covering the cake using tin foil and bake the remaining 25 minutes on 150C (fan is still on).
Thanks in advance for your advice.
Hi, try baking at 170C fan force and then turn off fan force. Also, don’t over beat the egg whites. Soft peaks only.
Okay. I think I might have over eaten the egg whites. That may have contributed to the cracks too. Thanks so much for the advice and I look forward to my next attempt! 🙂
Thank you Leslie! I am very fond of Chiffon Cakes, and started baking it after attracted by your awesome receipe. I changed flavor to poppy seeds and orange as requested by my husband , and he liked the softness and moist of the cake. However, it’s not easy to get a perfect cake just like yours. I have tried many times and all end up having the same problems. My cakes didn’t rise to the same height as the cake tin, and they cracked severely on top. The colour was too dark on the rim, and they all had dense layers just beneath the cracks. My oven tends to be very hot so I used 150C, and baked for 60 minutes. I put aluminum foils on top of the cakes at around 25 minutes when they started to crack. I would be very appreciative if you could give some advice on how to solve these problems. Thank you very much!
Try turning down the heat at the 20 min mark to 130.
Thank you. I will try it next time.
Thanks for the tips Leslie! Instead of adjusting the oven, I placed an insulated cookie sheet on a rack above the cake when cake top was starting to brown (bout 15min in) cake din crack too badly. I used virgin coconut oil as well.
Well done!
Can u please tell me which recipe out of the 4 you used to make your pandan chiffon cake. Is it ok to use can coconut milk & how much pandan paste to use
Use the 9 white recipe. It’s the best one.
Did you use a non stick pan? It is supposed to be an aluminium pan.
Hi Leslie, what can I use instead of corn oil? Is rice bran oil or regular sunflower or canola oil ok? thanks
Sure!
Most informative chiffon cake receipe. I had given up on this long ago because it’s so frustrating to get near to perfection. Taste was always right for me but the texture and appearance were a let down. Must re live this cake again. Thanks a zillion Leslie!
Let us know how it goes!
Thanks for your tip!
Wonderful! Thanks for your feedback!
Do just follow the recipe.
It sounds like its something to do with your oven!
Dr Tay, I esp love yr comment “If your egg sinks right to the bottom, give up and just go and buy a Bengawan Solo cake!” Trouble is, no Bengawan Solo how??? I’m in Hamburg, Germany wor! ?
Then, failure is not an option!
Sigh sigh .. guess can only drool and wait till Mar 2016 cos .. 1) cannot find cream of tartar and 2) no KitchenAid ??
You can easily whip up the whites with a whisk and your arm power and you can omit the cream of tartar. Just use very fresh eggs and take them out of the fridge to get to 15 degrees C and whip.
Dr Leslie,
My maiden attempt using your 9 egg white recipe (half all ingredients) with an air fryer.
It looks pretty and super soft…..but kinda sunken in the centre as it cools :(.
What is the recommended cooking time? As stated in the post above, an hour with a wet towel over the tin?
Thanks.
I am not familiar with the airfryer but there is no bottom heat so you will have to experiment with it.
Hi Leslie,
Is the recommended cooling time an hr with a damp cloth over the tin?
Tried your 9 egg white recipe (halved it) on a 18cm tin with an air fryer, it turned out soft but a bit damp on the base. Suspected it could be not cooled enough and moisture seeped in.
Any remedy to avoid this?
Thanks.
Air fryer heat is only from the top, so it doesn’t have enough heat at the bottom. I think that might be the problem.
Thanks…..will continue to improvise and your recipe is superb, well received by my samplers 😀
Mind if I seek your advice in making good begedil?
Do you have a recipe to share?
Thanks again.
Here is my bergedil recipe: http://bit.ly/ieatBergedilRecipe
The cooling time with or without damp cloth is irrelevant. The cake should be completely cooled to room temperature when you remove it. With the air fryer, the cooking is only on the top, so the bottom will be wet. You probably have to do something radical like cooking the cake upside down after 45 mins or something like that.
I am doing your recipe now . I have tried making it before 3 times and failed 🙁 my cake is in oven right now and i had a termometer inside. I found out that my oven is crazy it gose up and down . Maybe it is hunted hahaha. I appreciate your perfect detailed explanation. Thank you so much
How did your cake turn out?
I can find frozen pandan leaves but not the pandan paste/essence. What can I sub for that? Thanks
Just leave it out and rely on the pandan leaves. Add green colouring if the colour is not intense enough.
Hi Leslie,
Can I use the 9 eggs whites recipe in a 22cm pan instead of 25cm pan? Why did my chiffon cake cracked a lot on the top and when I tried to remove from pan the side of the cake was not smooth looking.
Please advise. Thank you.
Yes you can but you will have to waste some of the batter. Fill up to 1 inch from the rim and bake the rest in a small pan.
Hi Leslie, thank you for the recipe. May I know how much pandan paste to use, if I only use pandan paste and not juice or essence? Thank you!
Depending on your pandan paste, 1 Tbsp should be fine. It is not critical. If your pandan paste is very intensely coloured use less. If it is a bit pale, use more.
Hi Leslie,
I used a different recipe to make pandan chiffon cake, thus results in failure.
Are you able to advise me why is that so?
Ingredients:
Ingredients
6 Large Egg Yolks
25 g Sugar
70 g/ml Pandan Juice
1 tsp Pandan Paste, optional
70 g/ml Canola, Vegetable or Corn Oil
100 g Pastry Flour, sifted
Meringue
100 g Sugar
12 g Corn Flour/Starch
7 Large Egg Whites
Seek for yr professional advice
1. Don’t change the recipe. Use the recipe I provided. Once you are successful then go change it.
2. Your oven is probably not hot enough
Comparing your recipe with the other recipes, you’re using too little flour (112g). It should be closer to about 125g. Liquid sounds too low and lipids sounds too high.
If your oven is fan forced, then turn down the temperature to 150 once the cake is risen (about 20mins)
Hi Leslie, this is such a detailed pandan cake recipe. Thanks for taking time and effort in experimenting with this recipe! I live in the UK where cake flour is not available to buy, however a substitute is to add a 2 tablespoons of cornstarch (aka corn flour in the uk) to 100g of all purpose flour (aka plain flour in the uk). I understand this lowers the protein content of all purpose flour which is the primary difference between the two. Do you think this will work as a substitute or is it better to stick to all purpose or extra fine flour such as Top Flour?
Hi Elise,
I am sure they will have low protein flour in the UK. It might be called pastry flour. You can try looking at the protein level in the flour. 8% is what you are trying to go for. Failing which adding cornflour to plain flour is fine.
Thanks, I let let you know how it goes.
Hi! I was wondering how long should the cake be in the oven for, as I cannot see it stated in the recipe? So I don’t know how I can tell if it’s ready?
Thanks so much for all the detail and effort put into writing this!
I found the answer! Thought I read thoroughly but I clearly didn’t! Thanks again!
No problem!
I have just exported several sprouted pandan seeds from Thailand, and can’t wait to grow the plants. I have a wheatgrass juicer that would squeeze juice out of a rock so I’m not worried there… Would love to experiment with the cake – it sounds delicious and fragrant! Do you think it is possible to reinvent it in a vegan form? I would appreciate if you share more of your experiments, in the vegan realm:)
You recipes are fabulous. This pound cake recipe looks great. I have yet to try a cake recipe that is less complex. Somehow I have not had the chance to bake cakes. You made it possible for me. Thank you.
You are very welcome! Look forward to seeing your cakes!
Thanks Dr. Leslie. Finally got it right (at least in my opinion) on 9th attempt – that is no deflation. Ugly like **** due to blunt knife… Working with an oven that behaves like the stock exchange was tough (goes up hot slowly, but cools down rapidly). Think it’s age of oven plus we are in the Nordics. It’s 20 degrees C with all heaters on max and vents closed. Everything dries really quickly, which makes it a real challenge to keep the batter and egg whites from drying up. No kitchen aid but pure hand power… good exercise though in winter. Another plus point is that you are unlikely to overheat and there’s more control. Process takes longer but you get total feel of batter and egg whites.
Word of advice – LISTEN to the Doc… virtually almost everything he has said here has worked. As for the oven bit, it just takes some time to figure out how yours work. Managed to keep stock market today to plus/minus 3 degrees.
Well done! 9th attempt is not bad compared to my number of disasters!
I just made it and the result is fantastic! Thanks a lot for all the information!! ^_^
Well done!!Looks really good!
Make another attempt as no big eggs at home, I weight the egg yolk and egg white, about 6-7 small egg yolks, 11 small egg whites. . And the result is beautiful
Well done!
That is a mighty fine looking cake!
Any of your neighbourhood stores that sell kitchen things should have them. Or else go to Temple Street in Chinatown or the beginning of Joo Chiat Road. There are a few stores there that will sell.
All the best!
Thanks Dr Leslie for the recipe. Tried the 9 whites recipe yesterday and today. The taste of the final product is great!!! However the cake is not light and soft… it looks heavy. The base sinks too when i flip over. Appreciate your advise on what went wrong in the process. Thanks.
I think your bottom heat is not strong enough. The top is too strong. You might want to try placing the cake tin lower down in the oven.
Noted with thanks. Will try again this weekend 🙂
Thanks Dr Leslie for the recipe. Tried the 9 whites recipe yesterday and today. The taste of the final product is great!!! However the cake is not light and soft… it looks heavy. The base sinks too when i flip over. Appreciate your advise on what went wrong in the process. Thanks.
Well done! Looks great!
Hi Maggie, sounds like the top was not baked enough. You might want to increase the length of time in the oven by maybe 5-10mins.
Hi Leslie, thanks for sharing your recipe. How do we adjust the kiamnianwong 9 white recipe to fit a 23cm pan?
I would advise you to get the right sized pan for the 9 white recipe. If not just fill your 23cm pan to 1 inch from the rim and throw the rest of the batter away.
? ok thanks Leslie. Will try that ??
Hi Leslie.. I tried to bake the pandan chiffon today. It rises and all but there’s a problem. The cake has steaks or spots of dense part with some from top to bottom. It taste like cake fir those parts instead of chiffon. Any idea where I went wrong? The folding? Thanks for advice.
Sounds like you did not fold properly.
Ok thanks, will try again. As I’ve been folding quite a lot so worried about deflating it….
Yeah, if you overfold, the batter will deflate as well. Have to be very gentle with the folding. You can fold slowly, the meringue will be quite stable. The first 1/3 of whites should be fully incorporated with the green. Then take your time to gently fold in the rest of the whites.
Ok thanks. I’ll try it again soon……
Hi Leslie,
Thank you so much for the awesome recipe that comes with loads of useful tips. I tried your chiffon cake recipe last afternoon, and it works perfectly fine. I replaced Corn oil with Organic virgin- coconut oil. The cake was so fragrance, soft and moist. Best of all, there’s no crack on the top! Just in case if you’re wondering what oven am using, it’s the old fashioned oven called Baby Belling without any fan-forced function. I can never thank you enough, really!
NURUL
Well done!! Looks better than mine!!
Omg your cake looks so gorgeous!
Dr Leslie. Any idea why my cake sank by half it’s height? I baked it at 150deg for 55min. 20cm pan. Used the standard recipe instead of urs cos my pan was too small.
You need to follow the recipe!
Ah! Your recipe is awesome Dr Tay. The batter flows very easily into the cake pan compared to the standard recipe. And this version is definitely denser. My cake turned out fairer cos I baked it at 160deg. Wasn’t sure of my oven and didn’t have an oven thermometer. Thank you for your super detailed post.
No obvious cracks
Well done!
You are very welcome! Glad you had good success!
Hi Dr, you mentioned using a 60g egg. Is this with or without shell?
With shell. It is usually marked on the box. 10 eggs, 600g.
Thanks for your feedback! Its the coconut milk. Try using fresh ones from the market.
Because it has got a tube in the middle to ensure the cake rises evenly.
Hi Dr Tay, i try baking according to ur recipe but the cake didnt turn out well. Its out of shape and it fall out of the pan mins after i over turn it.
Which part of the recipe did you alter?
as much as i remember, I didnt alter anything. i tried to to follow the video as shown.. but anyway, not wanting to give up, i tried it the second time last night. this time i got the shape & taste but it is still not as fluffy still.. can u advise me which step goes wrong?
Hi Dr Tay, can i bake it in regular unlined round tins for layered cakes? will it rise the same and hold well when layered with buttercream? Thanks!
Hi Lesile, Thanks for sharing. I am having problem or having the middle ring sunk during cooling. It’s look ok when out of oven but sunk after around 10mins. Can you advice what may be the cause? Really appreciate your help. Regards, Jeremy
Yes, it is a small cake tin, so you didn’t use the recipe as prescribed.
Did you overturn it immediately after taking out of the oven?
Thanks for letting me know!
Did you over turn it while cooling?
Dear Dr, my tin measures 23 cm on the top, so I should use a 5 egg white recipe? Do I change the 9 egg white to 5 and reduce everything else proportionately? Btw, the tin is about 21cm at the bottom. Thank you.
Hey Doc, I adapted from another blog who adapted from your recipe, and ended up with a 6 egg white, 5 egg yolk recipe. It’s soooo good. I know what you mean about the dented sides and all because I used to make them. Thanks for the detail steps and tips. Here’s my cake, me and my kids loved it, so a 23 cm cake gone overnight.
Well done! Thanks for sharing!
Well done!
You need to follow the recipe to the T. Pan size etc. The only thing you probably cannot change is your oven.