

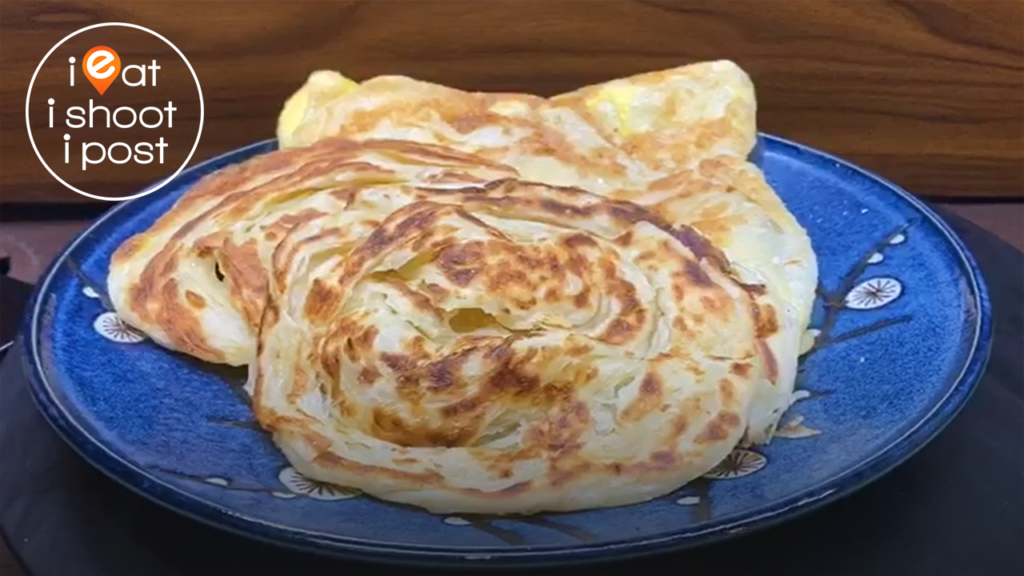
How time flies! It’s been 10 years since I posted this recipe for roti prata! So, for this 10th anniversary, I have shot another video on how to make Roti Prata!
Many people have used the recipe and have written back with photos of their success! Most are people living overseas where it is not possible to simple head down to the prata shop to satisfy that craving.
During this Covid 19 period, this is a great recipe to master so that you can have crispy and fresh prata for the whole family! Once you have mastered plain prata, you can start to fill it with other ingredients such as cheese, luncheon meat, roast duck, BBQ chicken, etc etc! Have fun!
First published on 23 Jun 2010
The reason I am writing this post is because I cannot find a single resource on the internet that gives you everything you need to know in order to create Roti Prata/Canai. In order to make a Roti Prata that is as good, or even better than those you find outside you really need to know all the details, from what kind of flour to use, to how to prepare the dough, to how to flip the dough just like your favourite Prata Man.
What’s in this Post
This post is necessarily long because I want to include everything which I have learnt over the course of the last month or so from talking to Prata Men, studying Prata flipping videos and even to the extent of discussing the characteristics of flour with the expert at Prima Flour Mills. I have included a few recipes plus a slideshow on how to make the dough and 2 videos where I demonstrate, step by step, the dynamics of the Prata flip as well as another method to achieve the same Roti Prata which even a 5 year old can do. I hope that by reading this post, you will be making Pratas at home in no time and wowing your friends with your Prata Prowess.
The Roti Prata Back Story
But before we get into the nitty gritty details, let’s talk about Roti Prata. I spoke to a patient of mine a while ago who happened to be from South India about Roti Prata. Many people have previously told me that the dish we Singaporeans call Roti Prata, (aka in Malaysia as Roti Canai) does not exist in India. My patient confirmed that it is not true. Roti Prata does exist in India, but only in a small part of Southern India and predominantly in a place called Chennai. Over there, this dish is simply called Prata. Indian migrants brought this dish to Malaya where it became known as Roti Prata. The Malaysians however, named this dish Roti Canai which means the “Roti” (bread) from Chennai.* If you still doubt that this dish is available in India, consider this: Most of the men who make the Prata in Singapore are foreign workers from Southern India. Do you really think that we brought them over to teach them how to make Prata? It’s like bringing the Chinese over and trying to teach them how to play Ping Pong right?
Anyway, Roti Pratas are a favourite breakfast dish amongst Singaporeans but there is a certain level of mystique about it because of the process of flipping the dough such that not many people would even attempt to do at home. Why would you want to make it at home if it is so readily available and is relatively cheap? Well, I can think of three reasons.
Why make Roti Prata at home?
1. Most of the Pratas you eat at the stalls will contain high levels of Trans Fats since they are made with cheap margarine and they usually contain more oil than is necessary. When you make Prata at home, you can choose to use Olive Oil and limit the amount of oil used.
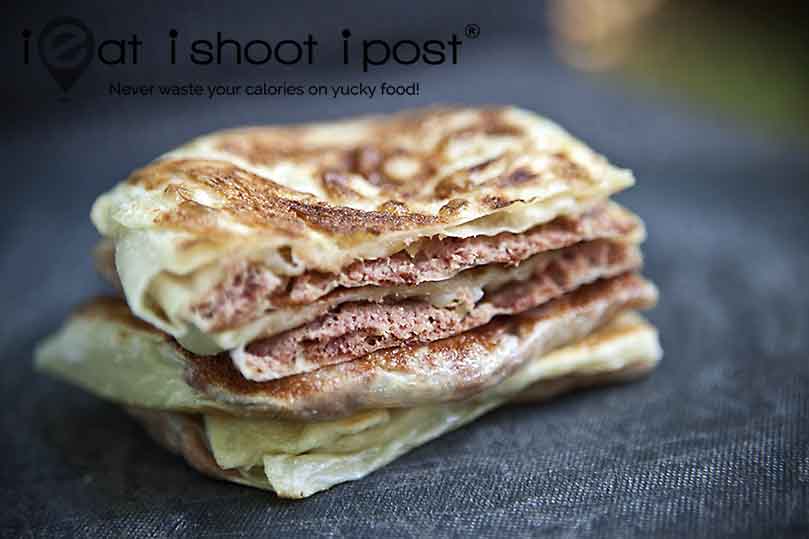
2. When you can make your own Prata, you can then add ingredients which you will never find outside, like say, Luncheon Meat, Egg and Onion Murtabak (filled prata) which is really very tasty. Then you can organize parties and get your friends to bring toppings and design their own Murtabak!
3. Because nobody believes you can.
Roti Prata Recipe
Ingredients
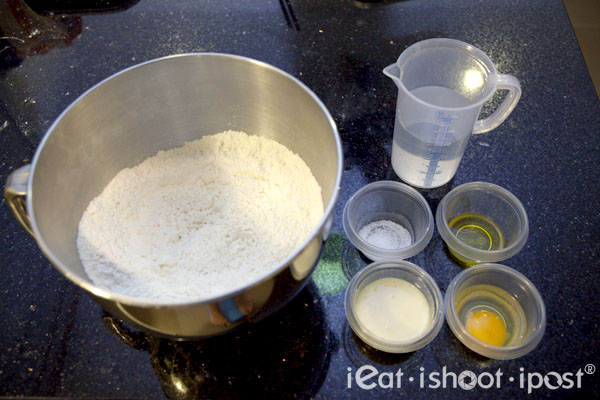
1. Plain Flour 600g
2. Water 270ml
3. Condensed Milk 80g (1/4 cup)
4. Oil or Melted Butter/Ghee 15ml (1 tablespoon)
5. Salt 1 teaspoon
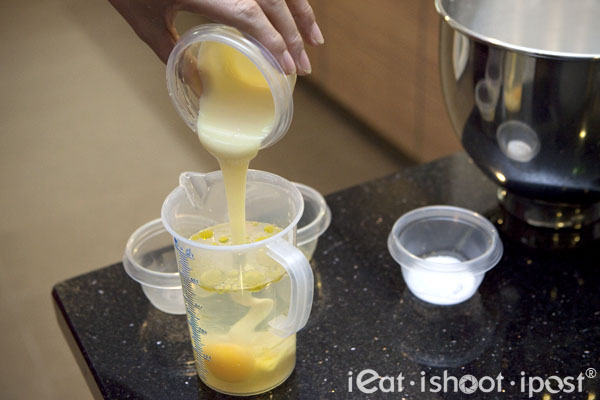
6. 1 egg
Here is another recipe without the condensed milk
Leaner Prata Dough Recipe (Crispier texture)
1. Plain Flour 600g
2. Water 300ml
3. Salt 1 teaspoon
4. Sugar 1 tablespoon
5. Oil 15 ml
6. 1 egg
Notes on ingredients:
Flour
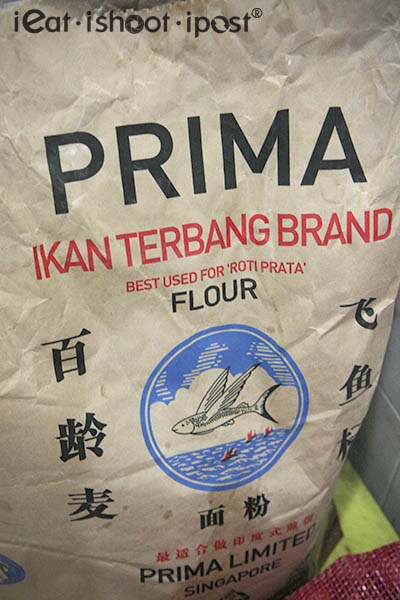 This is by far the most confusing and took me the longest time to figure out. In Singapore, almost every Prata shop uses a flour called “Ikan Terbang” (Flying Fish). It comes in 25kg sacks and on the sack it is written that it is “Best used for Roti Prata”. Now it is critical to get the right flour because you need the correct protein level in order to be able to create a dough which is both extensible and strong, but not too resistant to stretching or you will have problems flipping it. I eventually bought a whole 25kg sack of Ikan Terbang flour because I wanted to make sure that at least I got the right flour so that I can just figure out the rest of the recipe. You can buy a whole sack of flour for $34 at Hong Lim Complex at the corner shop on the the junction of South Bridge Road and Upper Cross St. They will also sell you 1kg portions for $1.80.
But you don’t have to do that because I finally managed to talk to the flour expert at Prima Flour Mills who told me that Ikan Terbang is simply plain flour with a 10.8% protein content. Furthermore, you can buy the exact same flour at your supermarket as it is sold in 1kg packs labeled “Plain Flour” by Primaflour. So where ever you are in the world, if you can get your hands on plain flour with a protein level of 10.8%, it would work perfectly.
NB:
Pizza flour with 11% protein should work fine as it is designed to be able to be stetched thin.
Water
I make my dough using room temperature water. The importance of water cannot be understated. Too little water and your dough will be too stiff and not very extensible. That means that when you flip it it will not stretch out nicely. Too much water and your dough will be too pliable and lack enough resistance. A hydration level of about 60%is about right. (Hydration level = Water weight/Flour weight X 100)
Condensed Milk
You can omit this if you like but it adds a nice caramel flavour and sweetness to the Prata. The milk also tenderizes the dough somewhat and the sugar helps to caramelize the Prata to a nice brown colour. If you omit the 1/4 cup of condensed milk, replace it with 40mls of water and 1 tablespoon of Sugar.
Oil/Butter/Ghee
This helps to give the Prata a nice flavour and also in making the dough more pliable. Oil acts like a levening agent by getting in between the gluten sheets. So the more oil, the fluffier the prata. You can omit the oil if you wish, it will just be a little less pliable when you flap and the taste will be a little flat and the prata less fluffy. Most people are so used to the Prata sold outside that they might comment that the homemade ones just lack something. If that is the case, just buy some Planta Margarine and fry your Prata in a pool of that stuff and you will achieve that authentic prata taste! Yes, we have been conditioned to enjoy the taste of Trans Fats!
Salt
Salt adds taste and strengthens the dough. Without salt, your prata will taste very flat and lifeless.
Egg
The egg proteins help to strengthen the gluten and makes the flipping easier. The egg white helps make the dough more resilient and the yolk contains lecithin which helps emulsify the oil. The egg also adds more nutritional value to the dough. When I omit the egg, I find my prata tears easier when I am flipping it.
Making the Dough
This is by far the most important part of the whole Prata production process. If you have a good dough and bad flipping technique, you can still end up with a good Prata. However, if your dough is bad, there is no way you will ever get a good Prata.
In order to make a dough that is pliable and elastic, you need to remember just one crucial point. Be patient with your dough! What dough needs more than anything else is time. Dough is like a bad tempered friend. If you want to get through to him, you have to use a soft approach. The more you fight it, the more it will retaliate. Let it cool down for a while and deal with it gently and it will do whatever you want.
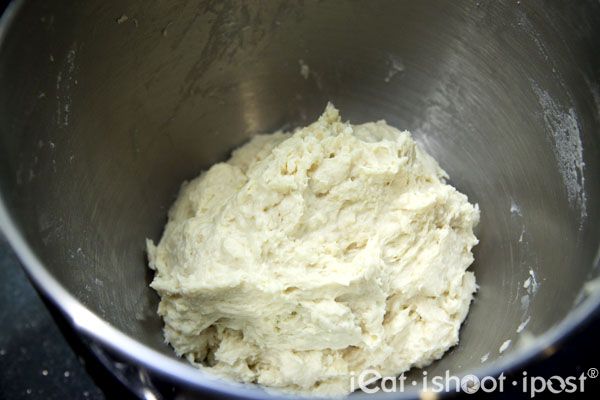
There is a lot of waiting involved. The first wait is after you mix the flour and water. Once both water and flour is mixed evenly, leave it alone for 20 minutes for them to get to know each other intimately. This stage is known technically as the autolysis stage. If you continue to force it to combine together, you are just wasting your time and energy. Give it 20 minutes and when you start to knead, you will get a smooth dough in no time.
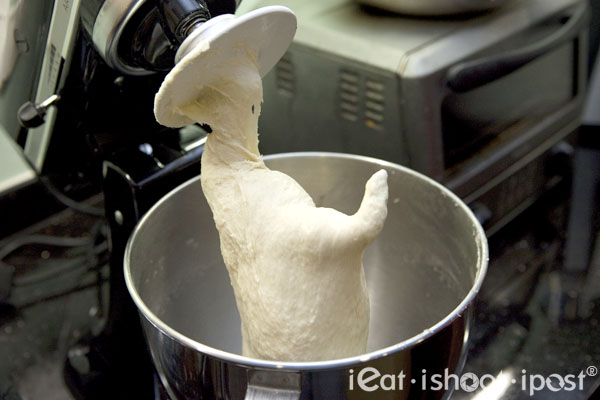
For this dough, you really do need to develop the gluten a bit. So I usually knead it at speed 2 on my KitchenAid (Medium slow) for 10 minutes with a 5 minute rest time in between. If you want it to be even more elastic, repeat the 5 minute knead and rest cycle one more time. If you are kneading by hand, you will need to double the kneading time. What you want to end up with is a tacky dough which becomes smooth as a baby’s bottom with just a bit of dusting of flour.
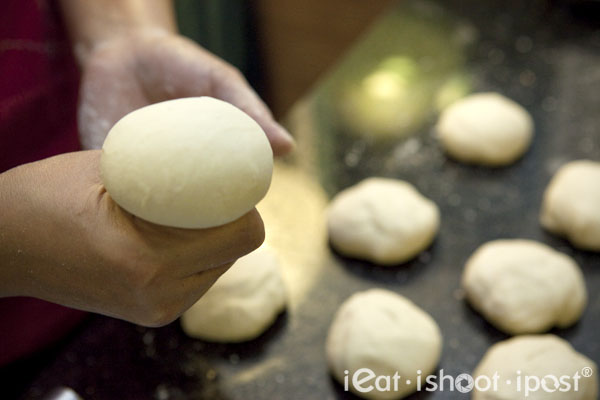
Right after kneading, divide the dough into equal parts. I usually divide mine into ten 100g dough balls (approx). At one time, I used to oil my hands and ball it like how I see the Prata Men do it but I realized that the oil makes it difficult for the flour to combine at the folds. What you really want is a smooth ball of dough without any folds because these folds will cause fractures in your dough during the flipping process. So now I divide my dough and make them into nice balls before I oil them.
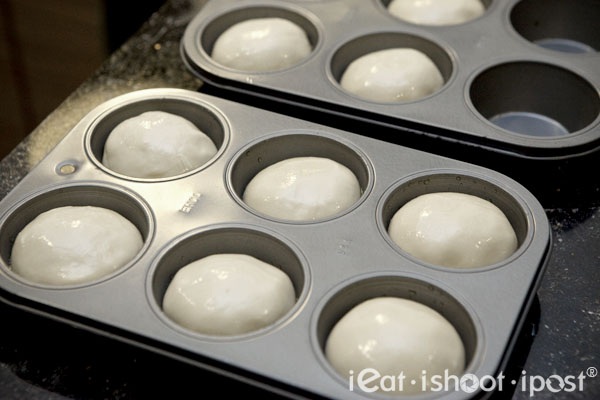
Once you oil the balls, you can do what they do outside and put them altogether in a box. But I find it easier to use non-stick muffin trays as I can minimize the amount of oil used and when I remove them, they come out as nice round ice hockey like pucks which is easy to flatten into round discs for flipping. You should try to rest them for at least 8 hours or overnight, because during this time, the enzymes in the flour will start working on the sugars and some of the wild yeast in the air will start fermenting the dough. The resting makes the dough more pliable and easy to flip as well as give it a more complex flavour. Remember to cover the dough balls with clingwrap to keep the surface from drying out. If you are in a hurry, you can flip the dough in as little as 50 mins after balling. (I guess it could be shorter, I just haven’t tried it yet) It still works, but you might find it breaks a little easier.
Note: When they make these balls outside, they coat them with margarine which hardens at room temperature. So they are able to stack them into a box, saving space. By using a muffin tray, you can avoid using margarine and apply just a thin layer of vegetable oil which is much healthier for the family.
ieat’s Express Prata Dough Recipe using the Food Processor
Sometimes you might just want to dish out your prata on the spot. I found that you can do this in an hour and fifteen minutes if you use a Food Processor. Basically, all the ingredients go into the Food Processor with the dough blade attached. Blend for 20 seconds until all the flour and water are mixed and the dough looks like a shaggy mass. Next, rest the dough for 20 mins then turn on the processor for 30 seconds followed by 2 min rest and another 30 seconds. The rest in between prevents your processor from overheating and allows the dough to rest so that it is easier to process. Divide and rest the dough for 50 mins and you are ready to go!
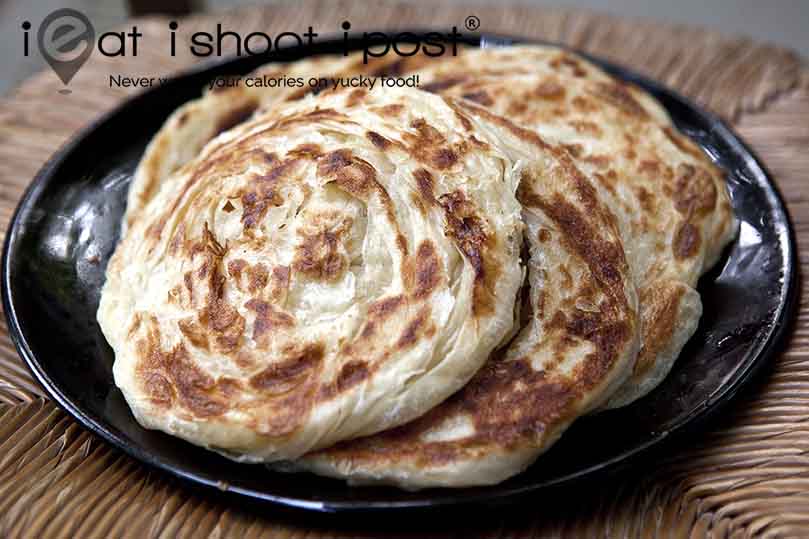
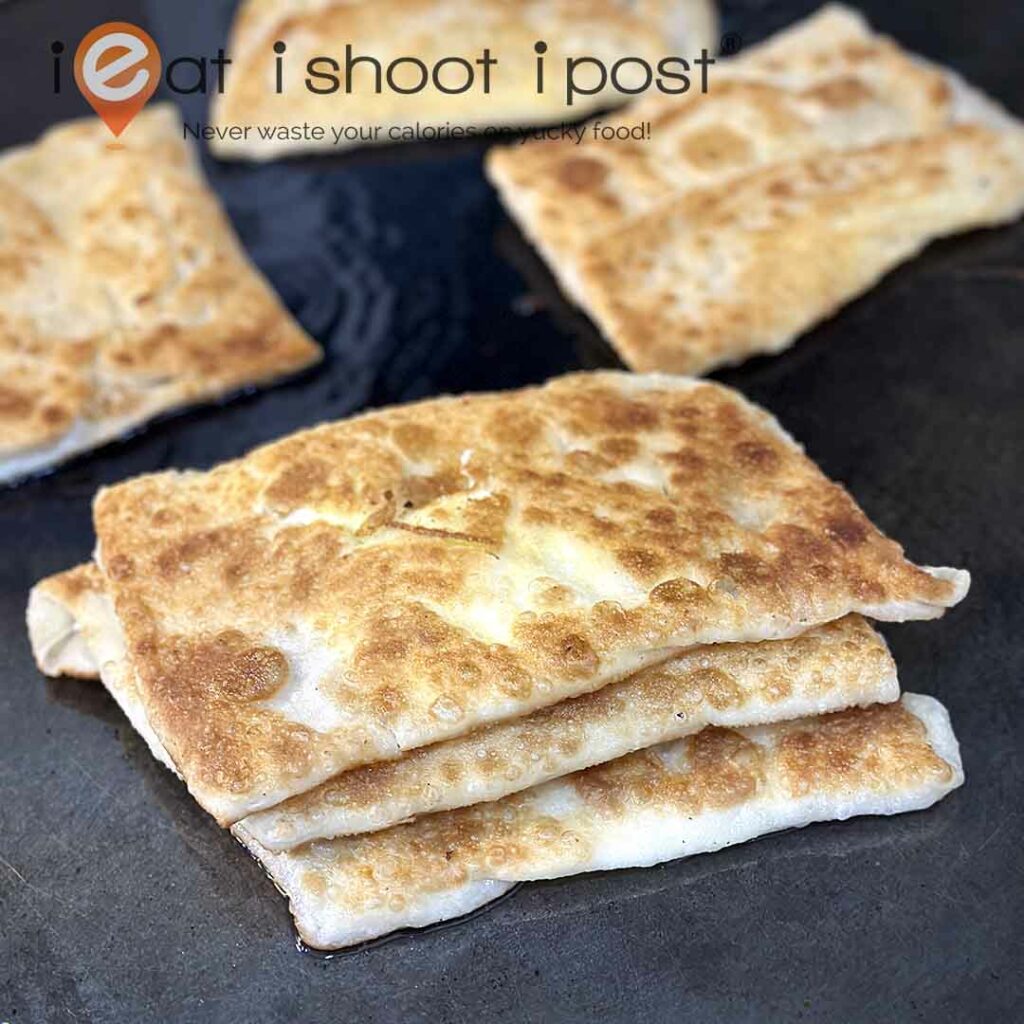
Flipping the Prata
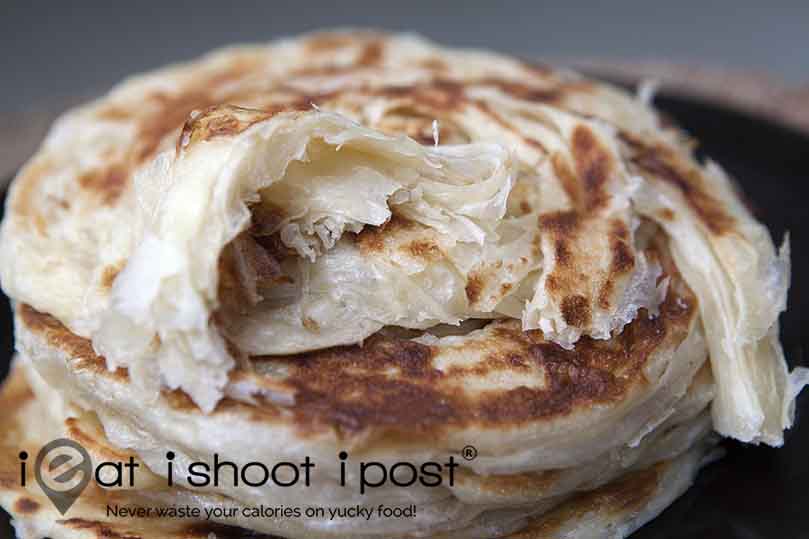
This is the fun part but is also the hardest to master if you want to be able to look like a Pro. (To really look like a Pro, you need hairy arms and a dark complexion, this I cannot help you with) I have actually tried to learn the technique from several Prata Men in the past and they have given me a few pointers here and there. But most of the time they just tell me that it would take me 3 months to pick up the skill if I practice everyday. As with most things, if you don’t understand the fundamentals of what you are doing and are just doing it blindly, it would take a long time. However, I have studied the videos on youtube over and over again and I eventually managed to conceptualize what is actually happening during the flipping process. With this basic understanding, I managed to master the skill within two weeks. (I must have flapped hundreds of balls though). In the video, I will show you the concept of the prata flip using a round disc, then you can see how it is done with a towel and eventually a piece of dough. I believe that if you study it well, you will be flipping Pratas in no time.
HD version uploaded on 31 Mar 2011
The Pro version of making Roti Prata
For those who are not so patient and don’t have a need to show off to their friends, I have made a second video where you can achieve the same membrane thin stretched dough using a method even my primary school daughter can do. Don’t be intimidated by the prata flip, just concentrate on making a good dough and I guarantee you that you will get to eat crispy, fluffy and healthier Pratas at home in no time.
The novice version of making Roti Prata
Ieat’s Drive for the Perfect Prata Recipe
I have been thinking hard about how to achieve a crispier prata without having to add more oil to the dough and have came up with a method that works pretty well. The only drawback is that you really have to time the whole process properly. As far as I know, no one else has published a recipe like this online so I think this should be an ieat original recipe.
What we need to do for a crispy crust and a fluffier inside is to introduce little air bubbles into the dough. You can do this by adding yeast or baking soda. I chose to use yeast because it gives you better control of the levening process. If you are after a Prata that will adequately portray your potent personal Prata prowess, I will use either Ghee or French Butter in place of oil and I also add 1/16 tsp of yeast (a pinch only) into the flour when I mix all the ingredients together. Once you ball the dough and oil it, place it immediately into the fridge to rest for 8 hours. By putting the dough in the fridge you slow down the levening process but you are still giving the dough time to rest and combine properly. About an hour and a half before you decide to flip you prata, bring it out of the fridge and rest at room temperature. The yeast will now slowly wake up and produce little bubbles of carbon dioxide in the dough. If it is rested beyond 2 hours, you will end up with bread, so timing is important. Just a slight 10% rise is enough to bring your Prata to the next level! You will find with this dough that your stretch membrane will not be less transparent as the normal dough without yeast and is a little less resilient. But the texture of the final Prata is crisp on the outside and light and fluffy on the inside and is especially good if you are planning to do Murtrabak as the layers inside will all be tender and fluffy.
Conclusion
Once you have mastered how to make Prata, it is time to organize a Prata Party where you can invite your friends over to create new Murtabak (filled pratas) flavours! Some of the ones that worked really well for me were beef burger and cheese, parmesan and sugar, Luncheon Meat, Egg and Onions and Cornbeef, Egg and Onions.You can really go crazy thinking of all the wonderful flavours that you can put into your Prata!

Daddy flipping Prata: Photo by Megan Tay 7 yrs old
Acknowledgements
Many thanks to Mr Lim Kay Kong, the Director of Research and Development at Prima Flour Mills who was instrumental in helping me finalize the Prata recipe. Thanks also to Soundman for helping to produce the Prata Flipping Instructional Video.
My Pandan Chiffon Cake and Tau Huay recipes can be found here
Please do write in and let me know how you went with your prata. I would especially like to know if you were able to make yours even better!
After playing with the recipe for a few months, I have slowly lowered the water content. In the past, I used a 60% hydration, ie 600g flour to 360g water, I found that a 50% hydration is actually easier to handle. So I have modified the recipe by decreasing the water.
* Footnote: After the writing of this blog post, one of our readers wrote in with reference to an article from the wsj that states that the origins of the word Canai is most probably attributed to the Malay word “to stretch” rather than its place of origin. You can click here to read the article.
Other similar recipes:
Ayam Curry Kapitam
Places to eat Roti Prata:
Chinda Mani Prata
Ali Khan
Spring Leaf Prata
Master Prata
Mr and Mrs Mohgan’s Super Crispy Prata

Hey Ieat! I am trying your Roti Canai recipet now! My dough is all oiled and waiting in the fridge! I hope it turns out as nice as had it in Malaysia! I doubt I can flip as well as the Parata Men there… but oh well! Thank you for your very precise analaysis on how to make roti canai!
Hope it turned out great!
Very interesting article — I started a very small Malaysian, Asian, Fusion eating place where I am (NL). People over here are very family with Roti met Kip (Roti with curry chicken). This is a famous dish from Suriname. But the roti really is just our chapatti with dal fillings. And I am dying to show my customers here that in Malaysia, we have something much better — roti chanai ! Of course I can buy frozen. But since my shop is a ‘home-kitchen’, I do not really want to do that.
I hope with the help of this well researched article, plus extensive instructions, I will be able to produce the roti/prata we Malaysians/Singaporean are proud of.
Thanks Doc.
All the best!
Hi Cindy.
Where are you based in the NL. I am craving for Prata.
Ah, what you need to do is to fluff the roti up by clapping the prata between both hands while it is still hot! Then you have that flaky prata! I think what you are describing is dhal chat. I don’t have the recipe for that unfortunately.
Great extensive guide, thank you! I only request one thing – another extensive guide for the traditional dipping sauce you would have with the roti in Malaysia! Do you have a recipe? Thank you
Yeah, I will have to work on that!
I just made the roti prata as per your recipe using ghee and it turned out so amazing me and my husband are in shock. I even managed to flip it as well. Thank you for the great recipe. Also i didnt let it rest over night.. maybe only about 30 mins and it turned out just fine. Just an idea i got from indian chef online: When the dough is fully streched out thin and in a rectangular shape you fold it like an accordion on the long end then you twist it into a coil and then roll it flat with a rolling pin- i got very nice flaky layers this way :).
Thanks for sharing!
Your slideshow above is not working anymore, do you have another copy?
Thanks, I have removed the slideshow and posted the photos instead.
Thank you very much for your in-depth investigation into this, I appreciate when someone examines and explains the whole purpose behind the ingredients and methods. A few questions though!
1) At what point do you add the salt to dough mixture? I do know it plays a role in do something with gluten.
2) Following that, is oil/butter only for oiling the dough balls or to mixed into the dough?
3)When does one add yeast/baking soda, after leaving it to rest for 20 minutes?
Some people say it is best to add it after the 20min hydroysis stage, but in practice, it didn’t really matter. The oil is for oiling the balls. If you are using yeast, (which I don’t, it was only an experiment) then add it at the start when you are mixing the dough.
Ah I see, I added the egg,oil and sugar after that stage and it seemed way to wet and unworkable to ever reach a reasonable consistency (I had to add a bit of flour ~ 60g). Thank you for clarifying all of that!
Very well done Dr Tay.
I’m confident that your recipe is very good. I particularly like your explanations. You explained what and why we do it. It is very detailed. Most recipes do not explain why.
The time & effort you’ve put into it shows your passion & character. I’ll now have a better understanding of my prata man’s actions.
Thank you. I look forward to your other recipes.
☆☆☆☆☆
Thanks your your note of encouragement!
If you are looking for a suitable flour – Caputo “Classica” flour works amazingly well with the “rich recipe” above (Caputo is sold around the globe in lots of good deli as this brand is considered to make the best pizza flour—which by the way is also amazing).
This brand of flour gives a stretch similar to what you see when Hawkers flip their dough and I can get a full size roti (as per an hawker stall size ) from only 50g of dough. This means the resultant roti is light with a crispy outside and a shreddy inner layers.
HINTS:
* Use 300ml of water (or a little more – approx 330ml) as this flour needs a higher hydration
* Better results for stretching if you do not rest in fridge…rest covered out on the bench
Happy roti everyone
Thanks for the valuable tip!
L,
FYI. If you have not already, it is worth trying the Caputo brand flour for pizza. We also use the Uuni 2s.
For home use, the version is Caputo “chef” or sometimes labeled as Caputo “Cuoco”. (approx 12.5% Protein). Caputo do have a specialist pizza flour version (12.75% Protein) but where I am it is only available in 25kg bags…
Sure! Thanks for the tip!
Hay..Great recipe and notes!
Just one comment:
We Egyptians have similar eat we call “Feteer meshaltet” or layered pie. The thing is we get a crispy outside and fluffy inside easily WITHOUT YEAST simply by having good amount of fat on top of the pie and we POP IT IN THE OVEN on medium heat until it puffs and when its out and cooled its fluffy and crispy. Can be used for dipping while mainting its outer crust!
Only difference in the recipe is we mix only flour and water (50% hydration) and we add little of tahini. (Arabic sesame paste)
https://youtu.be/RIgP8OFnLmM
Thanks for the info!
this video flatbread is exactly what i want to make, could you give me some more detail on the recipe? how many salt used and if it use egg at all?
Its all in the recipe!
It will become more spongey but you don’t really need to. Just follow the original recipe.
I made these yesterday and they were delicious, thank you for the recipe and detailed instructions!
However, they were more crispy and not as soft as those sold by the prata store.
Is it because of the amount of grease used?
More grease makes softer pratas?
Fry with more grease to make crispier pratha. To get softer prata, after frying use both hands to clap it and leave under a bowl.
Thank you for the good recipe. I tried to make it last week but for me I added green color by pandan leaves it turned out so goodddd. Smell good with cute color and I shared your recipe to my friends on facebook(all credit goes to u) all of them love it! Very easy to make and taste good ^^
Ps. For who wanna try pandan roti as me u needs 70g of matured leaves and 300g of water
Thank you alot for nice recipe we really enjoy it!!
Thanks for your nice feedback!
Hi, I can’t find the cooking method after flipping. Has it been removed ?
Thanks
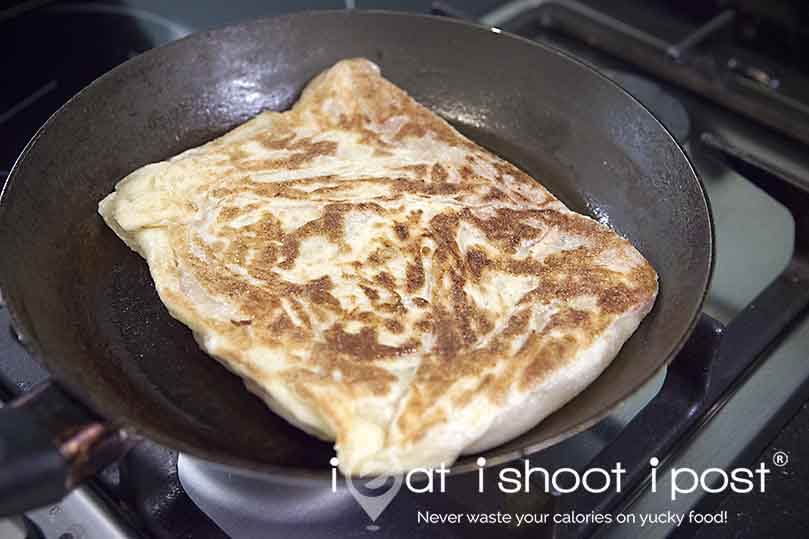
You just need to pan fry with a bit of oil
Hi Dr Tay. Merry Christmas to you and your family. One question is plain flour the same as all purpose flour in America? My little boy loves roti after our trip to Thailand. I want to try out your recipe, the most detailed recipe I have found over the internet. Thank you for sharing your knowledge of cooking.
If you use pizza flour it should work.
You need a flour that has the ability to stretch which is what pizza flour is.
Thanks for your detailed instructions. I live in Germany and you don’t even get frozen prata here. I give making prata a go, with great success. Made several versions – with and without egg, with and without milk, with and without baking powder. And each time I kept increasing the amount of oil. I think I like the version with egg, milk and a pinch of baking powder although it was heavier than the version without. Didn’t try with the yeast. I also didn’t follow the ingredient quantities to the T as I used only 100 gr flour each time, so it was agar-agak for the rest.
The trick is to stretch the dough paper-thin, no, even more than paper-thin. Taste wise, I got my end-product quite close to the pratas sold in Singapore and am convinced that if I add even more oil, I’ll get it right but I think I’ll stop where I am. When you make your own food, you realize how unhealthy some things can be. 🙁
Served with a Madras curry, this was fabulous.
Fran
That looks good! Well done! Good to be reminded that we really take our pratas here for granted!
Pizza is made with “00” double zero flour. I am in Canada and I bought the pizza flour from Italian grocery store. I use ’00” flour to make my roti
Thanks for sharing!
Hi I’m a little confused,
“So I usually knead it at speed 2 on my KitchenAid (Medium slow) for 10 minutes with a 5 minute rest time in between. If you want it to be even more elastic, repeat the 5 minute knead and rest cycle one more time”
So do i knead for 5 mins, rest for 5 mins, then knead for 5 mins again?
Also, do I add the salt, sugar, oil, and egg into the water to mix with the flour before the autolysis stage?
Thanks!
Yes, add everything in and mix, then leave for 20mins to autolyse. Then knead for 5 mins, rest 5 mins and knead another 5 mins. Then test the dough to see if it is elastic enough, if not knead another 5 mins.
Dr Tay, I am allergic to commercial yeast.. do many hawker stalls use commercial yeast in their prata?
There is no yeast in prata
Glad you approve! Thanks for the feedback!
I love this recipe. Would definitely try this with paneer tikka (another Indian recipe).
Oh, yes it will go with that!
Hi, Im from USA, but used to work in Sg from 1990 to 1999, so we miss pratha so much, this will be a big help, thanks
You are most welcome!
Oh wow! Thanks so much for your precious complement!
Hello and thank you for your very in depth article. We have been trying to perfect roti canai for a few months now and are hoping you will answer our questions. Firstly, the main issue we seem to be having with our dough is that when we come to stretch it and flip it the dough seems to retract and stretch back on itself, so we can never achieve very thin layers – do you know why this might be happening? And also, when you mention the hydration level of the dough, are you including all liquids in your calculation or just the water?
Thanks 🙂
Thank you! This is a nice article about roti canai!
Just wondering how well do these keep in the freezer?
I’m hoping to be able to make a large batch for freezing and defrost them for use later. Do I freeze it before resting overnight or after? Will the dough consistency be affected by the freeze?
Hi Jac,
Yes, they can be frozen. I would let the dough rest for a few hours then place them in the freezer.
Can all purpose flour be used?
Yes indeed.
Hi! In Chennai you will see it in menus as parotta, and often served with chickpea curry.
I love the in-depth explanation and guide. I hope I can flip like a prata man! However, Dr. Tay, I heard some say one of the famous prata restaurants used cake flour instead of plain flour for their prata. I don’t know how true but can we substitute using cake flour? Thanks.
No, I don’t think you should use cake flour. You need the gluten in plain flour to enable the dough to be stretchy
Thanks Dr. Tay.
Hi! I am trying to make Roti Prata because it is not available in my country. I came across your lovely recipe, but I am a little confused about the order of the steps. So first I combine the flour and water, and then? What are the steps after that? Sorry, I might be misreading but it would be awesome to see a step-by-step! Thank you in advance!
Just all everything together and knead until the dough is smooth and allow to rest.
The history of Parotta or Prata is it was brought to India by the Sri Lankan labourers who came to work in the Indian ports. It is mostly popular in the states of Kerala and Tamil Nadu the Indian states closest to Sri Lanka. There is no need to add egg ,milk, sugar or oil to the dough. In most places in South India it is made with only 3 ingredients ie plain flour salt and water. The right proportion is plain flour 1000gm(100%)(protein level 10.5-11.5 gm),550 ml of water(55%) and 20 gram(2%).Salt at 2% is a key ingredient as it provides the strength for the dough and prevents it from easily tearing while stretching. If the hydration is any higher than 55% the layers will fuse during the final pressing and they will not separate after cooking. Moreover if the protein content is higher than 11.5% the parotta will be chewy and will be difficult to tear easily into pieces.
Thanks for sharing!
Thanks for the share.✌🏾