

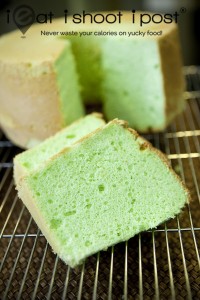
Back in 2010, I spent a few months perfecting my Pandan Chiffon Cake.
I haven’t been baking since.
You see, I am not a baker at heart. What I do love is exploring kitchen science and a good challenge. So when it comes to baking, I have to learn everything from scratch. I make plenty of mistakes along the way, but each time I fail, I learn something new and that keeps me going.
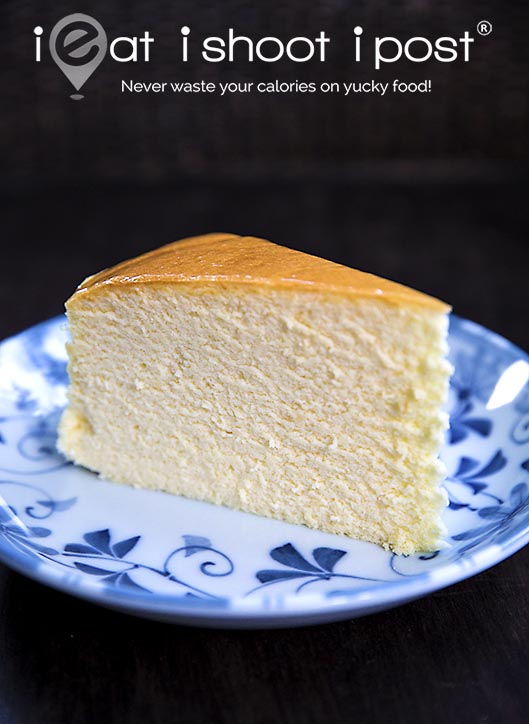
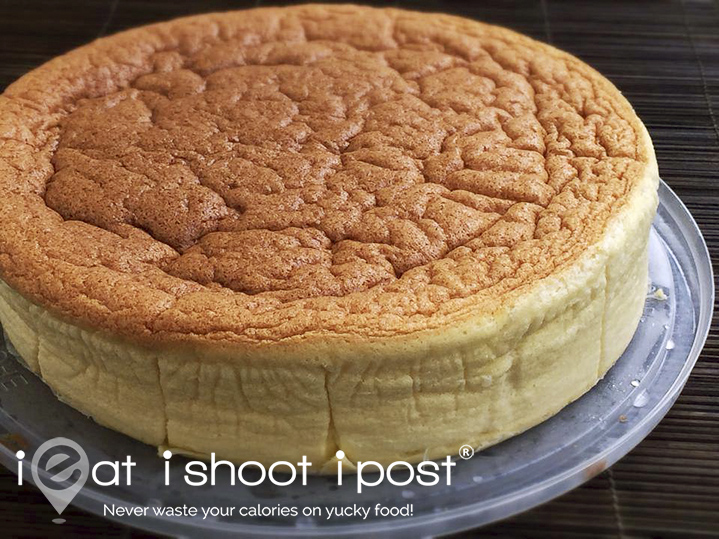
So why another Japanese Cheesecake recipe? Well, I wanted to pen down everything I learnt over the last few months of cake baking so that you don’t have to make the same mistakes that I have made. Cake baking is more of a science than an art. For non-bakers like myself, I have had to learn the hard way that there is a difference between using a non-stick pan vs an aluminum pan. Such things are seldom discussed in the myriad of recipes online, so I had to do a lot of research, reading up on cookbooks as well as seeking tips from professional bakers such as Chef Yamashita, who first got me started on this Japanese Cheesecake project after I picked up his recipe book; Tanoshii: Joy of Making Japanese Cakes and Desserts (2012). The recipe that I am presenting today is based on all these resources and you will find that I have done things a little differently from the rest of the online recipes. I believe that at the time of this writing, it is the best way of baking a Japanese Cheesecake and will result in a cake that has a smooth domed top and a velvety, light texture which just melts like cotton candy with the slightest pressure between your tongue and your palate. (Ok maybe not cotton candy, but you get the picture)
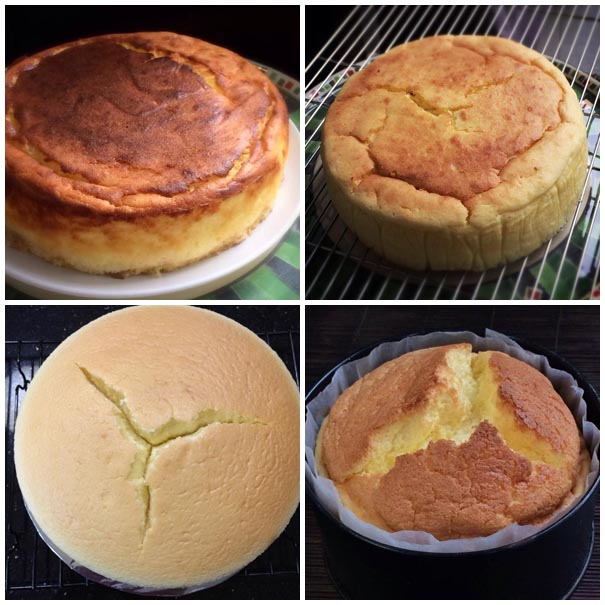
Now, it is easy to bake a cheese cake that looks bad but still tastes good. All of my failed attempts tasted good (see photos above). The most challenging thing about this cake is to be able to bake it such that there is a nice dome on top that is smooth and not cracked. All the attention to the nitty gritty details in the recipe is to help you achieve a perfect domed top and a beautifully moist and melt in your mouth cheesecake which will make all your friends green with envy and begging you for the secret recipe rather than patting you on the back and consoling you that the cake still tastes good despite the way it looks.
The ingredients in the recipe for the Japanese Cheesecake is quite standard and can be attributed to Diana’s Desserts whose recipe has been replicated by bakers in the online community. My recipe is based on her ingredients while the procedure is based on Chef Yamashita’s book with some modifications.
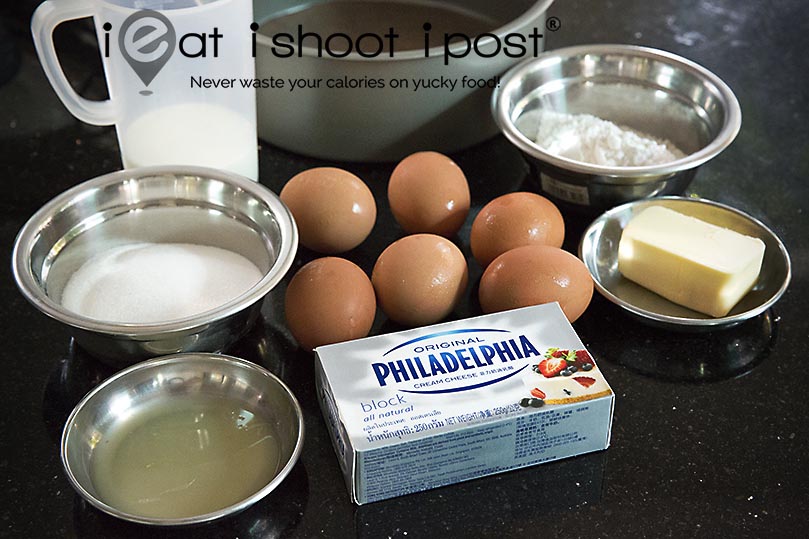
Ingredients list
Yellow Team
250g Philadelphia cream cheese (1 block)
6 egg yolks
70g castor sugar (This is half of the total 140g)
60g butter (1/4 block)
100 ml full cream milk
1 Tbsp lemon juice
1 tsp lemon zest (or lemon essence) (optional)
60g cake flour
20g cornflour
1/4 tsp salt
2 tsp Vanilla extract (optional)
White Team
6 egg whites
1/4 tsp cream of tartar
70g castor sugar (This is half of the total 140g)
Here is the breakdown of the procedure for your quick reference:
1. Pre-heat oven to 200°C (Top and bottom heat, no fan force)
2. Spray 8in x 3in cake pan with non-stick spray, line bottom with baking paper
3. Whisk cream cheese till smooth over a warm water bath
4. Add yolks and whisk
5. Add half the sugar (70g) and whisk
6. Warm milk and butter in microwave or stove, whisk into batter
7. Add vanilla, salt, lemon juice, lemon zest and whisk
8. Remove from water bath, sift flour and fold into mixture
9. Whisk whites at low speed till foamy
10. Add cream of tartar and beat at high speed till bubbles become very small but still visible
11. Gradually add sugar and beat till just before soft peaks
12. Fold whites into batter 1/3 at a time
13. Pour into cake pan and tap the pan on the counter to release air bubbles
14. Bake in a waterbath on the bottommost rack in a preheated 200 degree C oven (top and bottom heat, no fan force) for 18min, lower to 160 degree C for 12 mins and turn off the oven and leave cake in the closed oven for 30mins. Open the door of the oven slightly at the end of the baking for 10mins for cake to cool.
The video below outlines all the steps in the procedure.
If you have followed the procedure and have ended up with the perfect cheesecake the first time then CONGRATS! Well done! However, if you find that your cake isn’t as good as it should be then read on!
Trouble Shooting Notes:
1. Cream Cheese
Since this is a cheesecake, the cream cheese that you use is important not only for the flavour but also for the texture. I have used many different brands of cream cheese and my family and friends can tell when I use a different brand of cheese. Philadelphia cream cheese works perfectly for this recipe and will result in a cake that is light and fluffy with a subtle but distinct flavour which is well liked by my guinea pigs tasters. I once tried a different brand of cream cheese which resulted in my cake splitting every time I bake. It took me a while before I figured it out, but I eventually read that cream cheeses have binders in their formulation. So I postulated that some cream cheeses may have too much binders which will result in a stiffer texture which breaks easily when the cake starts to rise. So make sure you buy a cream cheese which is creamy and soft even when it is cold and not stiff like a sausage (like the one I bought)!
2. Eggs
Eggs come in all sorts of sizes. This recipe is based on 60g eggs. Look for cartons which state that the 10 eggs have a net weight of 600g. Eggs usually have a shelf life of about 1 month. Look for the expiry date and choose the freshest ones. Fresh egg whites will whip up better and taller. I find that it is okay to just use eggs straight out of the fridge. Make sure that when you separate the eggs that you don’t get any yolks in the whites or the whites will not whip up well!
3. Flour
This cake will tend to break if the structure is too strong. That is why you need to use low gluten flour. The gluten is still needed for the cake to rise as they form a stretchable membrane around each air bubble which allow them to expand like little balloons. The starch from the wheat flour as well as the cornstarch helps to delay the coagulation of the egg proteins. Once the egg protein and gluten stiffens, that is when the cake rises rapidly. From my observations, this happens at around 85°C. That is why I timed my oven temperature such that the cake plateaus at an internal temperature of 80°C. If you cannot find cake flour, then you can approximate it by the formula: 1 cup plain flour – 2 Tbsp plain flour + 2 Tbsp cornflour = 1 cup cake flour. But bear in mind that cake flour is bleached, ground more finely and formulated to be able to hold more sugar, so it is still better to use cake flour if you can buy it. Hong Kong Flour, Top Flour and Super Lite Flour should work as well, but NOT Self Rising Flour. Self rising flour has got baking powder in it and will turn your cake into huat kuay!
4. Sugar
You need to use castor sugar, not fine sugar. The sugar crystals in castor sugar is finer than fine grain sugar and is essential for making a good meringue (whipped egg whites). If you don’t have castor sugar at hand, just use your grinder to grind fine sugar into a powder. Don’t use icing sugar as it contains additional cornflour and might mess up your cake!
5. Salt
Salt improves the flavour of anything sweet which is why salted caramel is so nice. It has been shown that salt activates the receptors on the tongue and increases the perception of flavours, so don’t omit it!
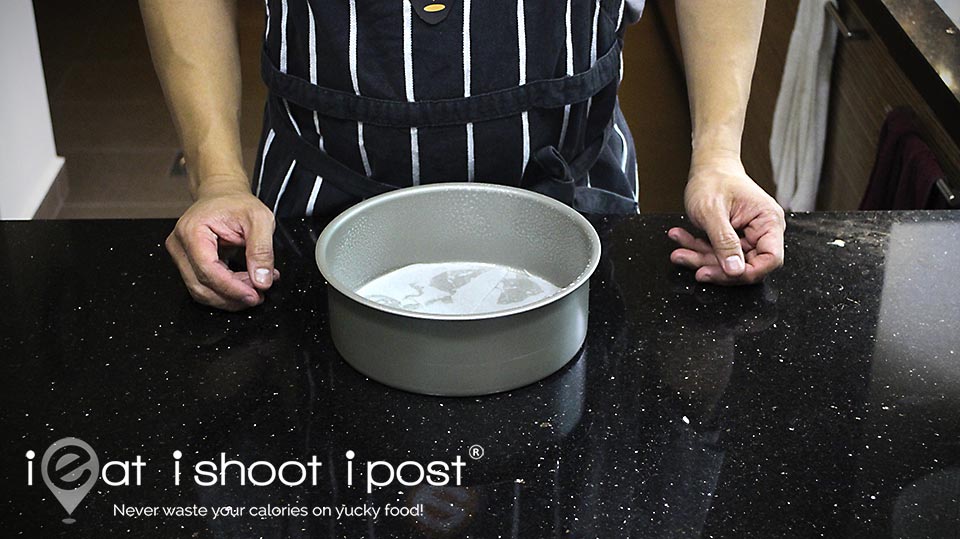
6. Cake Pan
Save yourself some heartache and go buy an 8 in wide, 3 in high non-stick light coloured cake pan for your cheesecake. I bought mine at Bake King near Haig Road market. You will notice that I don’t use a springform pan or line the sides with baking paper. I also hate having to line the springform pan with aluminum foil which can still sometimes leak and allow water to seep into the cake. (Yes, it happened to me before). I found that lining the sides with baking paper results in creases around the sides of the cake which is quite ugly. Using a one piece non-stick cake pan is much easier and results in a cake with very nice, straight sides.
You need to use a light coloured pan because those black pans will absorb heat easily and cause the sides of your cake to bake faster than the middle. This will cause it to dome and crack. I found that the non-stick, light coloured pan is the way to go. With this pan, the batter will come up to about 1.5 cm from the rim which is just nice as the cake will rise about 2 cm using the oven timing I provided. If you try to bake this at 160°C for 1 hr 10 mins as per most internet recipes, the cake will rise very high and then deflate resulting in an ugly wrinkled top.
Spray the sides of the pan liberally with non-stick spray. If you don’t have non-stick spray at hand, just brush the pan with butter and dust evenly with cornflour. Make sure that you apply the non stick spray thoroughly so that there are no dry spots, especially at the rim of the cake pan. The batter will stick to any spot which is dry and that will stop it from rising. Once that happens the cake will start to dome and the chances of a crack increases. The top should rise up evenly like a souffle.
7. Lining the Bottom of the Cake Pan
Line the bottom of the pan with baking paper so that it is easy to de-pan the cake after cooking. You can spray some non stick spray on the bottom so that the paper can stick to it (ironic isn’t it?). Alternatively, you can do what Chef Yamashita does and line the bottom with a 1cm slice of sponge cake! (This requires you to bake a sponge cake!) The sponge is great as it adds an extra dimension of texture as well as act as an insulator for the bottom of the cake! (Good extra step to show that you really put in the effort when you are trying to impress your future mother-in-law or wife)

8. Whisking the Cream Cheese
I found it difficult to get a smooth mixture when I melt the cream cheese together with the milk as most recipes tell you to do. Much easier to place the cream cheese over a warm water bath, cut it into cubes with a pair of scissors, allow it to warm up and whisk. You will find that the cream cheese will melt nicely into a creamy smooth mixture to which you can then add the egg yolks.
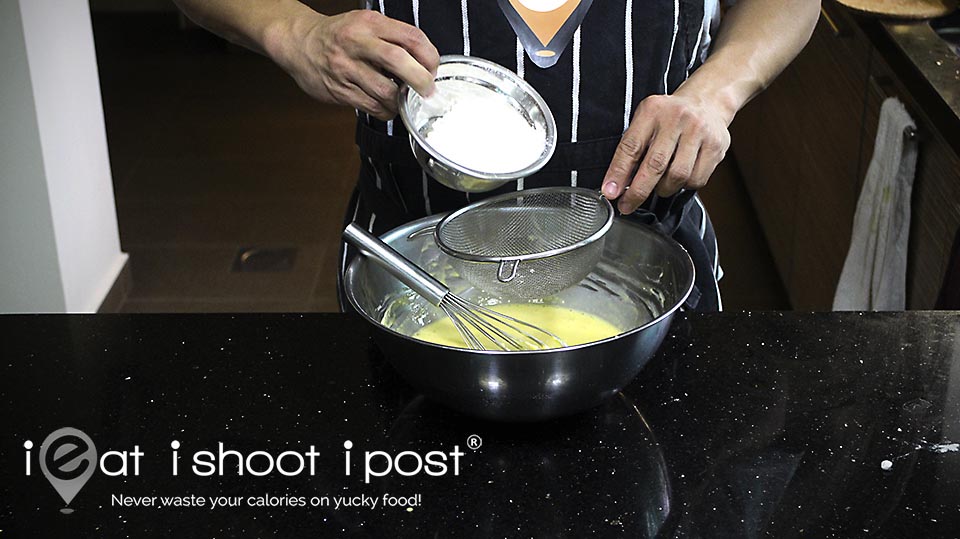
9. Folding in the Flour
Make sure you sift the flour to remove any lumps and fold gently just before you add the whites. Don’t be too bothered if it looks a little lumpy, as long as it is relatively smooth, you will be fine. Don’t over mix it as more gluten will form when you mix. More gluten will make the batter stiffer which result in more bubbles, more rise and a broken cake. Fold and mix gently and don’t allow the batter to stand for too long with the flour in the mixture as gluten starts forming when it is wet!
10. Temperature of the batter
The temperature of the batter should be between 40°C to 50°C. It should not be cold, neither should it be too warm as the cake will cook too quickly when it enters the oven. When this happens, the cake will break because the sides cook too quickly before the middle.
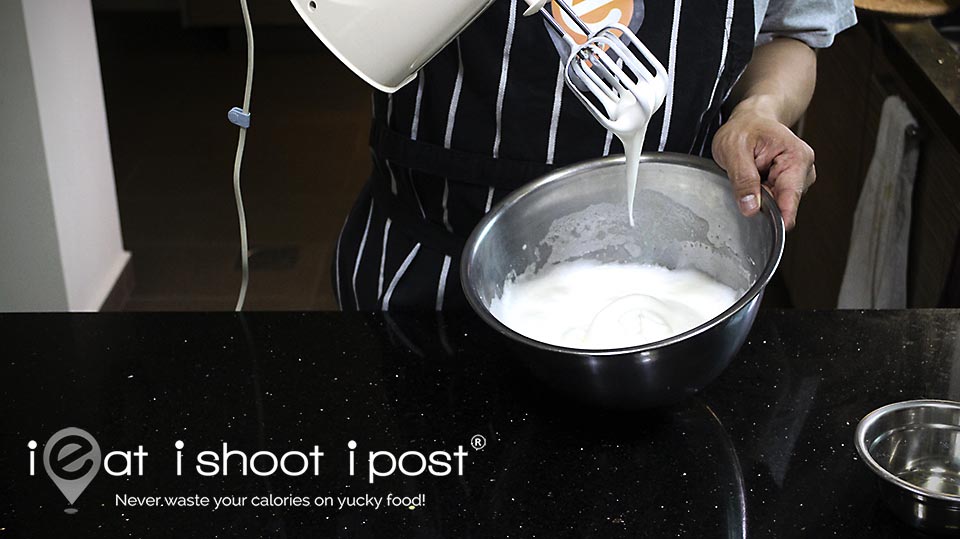
11. Whipping the Whites
The Japanese cheesecake is not like a chiffon cake where you want the cake to rise a lot and create lots of bubbles in the structure of the cake. It is light but still creamy and the bubbles remain very tiny. Don’t over whip the whites! If you get to stiff peaks, then your cake will break! I don’t even beat to soft peaks as I want a batter that is easily pourable. Somewhere just past the ribbon stage (the whites will form ribbons as it falls from the whisk) and before soft peaks where you get about 3 inches of whites left on your whisk after you lift the whisk out of the bowl for 2 seconds is just right. I don’t use my counter top mixer as it is too efficient and I often over whip the whites. A handheld beater gives you more control. Don’t forget the cream of tartar. It helps to stabilize the whites even through the baking stage. You are aiming for a meringue which is smooth and silky with a bit of sheen (from the sugar) that is easy to fold into the batter. It should not be lumpy at all. Err on under-whipping rather than over-whipping it as this cake doesn’t need so much air in it.
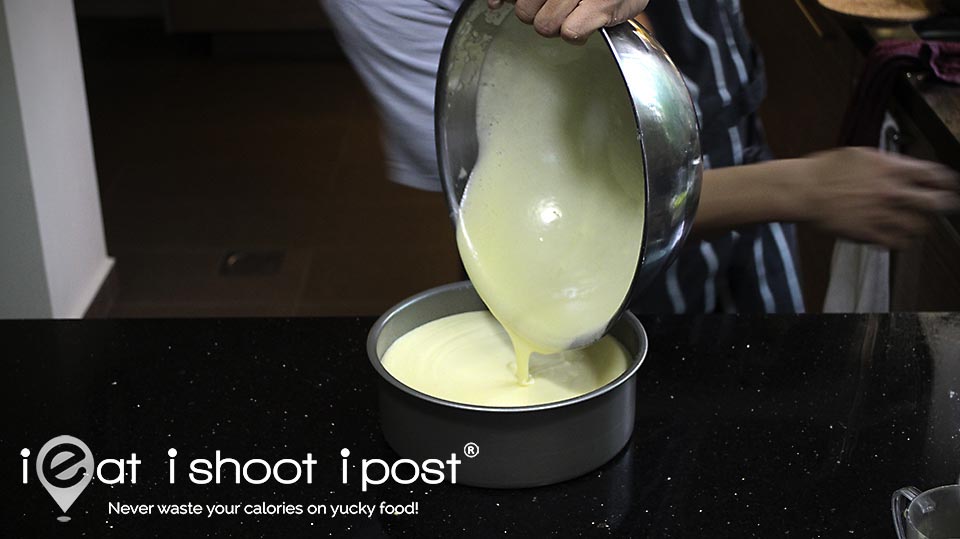
12. Filling the Cake Pan
Once the whites are mixed into the batter, you should have a batter with the consistency of thick potato soup and very easy to pour. You should not have to level the top with a spatula. It should just flatten out by itself. The batter should come up to 1.5 to 2 cm from the rim of the pan. You need at least 1.5cm for the cake to rise, so if for some reason you have extra batter (like you used 65g eggs because you never follow instructions!), don’t try to save it by overfilling the pan, just throw it away or you will end up with an ugly cake. Make sure you tap the cake pan on the table top sharply to release as many bubbles as possible! Bubbles will rise to the top during the baking and produce cracks!

13. Water Bath
You need to bake this cake in a water bath as the water will absorb the heat and provide a gentle, moist heat to bake the cake. Try to get another pan which is 1/3 larger than your cake pan. No one actually mentions this, but the amount of water you have in the oven actually matters! I found that when I used a big tray of water, it took a longer time for the internal temperature of the oven to rise to the set temperature. This makes sense since the more water you have, the more heat it will absorb! So use a pan which gives you about 5 cm of water all round the cake pan. I also found that it is useful to place a folded towel at the bottom of the pan in order to make sure you have a layer of water beneath the cake pan. You will be baking this cake at the lowest rack, so it is near to the bottom heating element. Placing a towel there will ensure that the temperature at the bottom of the pan never rises above 100°C. You should fill the pan with hot water. It doesn’t have to be direct from the kettle but it shouldn’t be cold. I usually use the water from the double boiler. The water should be about 1 inch high which means that it is 1/3 the height of the cake pan. It is important to have it high enough as it helps to keep the sides of the cake pan at a temperature that is close to 100°C. This prevents the sides of the cake from cooking too quickly which means that it will set before the middle of the cake. When that happens the cake will “dome” and if it domes too much it will crack.

14. Baking Times
Most online recipes say that you need to bake the cake at 160°C for 1 hour 10 mins. For my first few cakes, I found that my cake often rises too much and then cracks or deflates resulting in an ugly wrinkly top. I got so frustrated that I decided to put a temperature probe in the cake as well as the oven in order to know what exactly is happening in the oven. What I found was that at 160°C, the temperature of the cake would have risen to 75°C by the 40min mark, by around 50 mins it would be 85°C and the cake will rise exponentially, resulting in a very tall cake which might crack or even if it didn’t, will have a wrinkly top after it cools down. (Just like stretch marks after giving birth). I decided that I should bake this cake such that it rises as little as possible.
Normal whole egg will coagulate at 68°C. With all the other ingredients added, the coagulation temperature is around 80°C. So what we need to do is to come up with a temperature and timing which will bake the cake to an internal temperature of 80°C to 85°C. That would be when the egg proteins just start to coagulate. Stopping the cooking at this temperature should result in a cake which is more tender and moist. It is just like cooking a hard boil egg to 80°C as opposed to 100°C. Overcooked whites turn rubbery. I expect it’s the same when it is in a cake.
If we bake at 160°C, by 40 mins it will have an internal temperature of 75°C and when we turn off the oven, it will continue to rise and plateau at 81°C. But the problem is that the top will look pretty anaemic instead of having that bronzed South American suntan look. That is why I decided to pre-heat the oven to 200°C instead. Once the cake pan and waterbath is placed in the oven the temperature falls to 180°C and remains there for the first 18 mins. By this time the top will be slightly tanned. We then lower the temp to 160°C before the oven temp starts to climb again. By the 30min mark (from the start of baking), the cake would have risen by 1 – 1.5cm and have a nice brown domed top. The internal temperature of the cake at this stage is 75°C. That is when you turn off the oven and allow the residual heat to continue cooking the cake. The internal temperature of the cake should plateau at 81°C and the cake rise by not more than 2 cm before it starts deflating in the oven. By the one hour mark the internal temperature of the oven would have fallen to 110°C. This is when you open the oven door by 10cm (just slightly ajar, you don’t have to measure this!) for 10 mins. The cake would have already shrunken and pulled off the sides and ready to be de-panned.
Every oven is different, so you may have to adjust the timing to suit your own oven. Having an oven thermometer will help. As long as you keep the oven temperature at around 180°C for the first 18 mins and then lower it to 160°C by the end of the 30min mark, your cake should be cooked nicely.
NB: I bake with top and bottom heat, no fan force mode with the cake placed on the lowest rack. It works for my oven. You can try this first and adjust according to your own oven’s performance. An oven thermometer is a very useful instrument to have.
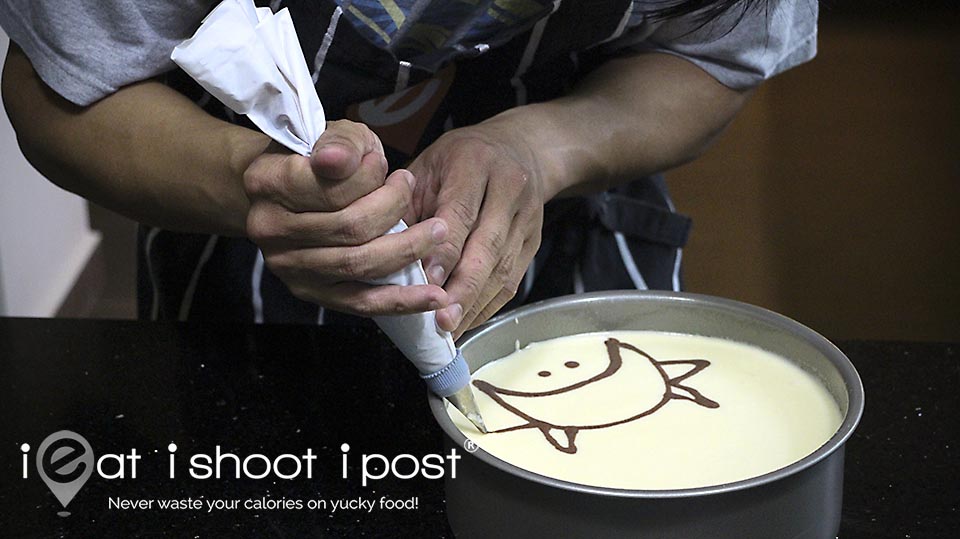
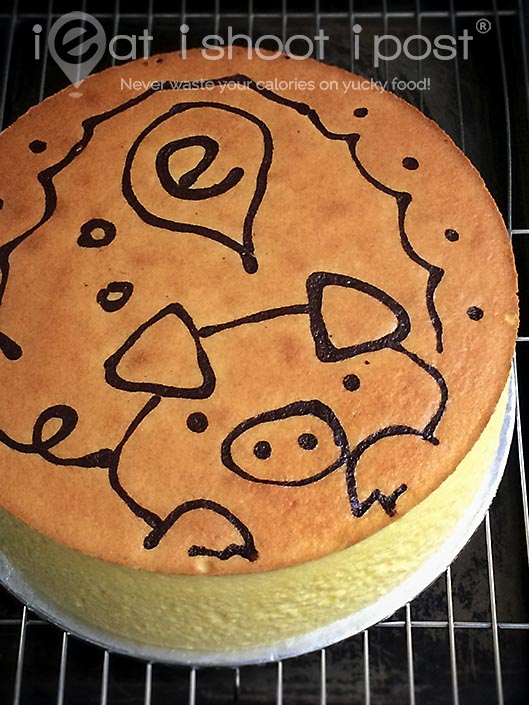
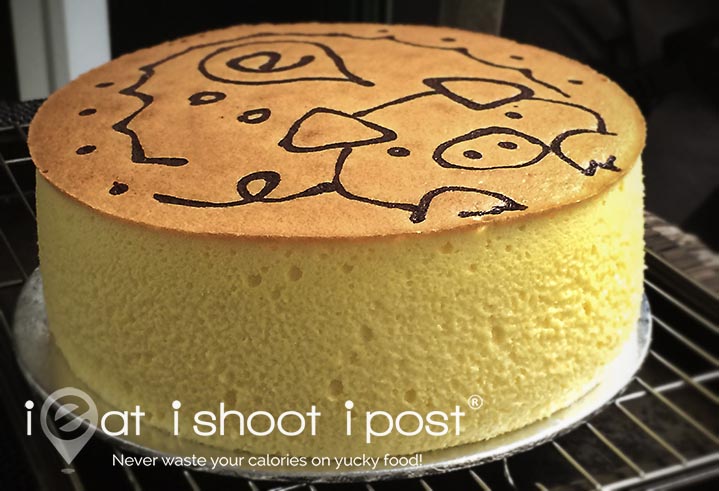
15. Drawing the Cartoon
This step is entirely optional, but I think it adds a nice personal touch if you are planning to give the cake as a present. All you need to do is to set aside some extra cake batter and mix it with cocoa powder. I use powder because it helps to thicken the batter so that it is easier to pipe. The dots are easier to do by using a satay stick dipped into the batter. Make sure you sift the cocoa powder to remove any lumps and mix well!
Since the shooting of the video, I have found a better way of drawing the cartoon. Instead of pouring out some batter and setting a side, just pour out the batter into your cake pan. Then instead of scraping the bottom of the mixing bowl, just shift some chocolate powder to whatever is left in the mixing bowl! This accomplishes 2 things. 1. If you did not mix the batter well enough, all the heavier batter will be at the bottom and if you scrape it and add it to the cake pan, it will sink to the bottom, resulting in a dense layer. 2. It is easier to sprinkle and mix the cocoa powder when it is already covering a wide area in the mixing bowl!
Instead of a piping bag, I bought a special silicone piping device which makes it so much easier than a piping bag. I bought mine at Takashimaya but I am sure you can find it at baking supply shops. You could probably do it with an empty squeeze bottle too!
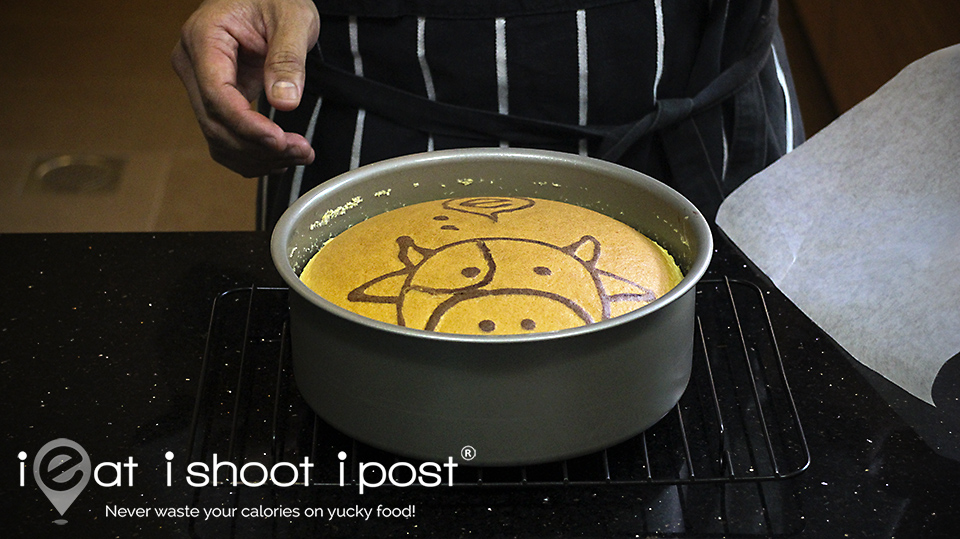
16. De-panning the Cake
If you have done everything right, de-panning should not be a problem. Just make sure you jiggle the cake to loosen it from the sides and de-pan when the cake is still warm and never do it after the cake cools in the fridge as the “skin” becomes damp and sticks to whatever you are using to de-pan it! The baking paper is just an extra guarantee to ensure the top of the cake does not stick to whatever you are using to de-pan the cake. (If the cake is warm, you don’t really need it)
16. Glazing the top of the cake
The cake looks best when it is just out of the oven. It needs to be aged in the fridge for four hours (better overnight) for its flavour to mature. But by that time the top will become wrinkly (It’s just like us humans!). In order to have a cake that looks good, you need to A. Take a photo of it when it is just out of the oven so that you can show the world how great your cake looks before it turns wrinkly, or B. Glaze it before it turns wrinkly.
To glaze you need apricot gel or glazing gel which you can buy from baking supply shops ie Phoon Huat, Bake King etc. Add an equal amount of water to the gel (1:1) and microwave it till it is boiling hot and stir till it becomes a smooth liquid and apply to the top of the cake while it is still warm. It is important to glaze it as soon as you take it out of the oven as the surface needs to be warm or the gel will just set too quickly. If it cools too much, heat the top with a hair-dryer to warm it up before you apply the glaze. Apply the glaze with as wide a brush as you can and do it with as few strokes as possible. (You will only get 2-3 strokes before the gel sets and further brushing will result in a rough surface) You will need at least two coats to give it a nice smooth surface.
17. Variations
Once you have mastered the basic cheese cake, you can then explore adding flavours to it. It can be as simple as using real vanilla pods where you scrape the seeds and add it to the batter during the yellow mixing phase or adding various flavour essences. Lavendar, Earl Grey flavour essences will work well. For a really Singapore version, you can do a Mao Shan Wang Durian Cheesecake! I have done this successfully and it is a hit with durian lovers! The flavour of the durian will fill the room and cause your guests to divide into two groups like the parting of the Red Sea! One group will be right next to your cake while the other will be outside the house! Here is my recipe.
To make the Durian version, simply puree 250g durian flesh with 100ml milk (This is the same 100ml milk in the original recipe, not an additional 100ml) in a blender. Then strain it and add this to the yellow team after you have mixed the yolks with the cream cheese. The rest of the steps are exactly the same. You can reduce the amt of durian if you wish. Up to 250g is quite safe as it has worked for me and results in a cake that is moist, yet light and fluffy with the perfume (stench to some) of durian to polarize your guests!
Conclusion
There you have it! Almost everything you need to know about baking the perfect Japanese Cheesecake! May you not have to go through the same heartaches I had to go through! Do let me know of your successes!
Acknowledgements
Many thanks to Chef Yamashita as well as all my numerous facebook fans for their valuable tips which have contributed to the success of this cheesecake recipe!
Success? Now try my Pandan Chiffon Cake Recipe!
Disclosure: This post was sponsored by Philadelphia Cream Cheese.
Some links above are affiliate links, meaning, at no additional cost to you, we will earn a small commission if you click through and make a purchase.
Other similar dessert recipes to try out:
Leslie’s Kueh Salat Recipe: Silky Restaurant Quality Kueh
Leslie’s Simplest Butter Cake Recipe
Fluffy Buttermilk Pancake Recipe
Japanese Durian Cheesecake
Ieat’s Overnight Yeasted Waffle Recipe
Simplified Croque Monsieur Recipe
Leslie’s Traditional Hainanese kaya recipe
1st revision: 4 Oct 2014


Awesome details tips. Will try and let you know the outcome
Hi Dr, I watch your video over and over again, just wanted to check, when did you remove the water bath? Saw you putting the pan with batter into the oven with the water bath and the next thing, I saw, you remove the cake from the oven and the water bath was no longer in the oven?
Oh, haha, I just remove the waterbath after the entire baking process! ie I take the whole thing out of the oven and de pan the cake.
That means after you turn off the oven and leave cake in the closed oven for 30mins and then open the door of the oven slightly at the end of the baking for 10mins for cake to cool ,the water bath still in the oven?
Yep!
and consoling you that the cake still tastes good despite the way it looks.
Amazing deciphering of the souffle cotton cheesecake! Thank u for sharing all the learnings and saving avid bakers alot of misery. Your entries are always so awesome!
Thanks!
Hello Leslie!
Thanks for sharing your recipe! Tried the recipe and it seems like my cake split into two layers, whereby the top was the light fluffy texture and the bottom later was this almost soft cheddar like consistency.
The way it looks is almost like it’s a fluffy cheesecake with a springy base.
Could it be that I didn’t fold the whites and cheese mixture well enuff?
Followed the recipe to almost a T, except for adjusting maybe a couple minutes of timing due to oven heat.
Thanks in advance Doc!
Here’s how it looks like
You probably did not mix the yellow and white together properly.
great recipe.. definitely a keeper!
My first Japanese cheesecake with your technique. The top(no dome and no shrinkage) is wee bit more golden than yours, will need covering with foil. However would you be able to tell me how to avoid the dense base? Thank you for your perseverance xx
LouiseK
I think the dense base is due to the inadequate mixing of the white and yellow. Make sure it is well mixed. I found that a lot of the yellow batter tends to sink down to the bottom during the folding stage, so be sure to scrape the bottom of the bowl when you fold.
Can i not use lemon juice at all or can replace with something else? I have tried with another person recipe and as i using a small oven, photo is my result, little eggy dense bottom but overall is moist and fluffy (not very fluffy though). After fridge overnight, it looks better. Please help. Thanks
You can omit the lemon juice, not a problem. I can’t really help you if you are using another person’s recipe, cos I don’t know what happened.
Hihi sorry. Failed 2nd attempt. Looks worse than 1st and not sure why as I used waterbath and use oven temp 150 deg C bake 1hr 20mins. Took out water bath last 12 mins and bake with 130 deg C bottom heat to ensure base is cooked. Pls see photos.. I used same recipe less 20g sugar and less lemon juice only. Pls help. My oven is cornell brand and small. Used oven thermometer to ensure its at 150 deg C with waterbath n cake in before start baking too. But actual oven adjusted to 200 deg C when internal oven is 150 deg C with waterbath. Hope I’ll be encouraged to try 3rd attempt. Very sad with the deflated and ugly cake. Thanks in advance for help and advise.
You should just follow the recipe as written in the blog. Don’t reduce sugar or adjust anything. Once you succeed with the exact recipe, then you go and make adjustments.
Hi Dr Tay. I just tried following your recipe, omitted only lemon juice and used Top flour.everything followed and used preheated 200 deg C but when open to put waterbath and cake, temp drop to 180 deg c and I bake at 180 deg c for 15mins as my small oven n gets hot easier then 160 deg c for another 15mins using oven temp To monitor. Then let it continue 30mins with oven off. And let it cool 10mins. I got a nice brown top, no cracks, cake didn’t raise high and didn’t shrunk much but still got a dense layer of egg on the bottom abt 1/2 cm. I’m using aluminium whole piece 20cm cake tin as i cannot find 3″ height and cake is quite short now. Lined sides and bottom with brown paper and use a 23 x 23 cm square tin put cloths inside n cake on top and hot water in slightly about 1cm high on cake tin. Really not sure where went wrong. Pls see photo. Thanks. P/S: my nice brown top stick onto my place when I turn to remove brown paper. Hmm..
Pls see photo. Thanks
Its your oven, unfortunately. Can you try to bake it in a friend’s place who has a proper oven?
Hmm. My friends don bake unfortunately and seems only cotton jap.cheesecake giving me problems. I’ve tried pandan chiffon, vanilla choc walnut chiffon, egg tarts, choc chip cake with no issues. Really hope to make this cake successful but really no luck. Hope anyone who uses small oven and make this cake successfully help me please. Much appreciated. . Thanks in advance.
Dr Tay, is it because the mixing part underMix? I made sure no white streaks n did scrap from bottom up but scared over mix so I stop once I see not whites. How can I make sure I mix it correctly- no under or over mix? I’m prepared to try the 4th time and really wanted to perfect this cake. Hope to hear from you soon. Thanks
Don’t overmix or else you can cause the bubbles in the eggwhite to deflate. If you undermix, then the yolk will sink to the bottom, also no good.
Sorry, the pics didn’t come through the previous post, here they are. Thanks!
LouiseK
It is also ver important that you mix the yellow and white together properly. If the yellow is not mixed properly with the whites, they will sink during the baking process and produce that dense layer.
Ok, noted, will definitely incorporate all of your suggestions. Thanks for taking the time to reply!
Eh…I should have read this prior to making the cake. Mine came out separated. Fortunately, the top layer is perfectly fluffy and delicious. Oh well, now I have good excuse to bake another one!
Yes, try again!
Hi
Can Japanese cheesecake wrap with fondant?
Don’t know!
It can, I made my husband this cake and cover it with marshmallow fondant..
My first Japanese cheesecake with your technique. The top(no dome and no shrinkage) is wee bit more golden than yours, will need covering with foil. However would you be able to tell me how to avoid the dense base? Thank you for your perseverance xx
LouiseK
It looks like the top heat is too hot and the bottom is too cold. Did you place the rack at the bottomost rack?
Yes, on the lowest rack as per your instruction. Perhaps I should lower the temp by 10C and covering the top after the right amount of browning. Also thinner cloth in the water bath. Will try again today and see what happens! Thanks, Leslie xx
My baking tin is the push-up ie removable base type. Can still be used in water bath?
Yes, but you will have to make sure it is waterproof by using 2 layers of heavy duty aluminum foil.
Do I put the aluminium foil below or inside the pan?
Wow, I never tried it before, so if I were to attempt it, I would put the paper cups in a muffin tray, put the muffin tray in the waterbath and lower the oven temp from 200 to 160 earlier. Maybe 5 – 10 mins so that it doesn’t cook too quickly. Alternatively, you might want to try cooking at 160 for 20mins and then brown the top quickly by placing it on the upper rack and turning up the top element to 200 for 3 mins or so. I am only guessing.
Thanks so much for your words of encouragement!
Excellent! Great job! Your cake looks fantastic!
No fan force! Absolutely not! I better pen it in! Thanks for your comment!
Your ingredient index show 70g sugar in the yellow team and another 70g sugar in the white team, but step 5 of method only stated to add half sugar, so what happens to the other half? Or should the amount of sugar be 35g yellow team and 35g white team?
Total amt of sugar is 140g. 70g to the yellow and 70g to the white.
Hi Dr ,
My question is the same as mabel’s regarding the amount of sugar needed for the yellow and white respectively. As per your instructions, we only put in 35 g of sugar into the yellow batter. The remaining to the white. But the recipe calls for 70g sugar for yellow and 70 g for white. Can you clarify on that ? Thanks!:)))
70g to white, 70g to yellow. Total 140g. When I did the video, I measured 140g into the one bowl and added half to the yellow. Sorry for the confusion.
my 2nd attempt, this time it didnt crack! yippee! i adjusted the baking times to 12min – 200degrees, 18min 160 degrees, 20min – closed door, 5min- 200 degrees to brown the top, my oven like cannot brown the top evenly sigh…. the drawing batter was a bit too runny, might hv to thicken it on my next try…
btw how do you slice the cake with so nice sides? i tried to slice it with a palette knife but the sides gets messed up when i take the knife out… 🙁
Dip the knife into hot water, wipe dry with a paper towel and repeat after each slice!
Nice cake btw!
Use dental floss, not mint flavor! Hold it taut and cut straight down thru whole cake, making three cuts for 6 servings, or four cuts for 8 wedges.
Thanks for the tip!
how do i post the pic??
pic
photo
Following the baking instructions to bake at preheated 200 degrees oven for 18min, lower to 160 degree C for 12 mins. Few questions I nee your advise Dr.
1.) Do I use top heat + down heat with fan or without fan?
2.) Do I use top heat + down heat through out the baking process?
Top and bottom heat, no fan force throughout the baking process.
All the best! Thanks for your comment!
I never tried low fat milk before, so I can’t really tell you.
Its not supposed to be like that. You need to get an oven thermometer and measure the internal temperature of the oven and adjust accordingly.
Hi, mine turned out really nice. The top didnt crack at all. I followed your step by step instruction but right after the last 10 minutes where I should leave the oven door ajar, i sliced the cake. The bottom and sides are nice and spongey, but the inside is still a bit wet. Is this ok? I put it in the fridge, hopefully the texture will improve after it is cold. Thank you for the great recipe! I also love chef Yamashita’s recipes!
That looks really good! Maybe you can increase the cooking time a little to get the inside less wet. It is supposed to be a little moist. Best is to leave int the fridge.
Yes, it has to be refrigerated and can last 3-5 days in the fridge.
As long as the internal temperature is the same as the convection oven, I guess.
Thanks for sharing. I will go back and edit the instructions. Keep trying! Your next cake will be perfect!
Hi Dr Tay, I tried to bake this cake twice over the weekend and it was a disaster. Key issue I have was that the bottom half of the cake was steamed rather than cake like baked. Have you encountered this problem before? Could it be because I have put too much water in the water bath? Also, I used a loose base cake tin as I couldn’t find any light coloured fixed base 8 inch cake tin in New Zealand (believe it or not). I finally found one that is black. Is it worth a try? Or should I get an aluminium fixed base cake tin? Which is of less risk? Appreciate your suggestion! Cheers!
Sounds like water got into the pan! Yes, it happened to me once!
I wrapped with aluminium foil and a plastic sheet out and I did not see any water inside though.
Also, are you able to advise whether I am better off buying a black non-stick or aluminium fixed based cake tin? I really don’t like the idea of using loose base cake tin.
Cheers!
Aluminum fixed non-stick pan! You should also get an oven thermometer so that you can monitor the internal temp of the oven. Maybe your oven is not hot enough.
Thanks Dr Tay. I did have an oven thermometer and use that extensively. If I get the aluminium fixed non stick pan, does that mean that I will have to line the sides or would buttering the side and dust with flour help?
I have already discussed this in the post! You should go back and read it.
I did read that but I think I got confused now with the aluminium pan. I am afraid I might have ordered a no non-stick aluminium pan but guess I will see when I receive the pan. Thanks a lot.
Hi Leslie, this was my 3rd try, making the durian flavored cheesecake! I did not manage to find fresh durian so had to make do with durian essence. What do you think?
Big thanks for sharing this great recipe!
Looks good! How did it taste?
The durian smell is there but flavor will be better if I used actual fruit. This is a picture of the whole cake, can I ask if yours looks like that after it cools down?
Thank you so much for this awesome.recipe and detailed explanation for each step. I am lousy in the kitchen, don’t even own a proper oven, used a microwave convection for this. Started cos I had 2 blocks of philly cheese in the fridge that needed using. Saw your cute cake, so thought I’d try. Told myself while I can’t bake, I can follow rules and directions
Wow that is a fantastic effort! Well done!! Looks better than mine!
I used a dark coloured pan from phoon huat and low fat milk. No issues for me
Usually that means that you did not mix the white and yellow together well.
Hi. Did a 2nd attempt yesterday and it turned out well. Thank you for ur detailed recipe.
Well done! I am sure Dad was really surprised! You can buy frozen durian puree at 717 Trading.
Thanks for your feedback. I used a light aluminium pan and did not need to cover with foil. Was yours a springform? If you use a springform pan, you need to wrap aluminum foil around it and that negates the effect of the dark colour pan.
Thanks for sharing this recipe. My first attempt base on your recipe is very successful. Cheers!
Wow, that is a beautiful cake!! Thanks for your feedback!
I didn’t modify as this is my first attempt base on your recipe so I try to fully follow your instruction. I may try put durian version when the season cones. Thanks a lot!
How come mine top comes out flat? And not done shape, My picture won’t thru I think it above 2 mb required ( how do I trim size ), anyway…
Hi I’m trying to bake a soufflé jap cheesecake using steam bake method..
Can these 2 method, steam bath or water bath method, interchange?
I don’t really know since I have never tried. The only problem is to get the top to brown.
Also my soufflé cheesecake is still wet even after an extended baking time of over 20 mins at 150 deg. The top has cracked and I continue baking but covered the top.
Read my post and follow exactly every step.
Hi Dr. Leslie,
This happens to my Jap Cheesecake. I follow thru your instructions. I saw a hair line crack in the middle at the 22nd minute of baking time then it erupted. No choice then I switched off the oven at 28th minutes. I left the cake in the oven for 30 minutes, keep door ajar for 10 minutes. What would be the cause of it?
You are using a dark coloured baking pan! I mentioned this problem in my post! 🙂
Noted. Will source for the light color pan. This is really science.
thank you very much
Um. I used the same dark coloured pan thrice (7 inch nonstick from Redman, fixed bottom) and my cake did not crack. I don’t know why your cake cracked but tbh i don’t think it’s the dark coloured pan……
Ok Redman sold it as a 7 inch pan but when i enquired at the counter the woman whipped out a measuring tape and the pan measured 8 inches 😡
Hi Leslie, I tried your recipe for the first time a couple of days ago to the T but when I poured the batter into the cake tin it was really bubble, unlike yours. I folded and didn’t mix the egg whites in. When I turned my cake out, it cracked from the bottom. What would be the cause of that? :O but within 24 hours of baking it, it was gone! My sis didn’t even get a slice!
You need to make sure you don’t introduce too much air into the batter when you fold! Well, at least now you have an excuse to make another cake!
Dr Leslie – I think yr post has caused a run on 8″ baking tins – Phoon Huat is all sold out!!
If only I got paid a commission!
I made mine today for the first time and it tasted exactly like fiesta cheesecake. Thank you so much for the detailed guide on how to bake a perfect cheesecake!
Thanks for letting me know! I am very encouraged!
hi doc, a couple of questions
1. why not add the lemon juice into the whites instead of the yellow team? maybe you can do away with the cram of tar tar that way?
2. what happens if you over beat the whites?
1. You can try and let us know!
2. If you overbeat the whites, the cake will tend to crack.
Hi Leslie, would like to ask how would the temperature and duration be like if I bake the same cupcakes liners?
I haven’t tried it yet so I can’t really say!
Finally I found the proven science behind the beautiful Japanese cheesecake. My first attempt turned out to be amazing! Thank you for solving all the myths that I’ve been struggling with for very long time. I stopped baking cheesecake for a while cause it’s so painful to see it rise n fall n wrinkled up. I love your great tips and I’m using them to draw reference & learnings for my deflated Ogura cakes! Hope I can fix it soon.
Thank you for solving all my myth about the perfect Japanese cheesecake. My first attempt turned out to be wonderful! Top a bit too brown as small oven & too close to top heat. I’ve tried many times of different recipes before this. I stopped baking it for a while cause it’s a pain each time to see it rise & fall & wrinkled up. I love your wonderful tips and perhaps can draw learnings to fix my deflated Ogura cakes!
Thanks for your encouraging feedback!
Left out the pictures in earlier comment. Yet to slice it, hope it’s good inside.
Hi Dr Leslie, my oven ‘Teka’ is unable to turn off the fan force. Do you think with the fan force on, it will affect the end result? Thanks.
Yes it will. You may have to set your temp 20 degrees lower than what I recommend.
I was attracted by the great photos from your receipe. I believe this receipe which with nicety picture presentation will lead me to the correct way. I am right! I used a 7″ square cake tin and water bathed in a much more bigger tray that with uneven space around cake tin, and I adjusted the temperature a little bit as my oven only has fan forced option, 180 for 18minutes and 140 for 12 minutes, turned off oven and left in oven for 40 minutes. However as my first attempt, the result was far more better than I expected. My husband was impressed by the taste of the cake! Thank you very much for the awesome receipe and the detailed tips to avoid fail.
I was attracted by the great photos from your receipe. I believe this receipe which with nicety picture presentation will lead me to the correct way. I am correct! I used a 7″ square cake tin and water bathed in a much more bigger tray that with uneven space around cake tin, and I adjusted the temperature a little bit as my oven only has fan forced option, 180 for 18minutes and 150 for 12 minutes, turned off oven and left in oven for 40 minutes. However, as my first attempt, the result was far more better than I expected. My husband was impressed by the taste of the cake! Thank you very much for the awesome receipe and the detailed tips.
That’s a lovely cake! Congrats and thanks for writing back! Very encouraged.
Thks for your selfless sharing! Here’s my creation
Well done! Looks good! Thanks for taking the time to post your pics!
My first attempt and we used half the recipe as an initial experiment. I’m really surprised by the colour, texture and taste. I expected it to flop but it turned out pretty well!
Well done!
Thank you so much for your recipe! My mum and I tried it for the first time and it came out nicely.
That’s wonderful! Thanks for letting me know!