

I have been wanting to write a proper Pizza recipe post ever since I started experimenting with pizzas three years ago but never really got round to it. This time round, I managed to finally get it done. The motivation came in the form of my new SMEG Pizza Oven which made it possible for me to finally make a pizza the way I want to at home.
The problem with making pizzas at home, or anywhere else for that matter is the problem of how to bake it. The conventional home oven is not suitable for making a real Napolitana style pizza principally because the oven is not hot enough and it doesn’t have a hot surface where you can place the pizza to cook. So in order to simulate the Italian wood fired pizza oven, you have to buy a pizza stone, place it on the oven rack and heat it up for an hour before you can put your pizza on top of it. For a while, I was doing that. It was fun and we had great pizza parties, but after a while I felt that the stone took just too long to heat up and the heat was not consistent. It was then that I discovered the GFerrari Pizza oven. This handy little home appliance can heat up to 300 degrees Celsius and the bottom stone heats up in 10 mins. It worked well and I had fun with it. But the problem with the GFerrari is that I don’t get to use the Pizza peel to shovel the pizza onto the stone. Furthermore, if you place the pizza wrongly in the oven, it is a real disaster that is difficult to remedy.
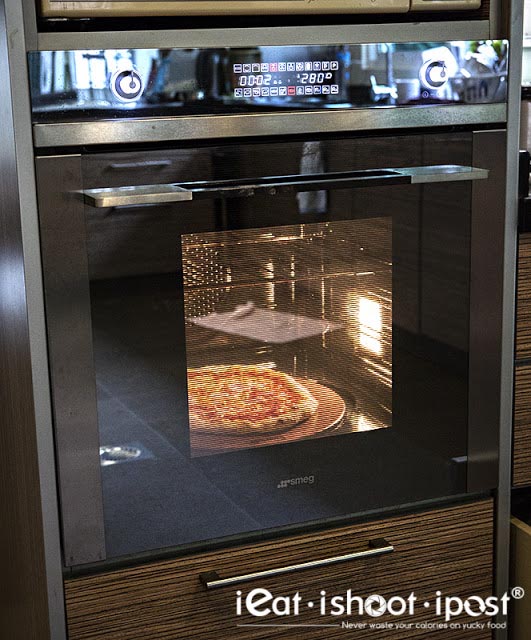
So pizza making took a backseat until this year when I discovered the SMEG Pizza Oven. This oven is pretty much a typical home oven but for one very important modification. There is a lid at the bottom of the oven which can be removed and a round pizza stone can be placed directly on top of the heating element effectively turning it into a hearth oven! The stone takes 10 mins to heat up to 280 degrees and its able to bake a pizza in 4 mins! Not exactly Vera Pizza Napoletana standards (90 seconds) but its pretty darn good for home use.
So the the last 2 months I have been using the SMEG Pizza Oven happily. Now I don’t have to wait an hour to heat up the pizza stone and I can shovel my pizzas in and out of the oven like a real pizzaiolo! The oven is able to keep the stone heated consistently and I have been able to make pizza after pizza in four minute cycles!
Pizza making is simple but only when someone tells you exactly what you need to do. My friend Damien and I have been playing around with the four basic ingredients of flour, water, salt and yeast for the last 3 years and although the ingredients are simple, there is a lot to learn in terms of the proportion, timing and fermentation of the dough! So after many trials and errors, I am going to present to you today a simple but full proof recipe which is going to make you wonder why you would want to go out for pizza in the future!
The most important component of the pizza is the dough. Anyone can buy great ingredients and throw it on top of a pizza. But the real pizza connoiseur judges a pizza by the dough. As far as I know, no one really ferments the dough for more than a day in Singapore. But when you make your own dough, you can ferment it for 2 to 5 days and allow the yeast and bacteria to mature and produce lots of aromatic esters and umami flavours!
In order to make great pizza, you need to plan ahead. You can make this dough in 3 hours, but nothing beats a dough that has been fermenting for 2 days. So plan at least 2 days ahead!
Ingredients
600g Plain Flour
Salt 2 tsp
Sugar 1 Tbl (optional – helps the crust to brown)
Water 360ml
Yeast 1/4 tsp
Notes:
1. I use Prima Flour because it is the same as the commerically available Ikan Terbang flour produced by Prima Flour Mills. Ikan Terbang flour is used by many pizzarias in Singapore and is also used for Roti Prata. It is very elastic and stretchable which make it suitable for these two dishes. If you want to have a heavier more toothy dough, you can use 300g Plain Flour and 300g Bread Flour. Sometimes I use 450g Plain Flour with 150 Canadian High Protein Flour. They will all work but give you differences in texture and taste. Experiment with it once you have mastered the basics!
2. I am using 60% hydration in this recipe ie the weight of the water is 60% that of the flour. It makes for a relatively wet dough which is essential when you are baking in a home oven. The pizzarias use high temperature ovens which can bake a pizza in 1 to 2 minutes, so they can have a dryer dough. When you have to bake your pizza for four minutes or more, it is important to have a wet dough which doesn’t dry out with the longer baking time. Once you have mastered the basics, try pushing the hydration levels to 65% and 70%. The dough is a little more difficult to handle, but the texture of the pizza is better!
3. If you are going to be using the dough after 3 hours instead of 2 days, then increase the amount of yeast to 1 teaspoon. Instant yeast works fine and you don’t have to activate it by mixing it with water. And yes, you can just add instant yeast and salt together and mix it into the dough!
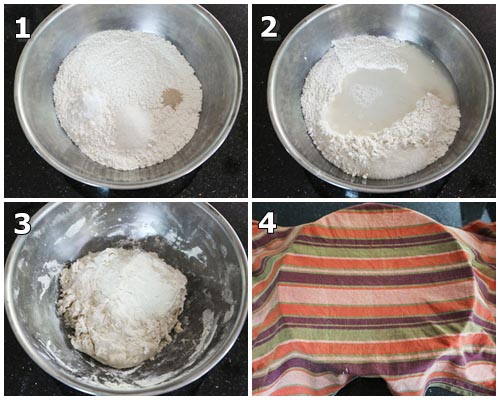
1. Place all the ingredients in a bowl
2. Create a well in the middle and add the water
3. Mix all the ingredients together until it is a rough ball (Just combined)
4. Cover with damp cloth and wait 20 min (allows flour to absorb water properly)
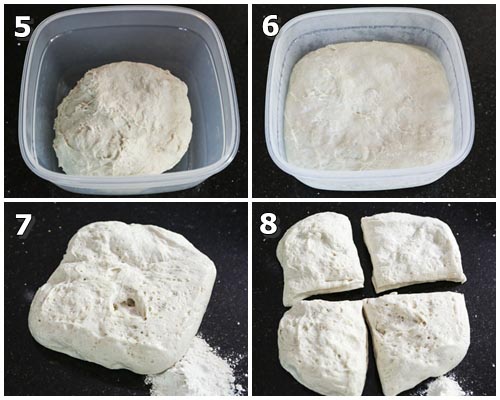
5. After 20 mins take out and knead for about 5 mins by hand or kitchen mixer (low speed – kneading hook). You can also use a food processor to process the dough for 1 min. The kneading part is not critical if you are leaving the dough in the fridge for two days as the long fermentation will encourage gluten formation. Some people don’t even knead the dough if they are doing a long ferment (Check out Jim Lahey’s no knead bread recipe). But I find kneading it makes it a little more resilient and easier to handle.
6. Now leave the dough in the fridge overnight in a lightly oiled container.
7. The next day it should have risen.
8. Now you can divide the dough into four pieces and ball it. Start balling it one day before you plan to make the pizza. I like to do this because after you ball it, it takes around one day in the fridge for it to rise nicely. If you ball it too early the dough can rise too much. You can even ball it 3 hours before you plan to bake the pizza. It takes around that time for the dough to rise depending on temperature and humidity. 3 hours is quite safe for Singapore’s weather condition.
Balling the dough
This video will show you how to ball the dough. Just make sure you pinch the bottom properly or you will end up with a weak centre when you shape the pizza.
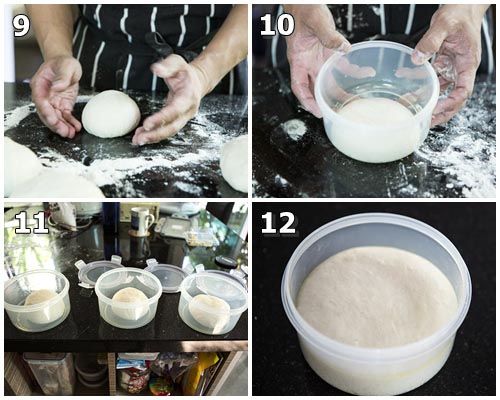
9. Balling the dough
10. Place the dough in a lightly oiled 1 litre container
11. Ready to be placed in the fridge
12. The next day it should have risen nicely
Shaping the Pizza
Here is the video on how to shape the pizza. Don’t imagine yourself throwing it into the air like how they do it on TV. That is only for show! To make really nice dough at home, the oven is not so hot, so the dough needs to be wet. So it is more delicate and really only needs a few stretches to get it to shape. Make sure you work on the rim of the pizza, that is what the Italians call the cornicione and it prevents the ingredients from spilling off the edge of the pie!
Oh, I forgot. You should of course heat up the oven before you start shaping the pizza! If you have a SMEG Pizza Oven, it only takes 10mins. (Big smile). If you are using a conventional oven with a pizza stone, give it at least an hour to heat up or get yourself a infrared thermometer to measure the temperature of the stone. (You can buy these from ToTT or Sia Huat. They cost around $140)

For the tomato sauce, I use canned whole tomatoes. If you really want to impress go buy a can of San Marzano D.O.P. It will cost a bomb and you have to make a special trip to the specialty grocery shop. I usually just buy the canned tomatoes from the supermarket. (Italian brand Cirio is good) All you need to do is to crush the tomatoes using a blender or you can even just use your hands. Add salt and sugar to taste. If you wish to add some oregano or Italian herbs, that’s fine but I don’t. Damien likes to add a splash of balsamic vinegar to give it some kick. Sprinkling the parmesan cheese will give the pizza its umami boost. It is critical what kind of parmesan you use! If you need to impress your mother-in-law-to-be (M-I-L-T-B) go buy some Parmagiano Reggiano. If you are just cooking for your kids, the packet variety at the supermarket shelves is fine!

I like to bake my pizza for two to three minutes and then take it out, add the mozzarella cheese and then finish it with an extra minute in the oven. That is because mozzarella is most chewy when it has just melted. If you cook it too long it loses that quality. If I use shredded mozzarella, I like to clump it together to slow down the melting process. When possible, I prefer to buy blocks and cut them into 1.5cm cubes. That helps to slow down the melting process and make it more chewy. As a rule, Danish mozzarella is better because it is made from milk and is more creamy. Australian mozzarella can sometimes be made from reconstituted milk powder. I usually buy Arla as it is widely available. Of course, if you need to impress your mother-in-law-to-be(M-I-L-T-B), then go buy some fresh Italian buffalo mozzarella (mozzarella di bufala). It’s darn expensive at Cold Storage ($9) so make sure the receipt is strategically placed so that she will pick it up and start planning the engagement party. You can buy them cheaper at the Foodies Market Place in Tiong Bahru. (around $4.50)
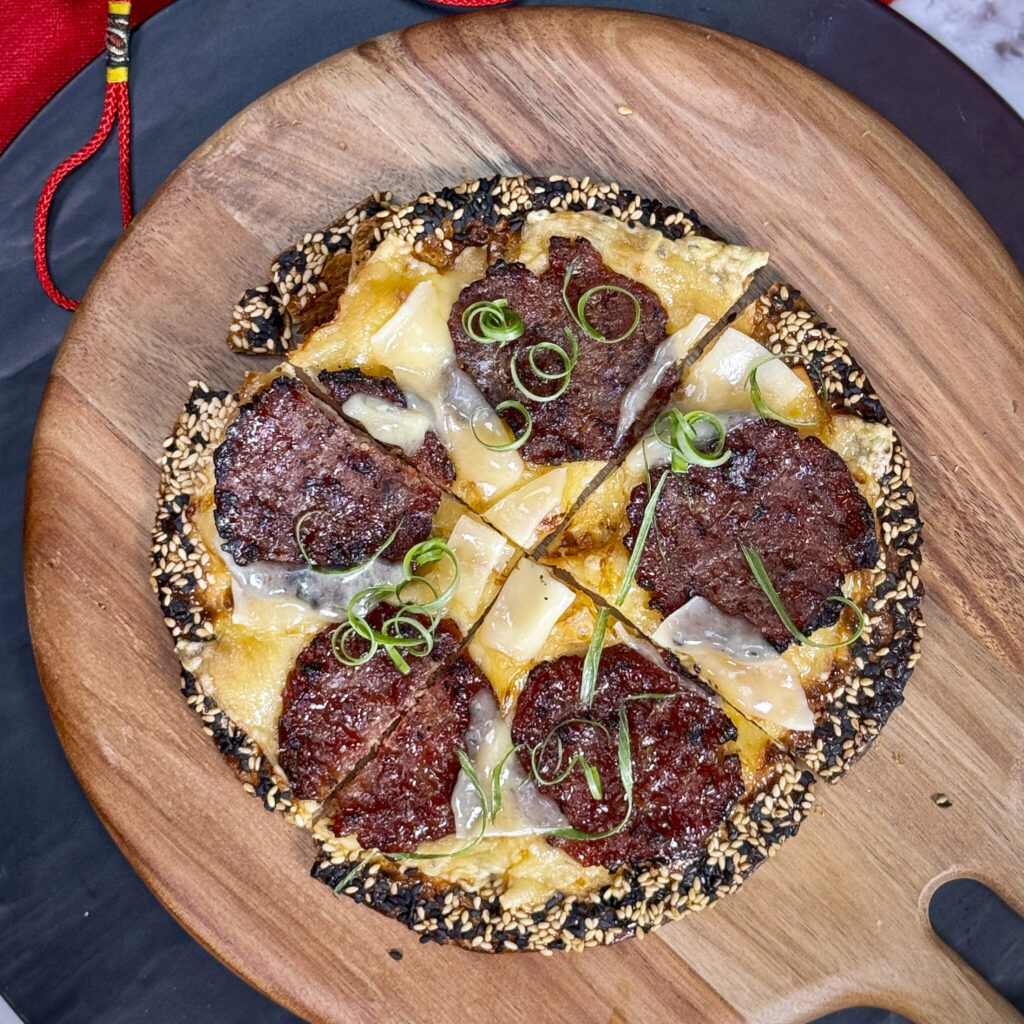
The rest of the ingredients is really up to you! Parma ham, rocket salad, salami, furikake, pine nuts, chorizo, chicken rice, sio bak… the sky is the limit!
Well, I hope I have given you enough info to get you started on your own pizza journey! Making your own pizza is very fulfilling and it is something everyone loves. Once you have mastered the dough, you can get all your friends over and ask them to bring their favourite topping and have a pizza pot purri party!
If you are in the market for an oven and may want to use it to make pizza, then I highly recommend the SMEG Pizza Oven! I have been using it for a few months now and it works very well! You can view the oven at:
APS Lifestyle Gallery
9 Muthuraman Chetty Road,
APS Building, Level 1 & 2
Singapore 238931
Tel: 65 62330593
This post is sponsored by APS Lifestyle Gallery
Disclosure: Some links above are affiliate links, meaning, at no additional cost to you, we will earn a small commission if you click through and make a purchase.


Hi may i know when you put the dough in fridge, is there a specific temperature that you observe ? Or simply the normal fridge temperature in Singapore that is around 3 degree Celsius? Thank you.
Just your normal fridge temperature of 1-4 degrees.
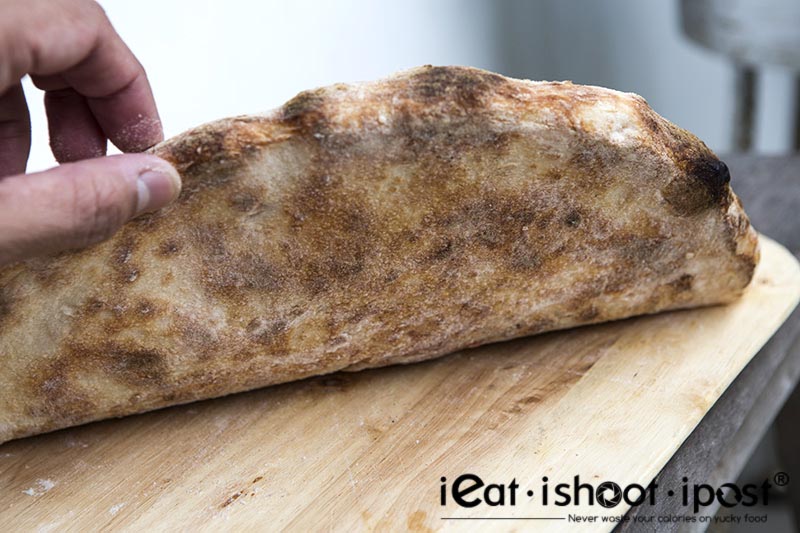
wow doc, that’s a really nice bottom on the pizza! Can the SMEG oven deliver that bottom?
Yes, it can. But it was years ago that I used the SMEG pizza oven. Now I use the Breville Pizzaiolo which is the best home oven for pizza so far.