

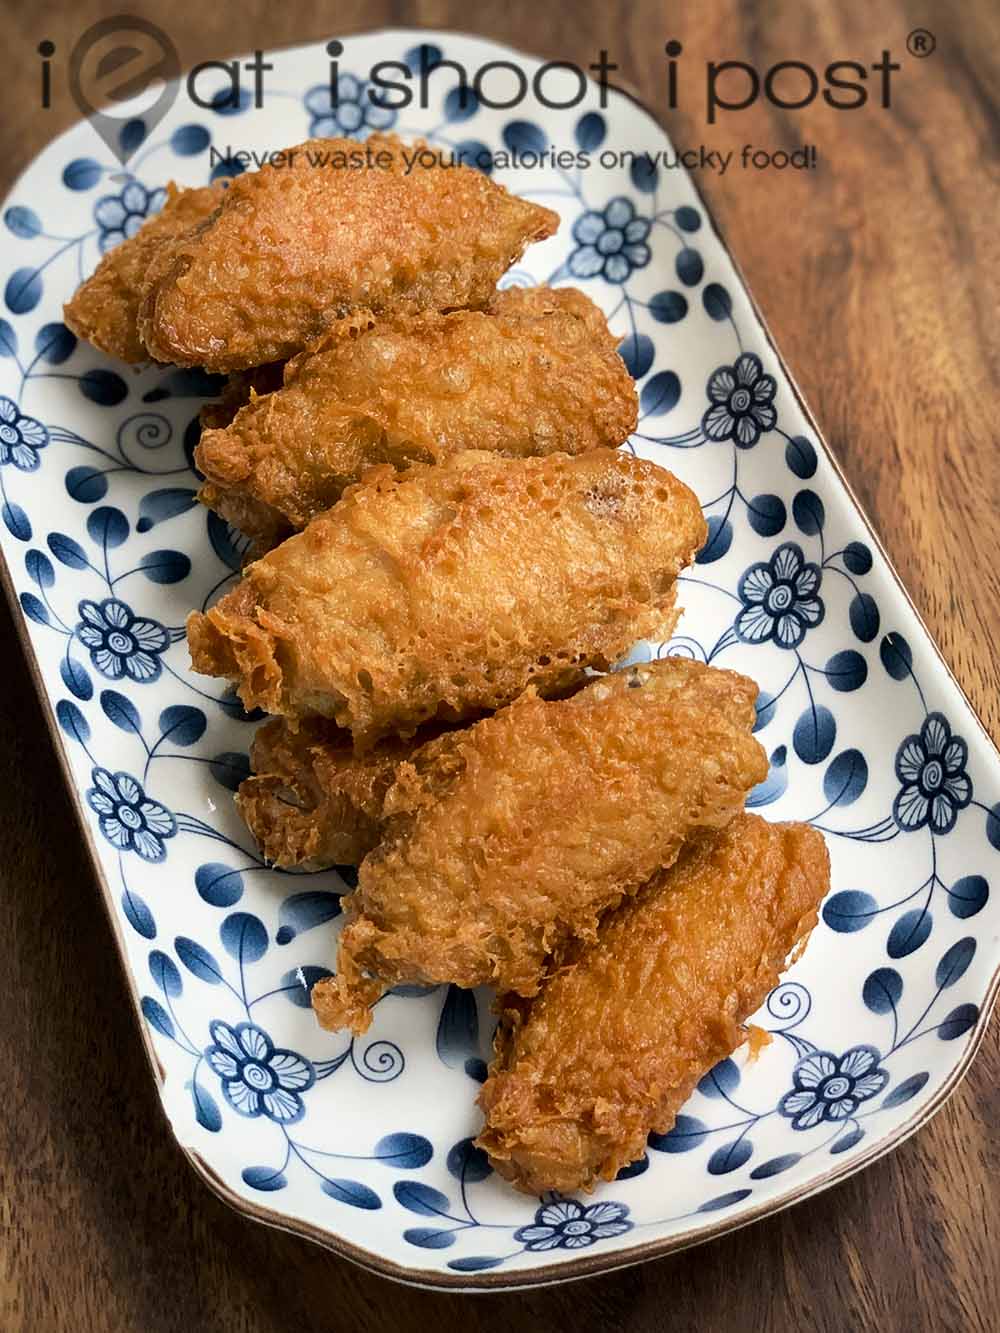
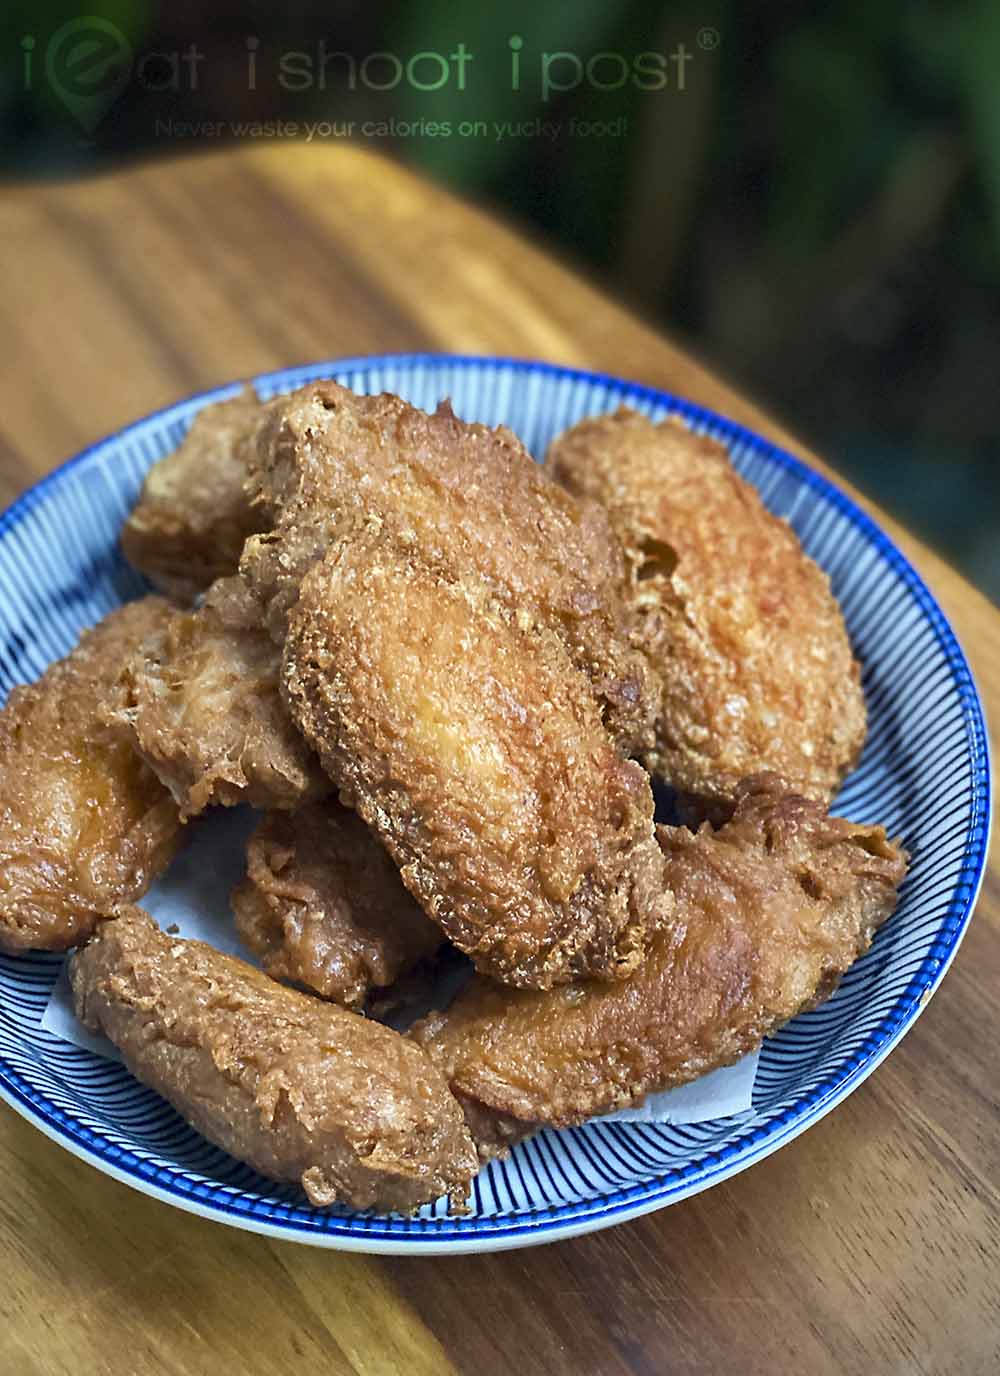
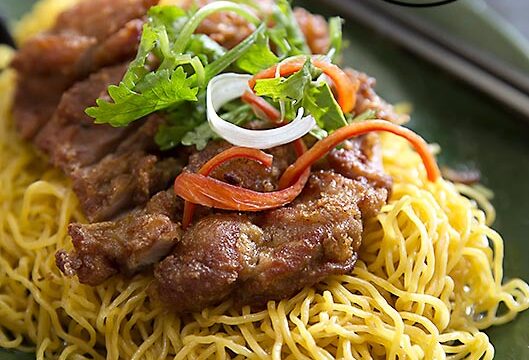
Delicious Har Cheong Gai recipe
Har Cheong Gai (prawn paste chicken) is one of those dishes that Singaporeans all love but is little known by tourists coming to our island city. Indeed, if you ask any westerner if they would like to try chicken that has been marinated in a putrefied prawn paste, I think they would probably think you are pulling a fast one on them. But for those of us in the know, Har Cheong Gai is the epitome of fried chicken wings. Plump and bursting with umamilicious juices on the inside encased in a shatteringly thin and crisp crust, it is hard to imagine how fried chicken wings can be any better! So, I’ve decided to share my har cheong gai recipe with you!
My Journey of finding the perfect har cheong gai recipe
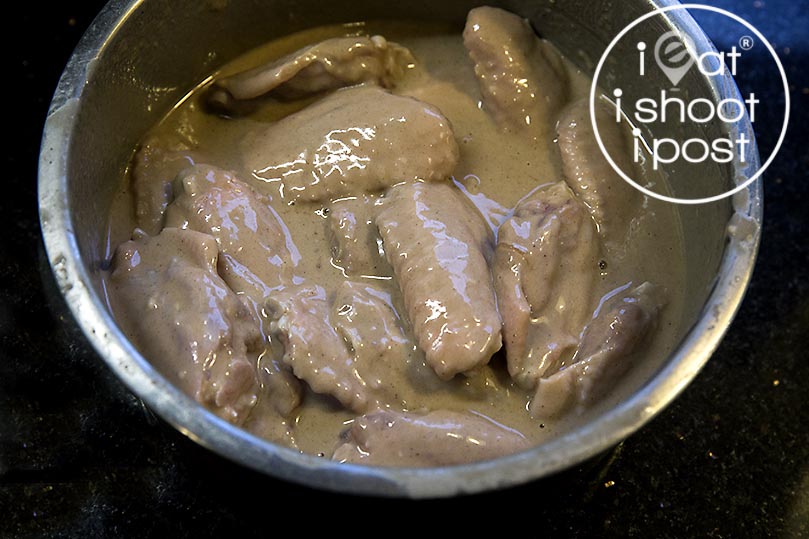
I have been searching for an authentic Har Cheong Gai recipe for quite a while. Unfortunately, none of the ones on the internet could give me a Har Cheong Gai like the ones I get at the Cze Char. The way to make Har Cheong Gai is unique amongst other fried chicken recipes in that the chicken is not just marinated first and then either dipped into a batter or dusted with a flour mixture before deep frying. With Har Cheong Gai, the batter is added to the marinade right at the beginning and then the chicken is left to marinade overnight. I am still trying to figure out why it is done this way. Perhaps it makes it easier for the Cze Char Chef bring out the whole box of pre-marinated chicken from the fridge and deep fry some straightaway and keep the rest till the next customer? Whatever the reason, the results are amazing.
Like all my other hawker recipes, this recipe came about through interrogating many Cze Char hawkers and chefs. No one will fully reveal their recipes to you but everyone will tell you a bit here and there. So, when you ask enough chefs, you will be able to piece it together eventually.
The Silver Lining
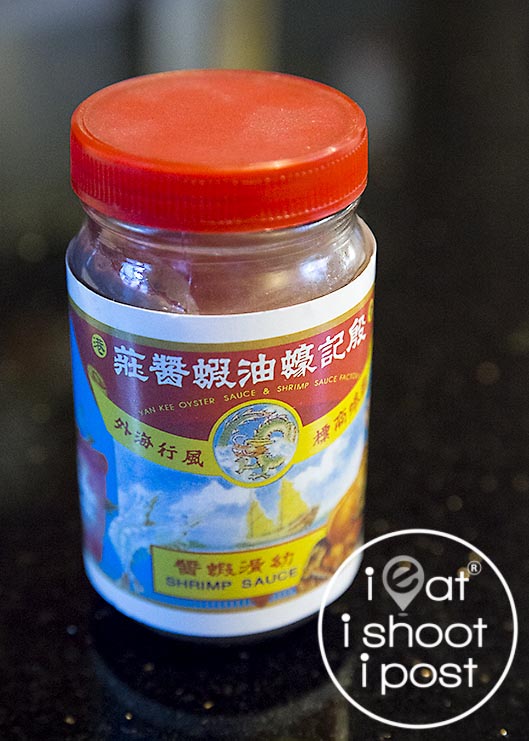
The first piece of the puzzle was actually revealed to me by Ah Yoke of Siang Hee back in 2009. She told me that to make really good Har Cheong Gai, you have to get a specific brand of shrimp sauce from Hong Kong. She then showed me the bottle in the photo below. Then she went to the fridge and took out a plastic box where the chicken is already marinated together with the batter and told me that this was her Har Cheong Gai which is ready for the fryer. She stopped short of revealing the recipe for the batter but simply smiled and said that she uses 7 different kinds of flours in order to get the texture that she wants!
Shrimp Sauce Marinade
For those who are unfamiliar with Shrimp Sauce, I must warn you that the first time you open the cover, you probably wonder if the stuff has gone bad. It stinks like a rugby boy’s underpants which has been left in the rucksack for a week. No one in his right mind would ever think about sticking a finger into the jar and tasting it. Like other umami rich ingredients, Shrimp sauce is made from shrimp which has been fermented such that the proteins are broken down into amino acids like glutamates and inosinates which give dishes that intense savoury flavour. It is essentially the same process as producing parmesan cheese or soy sauce. You won’t be able to buy this from the supermarket. (There is the Lee Kum Kee brand but it is not as pungent) I get mine from two places; the dry goods stores at the wet market and Victoria Wholesale Centre. You should be able to buy this from your nearest wet market.
The Batter
The 2nd part of the equation is to figure out how to get the batter right. This technique of mixing the batter into the marinade is quite unique to this dish. It is similar to the “Velveting” technique which is popular in Chinese cuisine. I first learnt about this technique during a fishing trip where I had some of the best wings ever. The cook on the boat used the same technique of marinating the wings in batter before deep frying and the crust was thin and crisp. When I asked her what she used, she simply told me that it was a pre-mix tempura flour which you can get from the supermarkets. That is certainly a good alternative if you don’t want to mix your own flour. I have tried using “Dragon Boat Crispy Flour” from Kwong Cheong Thye which also works really well. But I realize that there will be many readers from overseas who will not be able to buy this particular brand of pre-mix, so I really needed to get back to basics. After a series of trials and errors, I eventually settled on a 50:50 mix of plain flour and potato starch (or tapioca starch) which gave me the kind of light, flaky crisp crust which does not turn chewy and hard after resting. Potato starch is used to coat chicken chops in Taiwanese “Shilin” fried chicken and I have always felt it is a great starch for deep frying. Some recipes have called for corn flour, but in my experience, corn flour tends to produce a crust which is thick and tough rather than delicate and crispy.

Deep Frying – not as straightforward as you think!
You might think the deep frying part is quite straightforward, but the Cze Char chefs tell me that there is a certain way to deep fry the chicken so that it is crispy and dry when its served. To do this the chicken needs to go into the oil at a high temperature and then the heat is lowered once the crust is formed.
You do not need alot of oil for deep frying
For those of you who do not do much deep frying at home, here are a few things you will want to consider. First, you do need a lot of oil for deep frying. Don’t try to deep fry in a small pot to try to save oil. The key is to have enough oil so that your chicken is fully submerged and the oil temperature will not drop too much when you put your chicken in. If you use a small pot of oil, what will invariably happen is that the oil temperature will drop drastically and you will end up with chicken that is drenched in oil when served. When you are deep frying, the water in the batter is essentially boiling off which is why you get plenty of bubbles. The movement of bubbles from the batter to the oil prevents the oil from seeping into the chicken.
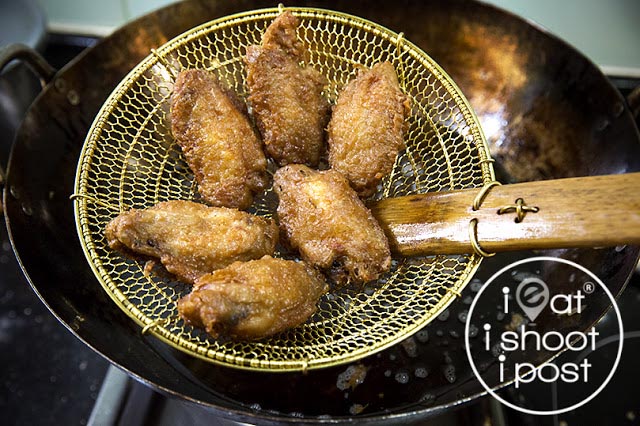
1. Cze Char Method
With the Cze Char method, start with very hot oil (180°C – 190°C) for the first phase of cooking. After about one minute the temperature of the oil will need to drop to around 160°C so that the inside of the chicken will cook properly by the time the crust is golden brown. If you keep the temperature too high, the crust will brown too quickly while the inside is still raw. What I do is to heat the oil to 180°C, then drop the chicken in. The temperature will gradually drop to 160°C as the heat from the hot oil is transferred to the chicken. I adjust accordingly with a thermometer. As a rough guide, your oil bubbles should look like the top photo when you put the chicken in, then as it cooks, the bubbles will decrease as the temperature of the oil stabilizes to around 160°C . Just make sure it doesn’t fall to below 140°C or your chicken will be oily. When it is almost ready, turn up to heat again to 180°C and remove the chicken from the oil when it is golden brown.
2. Double Frying Method
A second way of doing this is to double fry the chicken. I have not tried this myself but essentially, you want to fry the chicken at 130°C to cook the inside first. Then allow it to cool and then deep fry a second time at 190°C. This is supposed to give you a nice crust which will stay crisp for a longer time. It is the same principle as frying potato chips where the starch is cooked first then cooled to allowed to harden (a process called retrogradation) before crisping it with a second fry. You can use this method to deep fry a whole batch of wings first, allow them to cool and then put it into the freezer. Then whenever you want to serve the wings, just bring them out and quickly deep fry them at 190°C.
Ok now that you have the basic principles, here is the recipe:
Ingredients:
Part A:
1 kg chicken mid wings
3 Tbl Shrimp sauce
2 tsp sugar
2 Tbl Sesame Oil
3 Tbl Chinese Wine
1 teaspoon white pepper
2 teaspoon MSG (optional, but don’t blame me if it doesn’t taste like the real deal)
Part B:
80g Plain Flour
80g Potato Starch (or Tapioca starch)
1 egg
100ml water
1/4 tsp Bicarb,
1/4 teaspoon baking powder
Directions
Mix all the ingredients in Part A together till the chicken is evenly coated. Mix all the ingredients in Part B together till you get a smooth batter and add this to the marinated chicken. Mix well and place in a plastic container to marinade for 8 hours or up to 2 days.
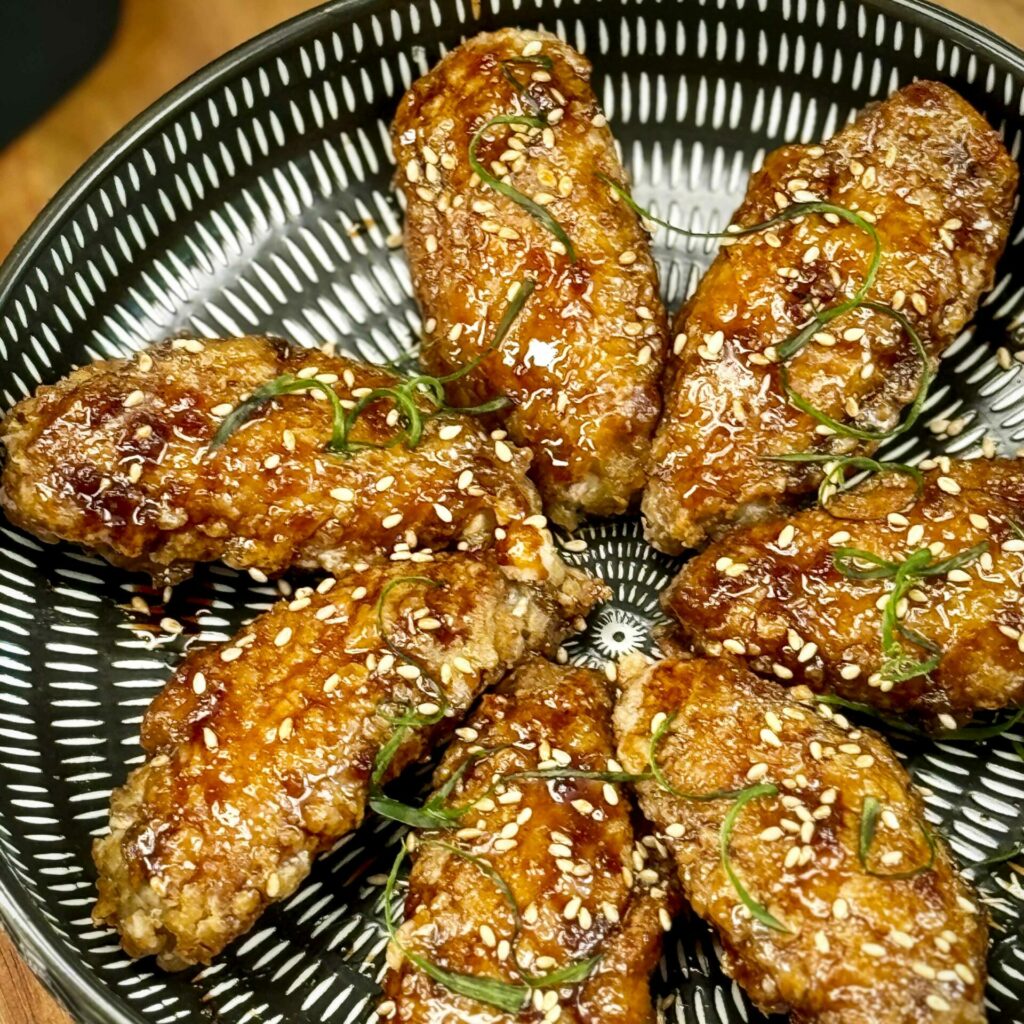
Heat oil to 180°C and drop a few wings into the oil. After about half a minute, use a pair of chopsticks to separate the wings so they don’t stick together. After about 1 minute, the oil temperature should have dropped to 160°C if not lower the heat. Cook for 3 mins then turn up the heat again to 180°C and remove when it is golden brown. Serve with a squeeze of calamansi and sweet chilli sauce (optional).
Updated 7 Aug 2019
I replaced the potato starch with tapioca starch and the results were excellent!
Achknowledgements:
Thanks for Chef Roy Loi of 12 Stones noodle house for helping me with the recipe. Roy’s mom was the first to introduce Har Cheong Gai to Singaporeans in the 1970’s when she came up with the recipe and served it at Loy Sum Juan restaurant in Outram Park. This is a modified version of the original recipe for the home cook.
Other chicken recipes:
Kyoto Jing Du Chicken
Crispy Chicken with Colonial Curry Sauce
Roast Chicken
Tea Smoked Chicken
Soya Sauce Chicken
Places to eat Har Cheong Gai :
Eng Kee Fried Chicken Wings
Check out 18 Chinese New year Recipes to try!
Disclosure: Some links above are affiliate links, meaning, at no additional cost to you, we will earn a small commission if you click through and make a purchase.


Hi Leslie, did you try double fry the chicken wing? It actually give a crispy outer coating that last longer. I was inspired by the Korean style of frying their chicken and they are using double fry method that not only cooked the chicken thoroughly and the 2nd frying force the oil out of the food.
Second fry can be done by air fryer at 200 deg for 6 mins have had very good results.
Most wet markets should have it.
Kwong Cheong Thye at Sims Ave
Doc, if we use the Dragon Boat crispy flour, do we still need the other stuff in your recipe? Like the bicarbonate soda and baking powder…
No, just add water.
Ah…thanks! 🙂
My plan is combine zi pai ji n shrimp paste technique.
Thanks!
I finally found the Lee Kum Kee prawn sauce in Illinois — at an H Mart, a Korean-owned Asian grocery chain, this one w/a feature wall of LKK products. I’m excited to share this dish with my family. Many thanks for sharing the secret!!
I wonder if a healthier version of this is even available. As much as I love the deep fried taste of it, cleaning up is a bitch. Air frying it may not give the same crispy texture but I guess it is somewhat healthier.
Is it even possible to air fry it though, Doc?
I don’t think Air Fryer can handle a wet batter.
Dear Dr. Tay, thank you for your recipe. I’ll certainly try it.
I have a question: do you know what the purpose of the baking soda is? I don’t think it acts as a leavening agent in this recipe, since baking soda as a leavening agent needs a real acid (like vinegar) which the recipe lacks. Cooking wine is not acidic enough to react with the baking soda (I tried it myself the other day). I know that baking soda is a meat tenderizer as well, but why would one want to tenderize chicken wings? And if one would, would such a tiny amount of baking soda have any tenderizing effect at all? So, is there perhaps another reason for adding baking soda?
Thank you (or anyone else who knows the answer).
Baking soda also helps to brown the chicken by altering the pH of the batter. There is also water in the egg white which will react with baking soda to produce leavening
Thank you for your aswer. You’re right about the browning effect of alkaline ingredients. I doubt that the baking soda works as a leavener in this recipe since baking soda won’t react with water. It needs an acid. I just added water to a teaspoon of baking soda. No reaction at all. Baking powder on the other hand reacts with water. Anyway, I will try your recipe including the baking soda because of the browning effect you mentioned.
I made your recipe last evening. It was very delicious! I entirely skipped the baking soda after all and added an additional 1/4 tsp baking powder for leavening. The drumettes I used were nicely browned in ca. 5 minutes of deep-frying.
Glad it worked out for you!
So how did it go?
Thank you Dr Leslie for sharing. Will try this recipe soon. I am an amateur cook. Want to master this because my SIL loves Shrimp Paste Chicken.
All the best! Let us know how it goes!